Blue Sky 2018
For our Spring Exhibition we all completed a Blue Sky Project. The Blue Sky Project is modelled after an innovative idea from Apple where its employees were allowed to spend up to 20% of their time developing a project that was of interest to them personally or a passion of theirs. It was meant to solve a problem or create something new. For our version, we were to solve a problem of a fellow student not in PLP. This is mine:
Target Group: Fellow Grade 8 (not in PLP)
I Chose: Fellow Rugby Player
Problem: No rebounders available for practicing solo kicking for rugby or at proper height for solo passing practice.
We used the LAUNCH method of problem solving. You can refer to my blog post Launch for more information but basically each letter stands for a part of the process for solving a problem.
L: Look, Listen, Learn:
My fellow rugby players needed a way to practice kicking for conversions but needed it to fit in a small space when they couldn’t get to the field to practice. It needed to be something they could use by themselves and they also wanted to be able to practice passes with it.
I researched what rebounders were available and found that most of the rebounders that were tall enough for kicking had no way to tell if you were using the right angle. Most of the rebounders that were meant for kicking were shorter for soccer and angled backward. The rebounders that were used for practicing rugby passes were hand held so couldn’t be used by yourself.
-

- Rugby Hand Held Rebounder
-

- Soccer Rebounder #1
-
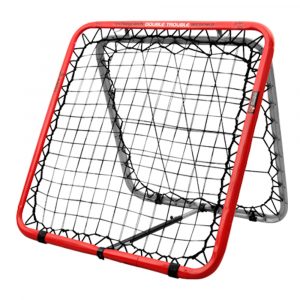
- Soccer Rebounder #2
A: Ask:
I asked who could I find to help me build it, what I could build it out of, where I could test my rebounder, and how I could make it work for practicing kicking. My grandfather could help me build it out of wood and I could salvage some components from an old hockey net at home. I had a centre area for kicking practice, and used two side panels to act as rebound zones for passing practice. I asked my rugby team to try out my completed rebounder to provide feedback.
U: Understand:
I researched if there was a particular angle for kicking rugby conversions. Much to my amazement, a group of researchers in England had studied the best rugby kickers to answer this very question. It turns out that the angle is 30 degrees. This meant that I could design a rebounder that needed very little space by simply replicating the 30 degree angle.
KEY POINTS FROM THE ARTICLE:
The optimum projection angle in a rugby place kick is about 30°.
The optimum projection angle is considerably less than 45° because the projection velocity that a player can produce decreases substantially as projection angle is increased.
Aerodynamic forces and the requirement to clear the crossbar have little effect on the optimum projection angle.
https://www.jssm.org/vol13/n1/28/v13n1-28text.php
Journal of Sports Science & Medicine
Optimum Projection Angle for Attaining Maximum Distance in a Rugby Place Kick
N: Navigate your Idea:
I had the idea to have an upright rebounder and use a set distance from the rebounder that would be available in an average backyard to create the correct angle. This set up a right angle triangle that I solved to get the height on my rebounder. For a kick to create a 30 degree angle from a distance of 7 feet away, my target height was 4 feet.

C:Create a Prototype:
Here are my building plans, which my Grandpa helped me with as he is an experienced wood worker. We built my prototype and made it so it broke down into several pieces for easy transportation. I added bright tape across the net at 3’ and 5’ to create the target zone at 4’ for kicking at the 30 degree angle needed.
-

- My Building Plans
-

- Me building
H:Highlight and Fix:
When we put my rebounder together again at home, I realized that it needed some reinforcement of the upright wood pieces as it was too wobbly. I added L-brackets and some brace pieces to fix this issue. We tightened the side panel nets using zip ties so they would rebound a pass better. We also added braces to the bottom of the side panels to get a better snap.
I took my rebounder to rugby practice and my team and coaches tried it. For the pass rebounders on the side, I made one straight up and down, and one angled slightly upward to see which provided a better angle of rebound. My fellow team members really liked the rebounder and preferred the true vertical passing rebounder. My coaches really liked the 30 degree angle for the kicking section and agreed that it was the correct angle. They were impressed with the rebounder and enjoyed trying it out.
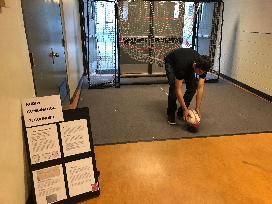
The next step was to present my rebounder at our Spring Exhibition. Here are some photos at the Exhibition.
-
- Setting up
-

- Rebounder all set up
-

- Ready to demonstrate
-

- Demonstrating Rebounder
I got some really great feedback at the Exhibition. On the positive side people liked the idea of it and thought that it was a good project. They were impressed that the rebounder could come apart to be moved to different locations. They were impressed with what I came up with in such a short period of time. My fellow students who tried it said that it worked really well for rebounds for passing and liked that the net in the kicking section in the middle could be adjusted so it caught the ball when you kicked it properly.
The suggestions to improve my design involved making it more portable and easier to set up. While it only took me 5 minutes to set up, it did require the use of a drill. It was also suggested that it appeared a bit heavy, which would also make it harder to move. If I was going to manufacture this rebounder, I would want to use metal tubing to make the frame, which would address both of these issues. However, it would need to be out of heavy gauge tubing to withstand the kicking force so it still wouldn’t be super light for this kind of application. I really like the layout of the rebounder and how well the two different net zones work, as did everyone else, so I wouldn’t change the basic design.
![]() calebe • June 17, 2018
calebe • June 17, 2018