Not going to lie I’m not really sure what to call these conferences. I have never done them before, and I have heard people call them TPOLS, SLC’s and MPOLS. Im pretty sure these ones are MPOLS. Anyway, it’s that time of year when PLP students participate in MPOLS. Basically MPOLS are for students to present to their teachers and parents work we have done throughout the year, and to demonstrate how they have grown as a learner in PLP, and how they can keep improving as a learner. I think it is important to measure how you have grown as a learner and how you can improve, because like anything there is always room for improvement.
The four PLP courses (humanities, maker, math and science) have all demonstrated how I have grown as a learner. In math and science I have learned new concepts and demonstrated my learning in my projects. For example the very first math project, I showed creativity as well as demonstrating the math involved with it.
Some evidence of work that I have shown hard work and I think it is the project I am most proud of is my History Week video. This was a partner project and Mimi and I worked really well together. In this project I branched out used Explain Everything instead of iMovie. This was good for me to be comfortable with using other apps, since every app has different features. I think from this project I proved that my editing skills have grown since I started PLP. I was very proud with the outcome of the video. Also the blog post to go a long with it I thought I did well with the structure of the post and I included links, photos and videos. At the start of the year my blog posts were not something I am too proud of. There was a big improvement from the History Week post and my very first post (Camp Capilano). I am more comfortable with writing posts, and I have a clearer understanding on what I should be including.
In PLP I have encountered times when I have been frustrated during projects. For our Sins of The City podcast I had fun but also I was pretty frustrated. Especially since we had to re-write our script around 3 times, and dedicated five hours at Starbucks one day to write our scripts that we then ended up having to re-do. I think if I was to do this group project again, I would make sure we could find more days that everyone could work on the project and this fits under time management. I think from having more practice with working in groups my time management skills have improved a lot. Now I will contact everyone in the group to find days people are around. This would benefit my group so that we had more time to work on the project outside of school. Even though it was pretty frustrating having to re-write and record the podcast, I learned how important it is to revise work, and there is always room to improve, and in the end I was happy with the end result. This goes to all projects I have done. Almost every project I have done my revisions to make it the best work I can.
As I said earlier there is always room for improvement, and there are projects/work that I am not too proud of. For example my first draft of the individual Sins of The City essay that we wrote, definitely wasn’t my best work. Something that I need to work on is essay writing. I can find it challenging to write a well structured essay, and it is a skill that will take practice to succeed. I guess a part of that is getting my ideas out of my head onto paper that will make sense. Also something that I need to work on is fully reading over any paper before handing it in. I may even have to read it out loud to catch all the errors. Writing a well structured essay will take a lot of practice but it is something to work on.
I think it’s fair to say that I have grown as a learner throughout this school year. I have shown growth throughout my blog posts to video skills. For me coming into PLP was definitely a good decision. The way we learn fits with my way of learning, visual and projects. This is my first year in PLP, which just shows that there is even more room to improve on and I think after more years with being in this program I will keep growing as a learner.
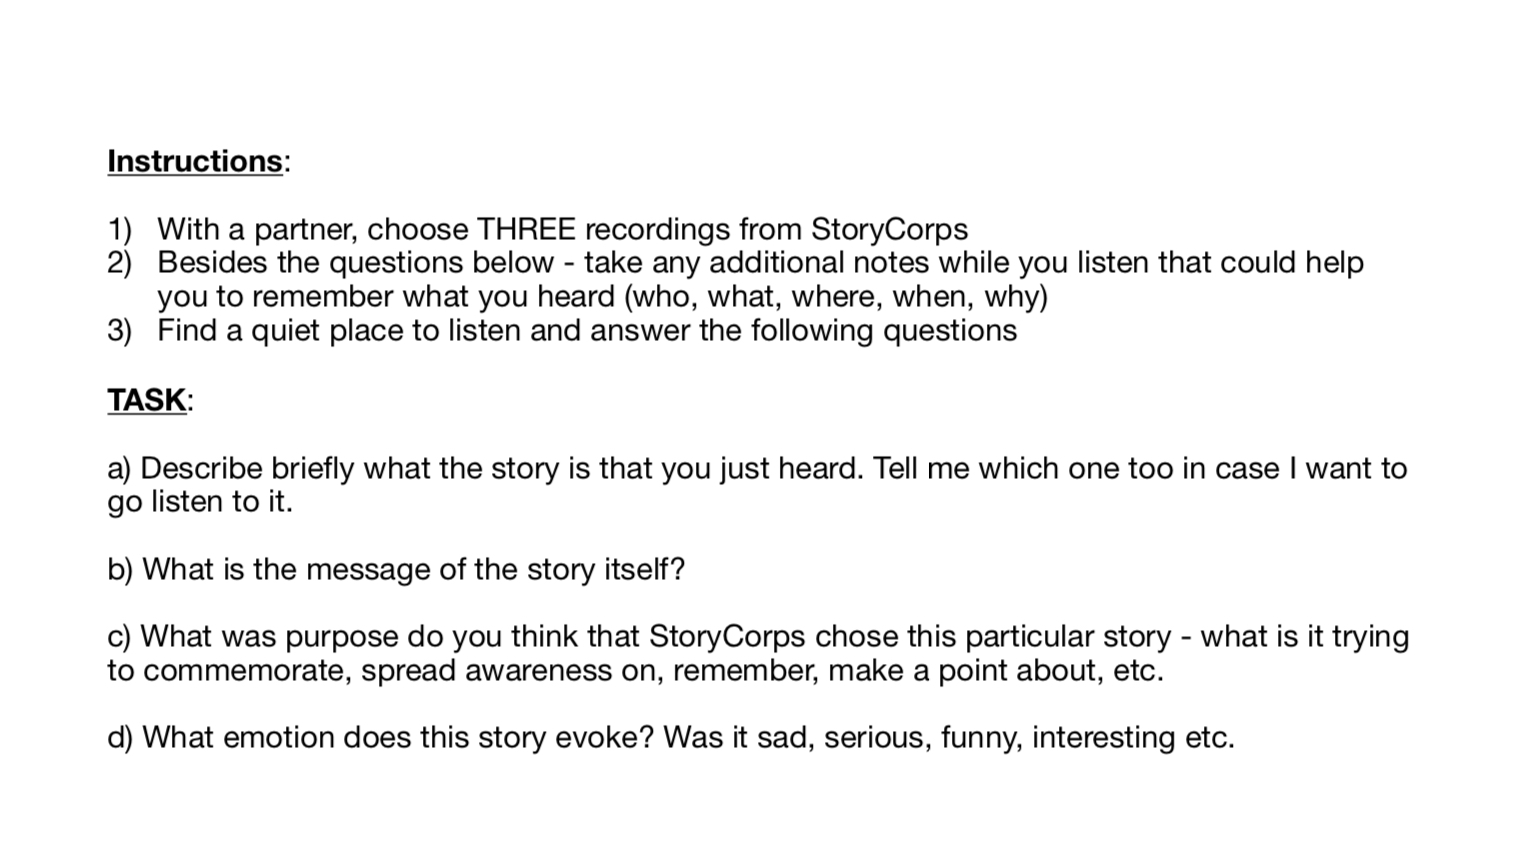
Throughout the year, we have been working on our story telling skills and how important they are. We were introduced to Story Corps to help us have a better understanding on story telling and and important it is to listen. Story Corps interview people and make them into podcasts to publish on their website. So our exhibition was going to involve us making podcasts. However, not just any podcasts, they were going to be interviews.
The task for the exhibition was to work with a grade 12. At first I was pretty nervous about this because I didn’t know the grade 12s that well. The grade 12s got to pick who they wanted to work with. My partner was Luciano. I was ok with this since I knew him already. The grade 12s role in this project was to be the producer. We being the grade 10s, were the ones recording and editing.
Grade 12 interview #1
The goal was to have three podcasts at the end of the whole project, so almost like our own mini series. The very first podcast was to interview our grade 12 buddy. The story could be about anything. The first step to creating a podcast is to create a list of questions to ask them. Luciano had a story that he could tell, so we thought of questions that can relate to his story.
Here are all the questions we came up with:
Once we got them approved, it was time to record. We wanted to make the podcast sound as natural as possible, therefore we didn’t write a script, we just had our list of questions. Recording the interview was a challenge, since everyone needed to record, we needed to find a quiet room with no other groups. Luciano and I recorded outside since it was the quietest place.
For editing we were told to use the app Ferrite. I had never used Ferrite before, therefore I had to figure out how to use it. To learn how to use the app, I watched a few YouTube videos and I finally got the hang of it! For some reason I had an issue with downloading my Garage Band song into the podcast. It took some time but I finally figured it out. Now that I knew how to use the app, the project became a lot easier. The parts I edited out was any long pauses, and a few of my questions so it was mainly Luciano telling the story.
Here is the finished podcast:
You could say this first podcast was our practice since we were going to be making two more.
Family Podcast #2
For our second podcast, we were going to be interviewing a family member. Just like the first podcast, it could be any story. We were told to be told a story we didn’t already know. I decided to interview my mum, because she could tell a story that had been shared throughout my family. In the past I have always wanted to know the story so this was a good time for her to explain what happened. Basically the story is about how I got my American side of the family. Since I didn’t really know the story I had to be engaged so I could ask questions.
Family podcast:
While we were working on these podcasts, we learned more about how to make a good interview. Something that is key when interviewing is listening. To practice this skill, in partners we listened to a few podcasts from Story Corps and recorded on pages the following,
For this activity we needed to be engaged so we could answer the questions. From this activity I realized how important it is to listen to the interviewee. You definitely don’t want to be in the situation when you can’t think of a question because you weren’t listening!
Exhibition night!!
Finally the night everyone had been waiting for, exhibition night. This was going to be my first exhibition ever, so I was a bit nervous and didn’t really know what to expect. Now that we had interviewed our grade 12 and a family member, we were now going to be interviewing a stranger that was visiting the exhibition. The goal was to interview three people at the exhibition, and by the end we could chose one to create a podcast. While we were interviewing people, the grade 12s role was to find people for us to interview.
When I say stranger they were parents of the students, not completely random people. This was quite a long process leading up to the night. Since we were interviewing a stranger, we needed to ask a powerful question to get a story from them. Once they had a story we could then ask follow up questions. I think the starter question was the most challenging part. The question couldn’t be specific since we didn’t know anything about them. It had to be a question you could ask anyone. In class we had a few lessons on how to ask a broad question. We then had to brainstorm a list of our questions.
The topic I was most interested in was travel. I wanted to hear about other people’s adventures.
Our interviews would be take place in class rooms. We had a limited number of class rooms we could use, therefore we were put in small groups of three. I had Mimi and Kate in my group. If you were being interviewed, would you rather be in a boring class room sitting at a desk, or in a more relaxed environment? Well our task was to transform a class room into a non stress, relaxed environment. This was going to be a challenge and a lot of our creativity skills would be involved. Every class room was different and some better than others, therefore each group picked a room out a hat. Luckily we got French room that isn’t too big. Of course each class room has chairs and tables and somehow we needed to move them out of the way. To make the space as welcoming as possible we needed to bring our own furniture in. As a group we decided to go with the boho vibe. We also brought in some cookies and tea for beverages to give the interviewees.
Setting up!
To set up there was my group and our grade 12 buddies helped us. We were told to take a picture before we started moving everything so at the end of the night we could bit everything back together, like we were never there. I took us maybe an hour and and half to finish setting up. We started right after school until 4:30.
Overall I was really happy with the end result of the room. It was very inviting and definitely would make the interviewee feel comfortable. We got many compliments from the interviewees 🙂
Recording!
Our group made a timetable so each person had time to record. We each had around 15mins to record each interview. When the doors opened for the visitors to come in, the grade 12s were busy looking for people. The first person I interviewed was called Tylo. I sort of knew him because he is friends with my brother. He told me about when he hiked the West Coast Trail. The interview went pretty well and it was a good practice. Luciano had asked his parents to be interviewed. I didn’t know his parents at al so it worked well. Also both of his parents had done a lot of traveling so I asked about their trips they had been on.
From listening to all my three podcasts, I decided to use the interview I had with Giovanna. The audio was a lot better than the others and I thought it was the most powerful.
First draft:
We got our grade 12 to listen to our podcast and they gave us some critique. I am happy of how the final podcast ended up.
From do this project I felt like I learned a lot from it. Not just the aspect of telling making a good interview, but working with others. This whole project, we were working with a grade 12. For the last interview (the exhibition, I definitely stepped out of my comfort zone. I was pretty nervous to interview a stranger, just because I was worried I would be stuck with thinking of questions, and just the fact you are interviewing a stanger. However, I did learn a lot about how to create good questions and how to run an interview. I also learned how to use Ferrite. Now that I know how to use it, I will use it for other projects.
In PLP we have been discussing a lot about technology. To be specific, how technology has chaged the way we live through out history. We have also discussed how technology can act as a disruption. For this project we had to pick a technology or a concept mentioned in the novel we recently read called Little Brother by Cory Doctorow. The technology I chose to research was called Slashdot.
Slashdot was founded in 1997. It is a social news website that was created by Hope Collage students, Jeff Bates and Rob Malda. Slashdot is a place where people share news stories, and can discuss events with other users. The stories featured on the website are about science, technology and politics. Each story posted becomes a discussion among other users. As I was scrolling through the Slashdot website, a story that I discovered was ‘South Korea Plans to Ban Crypto Currency Trading’. I even went through and had a look at the discussion below. There were 71 comments of users debating and talking about the article.
Here is a screenshot of what the website looks like:
As I mentioned earlier, we had to pick a technology from Little Brother. Slashdot was mentioned in the book. Little Brother is all about technology, and how it can act as a disruption. Here is when it was mentioned in the book,“A lot of websites chronicle the fight for cyberliberties, but few go at it with the verve of Slashdot, “News for Nerds, Stuff That Matters”(ch.1). As I said earlier, the website is for sharing news stories. Slashdot is similar to the Xnet, a huge part of Little Brother where users communicate anonymously. Slashdot is similar in the way, it is a public website where anyone can share their opinions and communicate online.
This website (Slashdot) is a big part of the outside world. Pretty much all top news stories are shared, and all have a long discussions between users, giving their opinions and thoughts. Some examples of top events that have been shared are, the Strike in Iraq, 2005 London bombing and 9/11. This whole website allows people to discuss major problems in the world and connect them with each other.
Over time Slashdot has become more and more popular. It was a hot spot on the internet for news information and computer geeks. In 2012, Slashdot had around 3.7million users per month and received 5300 comments per day. In fact in 2001 Slashdot was launched in Japan. It was spreading so fast and you could basically find any information on the site on the news. Many could say that Slashdot could act as a disruption with its creation throughout history. Think about it, it is a website where you share opinions on huge topics. It could be used as a disruption, since it is all anonymous and anyone can write anything on the website.
There are so many types of different websites on the internet that all have similar purposes, sharing information, giving opinions ect. Slashdot is just one of the many websites out there.
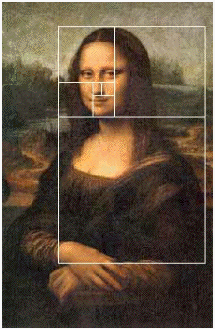
You may or may not have heard of the golden ratio. It is used in art work and architecture. In this project we had to demonstrate how you can you the golden ratio in artwork/architecture.
I had never heard of the Goledn Ratio before. To get an understanding of what the golden ratio even was, we did a small activity in class. We had to find five objects around the room that used the golden ratio. We also had to research and find images off of the internet with the golden ratio. To see if the object had the golden ratio, you measure the two side lengths and divide them, if they equal 1.61, that is how you know the golden ratio has been used.
What is the Golden ratio?
The golden ratio is used in architecture, nature and art. It was actually founded by the Greeks. The symbol is the Greek letter, phi. It is a number approximately equal to 1.618. To draw the ratio, you measure the object and make sure the measurements were going to equal 1.618 (the golden ratio) and then make a square out of the rectangle.
The phi symbol:
An example of architecture that used the golden ratio is the Parthenon, a temple in Greece. The fact that it uses the golden ratio, makes it look neater and more appealing to the eye.
Like I said earlier, many artists use the golden ratio in their art work. Leonardo Da Vinci and many other artists use the golden ratio their art work. The golden ratio is found in the face of the Mona Lisa. To answer the question on, how if math used in art to create patterns and appeal to our sense of aesthetics? Well, it is proven times to be aesthetically pleasing to the human eye!
How I used the golden ratio for my project,
This project was pretty open. We could show the golden ratio with pretty much anything. Some people made sculptures and some drew. I chose to draw. For my golden ratio project I used the golden spiral for a lot of my objects. To do this, I measured the object that I was trying to draw, and then made sure the measurements were going to equal 1.618 (the golden ratio). To make the spiral over lay, I make a rectangle around the object and then made a square from that rectangle. And then you keep cutting it. The spiral has to follow the object. All of the objects in my drawing follow the golden spiral.
Here is my original drawing:
For my project, I used Sketches Pro. The reason I used it was because, there were many different types of tools I could use. I could also use the layers that was helpful when it came to drawing the golden ratio over top of it.
I showed how the golden ratio is found in nature. I was actually pretty surprised on how many times the golden ratio is found in nature. I got inspiration from the internet for the parrot I used a parrot to show the golden ratio in animals. This parrot follows the golden spiral.
The Golden spiral is very similar to the Fibonacci spiral, but is based on a series of identically proportioned golden rectangles. You can use the golden spiral to help draw and get the right proportions of an object.
I also showed the golden spiral in flowers and trees and even the moon. So this just shows that the golden ratio can be used in pretty much anything. This is whole project just shows how important math is when it comes to art. Math literally used in everything.
There were a few things to revise. I needed to make sure all of the spirals lined up with the object. I also changed the background to a sunset to make it look a bit more interesting.
Revised project:
As you can see the spiral lines up better with the drawings. It is easier to see that the object has follow the golden ratio.
Overall this project was pretty fun, we got to be creative and make our own creations. This project shows how important math is, and how it is used everywhere.
Believe it or not, every city has their own sins, but some can hide them better than others. Vancouver is a perfect example. Vancouver is a beautiful and well developed city. However, we need to take into consideration that nowhere is perfect.
The topic for this unit was, Sins of the city. We started off talking about issues in Vancouver and our opinions on different injustice issues. We discussed the environment, human rights and the city growth. An activity in class to get us thinking was to talk about problems in Vancouver. We got to give out opinions on things like, if the Kinder Morgan pipeline should be built, or if residents of Deep Cove should get priority in cafes in Deep Cove, etc.
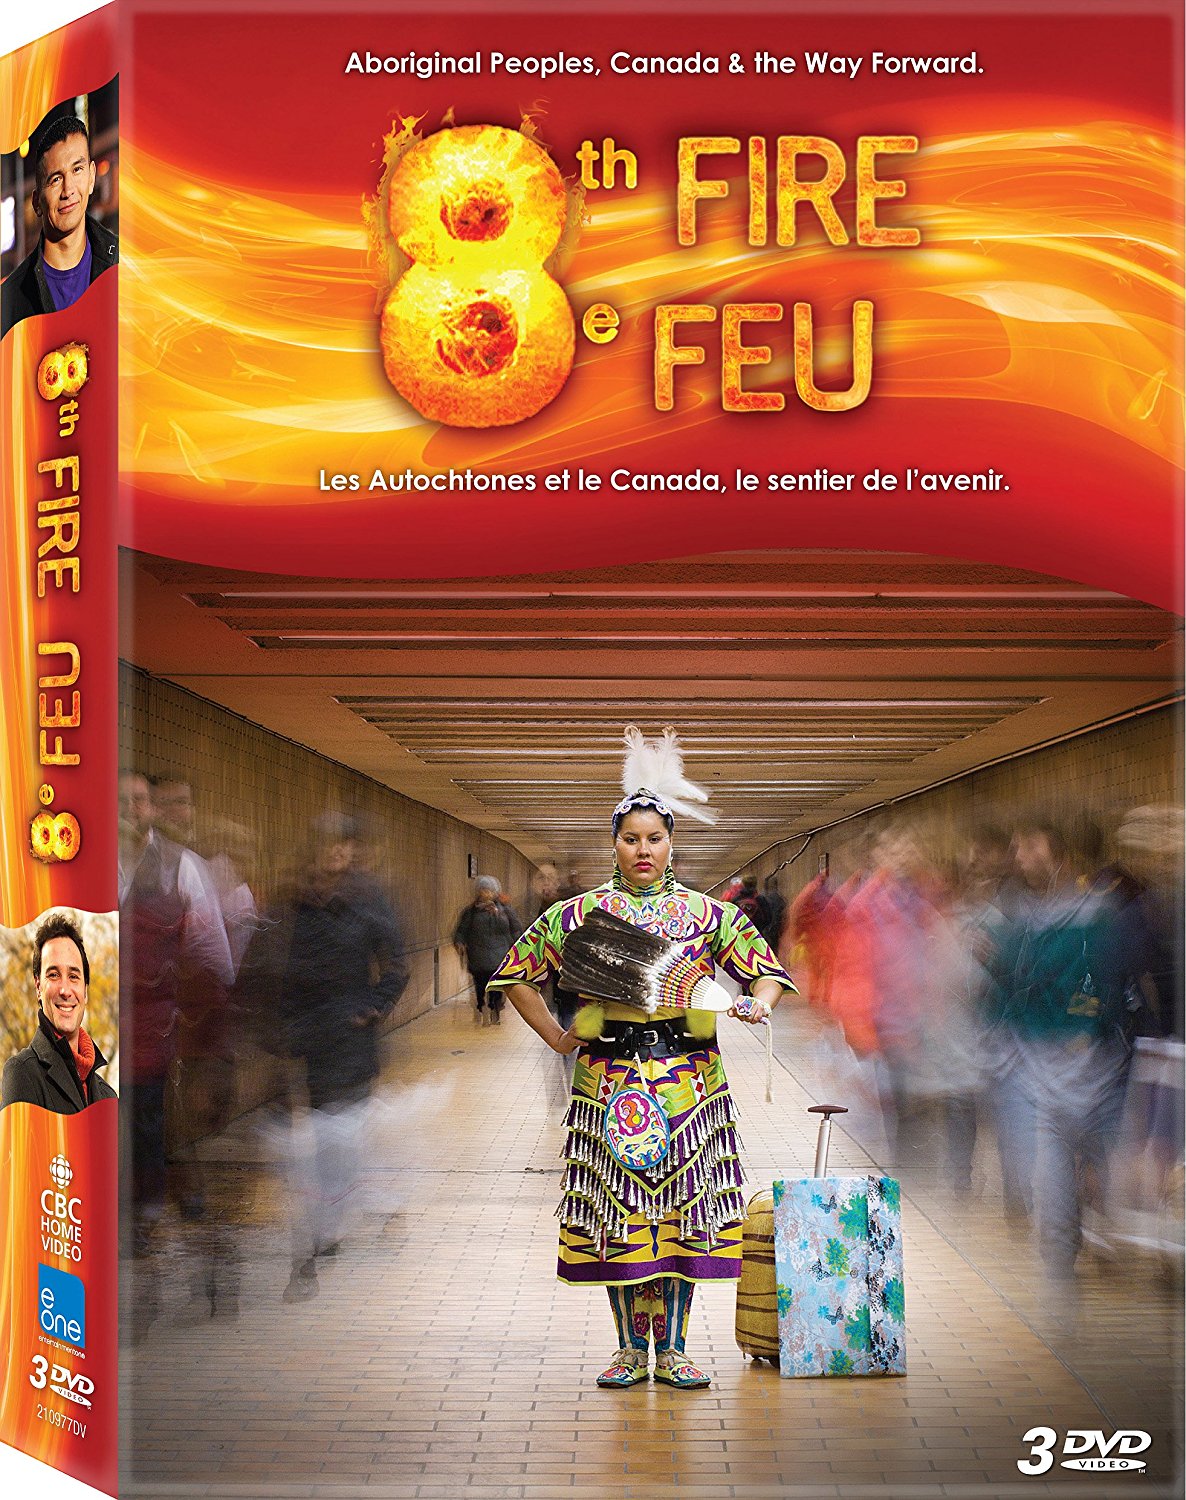
In class we watched a short episode of the 8th Fire. A key one was Aboriginal rights about the aboriginal people in our area and their culture. I learned all about the history of the aboriginal people. Something that stood out to me was that the residential schools only recently shut down!
Once we had talked a bit about Vancouver’s sins/issues, we were introduced to a project that wouldn’t be due for a while. We knew it would take time to decide what topic we were most passionate about.
THE PROJECT:
Here is a quick over view on what the project was. Basically the assignment was to make a group podcast about a challenge or social injustices that has occurred in our city. Sounds simple right? Well this issue also had to relate back to the inter war years. Let’s just say a lot of research was needed. On top of that, we needed to find an interview that related to our topic. The goal for this project was to teach the other groups about a challenge in Vancouver.
To help us get a better idea on what topic we were going to choose, the whole class went on a field trip to the Vancouver Museum. This was the first time for me going to the museum. If I’m going to be honest I don’t usually like museums, but I really enjoyed visiting the Vancouver Museum. The way it was set up was more interactive than other museums.
After this field trip, we were supposed to have chosen the topic we wanted to research for the project. There were five categories to choose from.
The categories were:
– environmental
– housing
– immigration
– aboriginal rights
– human rights
The museum had a section for each topic. After a lot of thinking I was drawn to the environmental topic. Something that sparked this idea was in the museum, I saw a poster about the Kinder Morgan pipeline. This interested me because this project is a huge deal and I wanted to know more about it.
After a few days it was the day we have all been waiting for, we were put into our groups. I was put in environmental with Mimi, Simon and Calum. Together we decided to focus on oil spills in Vancouver. A sin of the city that was most interesting to us is the Kinder Morgan pipeline project. Since we are all against the pipeline, we focused on the consequences if it was to spill and how it would affect the environment. The topic we chose was really relevant to us because if it was to spill, we would have the most impact.
As I said earlier, apart of the project was to relate it back to the interwar years. This was a challenge for us because back then, the environment wasn’t a big deal. We decided to research past oil spills that had happened in Vancouver. The Ambleside oil spill that happened in 1973 stood out to us. This was a devastating event for the community. This spill destroyed ecosystems and the response team was pretty much useless. Community members ended up cleaning the shores of Ambleside. Our idea was to make a point that we don’t want history to be repeated by having another oil spill.
THE INTERVIEW:
Having an interview was a huge aspect of the project. For the interview we had a few people we were thinking of contacting. We needed to find someone that could talk about the Kinder Morgan pipeline. We wanted to ask so one for their opinion. Justin Trudeau was on our list of interviewees. We thought we could ask him to give us his honest opinion on the pipeline. We crafted a letter to together, however we decided to find someone against the pipeline and we just never ended up following through on that plan. I knew of this group called the North Shore Nope (NSN), a local activist group against the Kinder Morgan. My mum used to be apart of the group so we knew it was a legit group. We sent an email to the head of the NSN, Janice Edmonds, asking if she could answer a few questions about her opinion about the pipeline and what her organization does. We got a response pretty quick, so we went a head and arranged an interview. As a group we went to her house for the interview. We asked a few questions about her organization and they spread awareness about the Kinder Morgan pipeline. As well as focusing on the environment, they mainly focus on the health risks of it spilt. This interview definitely pushed me out of my comfort zone, because I don’t usually like interacting with strangers, especially going to their house and asking them questions. It was definitely good practice for when it come to talking with strangers.
THE SCRIPT:
I must say I think we re did the script at least three times. One day our group sat in Star Bucks for FIVE HOURS on the pro d day to write the script. We even had to re do that script we wrote because we decided to focus on health. The first dratf of the script definitely needed revising!
FIRST DRAFT:
For the style of podcast, we decided to do a debate. So two people were going to be against the Kinder Morgan, and two people with the pipeline (we were all against don’t worry). For the against, we chose our interviewee to help back us up. Once we had the first draft of our script, it was time to start recording. We weren’t quite able to record in one go because it was pretty hard to not to laugh.
Here is the first draft of the podcast:
A lot of revisions were required. For one, the interview needed to be cut up. Another main point was it didn’t sound like a debate, because we all sounded so scripted. A stronger conclusion was also needed. We actually ended up pretty much re doing the whole podcast, we just kept the intro (first 30 seconds). We decided to scrap the idea of a debate and tell more of a story. Since we changed our idea again, the script had to be revised.
Something our teacher rightly pointed out was that the Ambleside oil spill didn’t actually occur during the interwar years. This was a bit of a dilemma for our group. More research needed to be done to find something in the interwar years. We came to a conclusion that the refinery across from Dollarton was built in 1935. The refinery was built to turn synthetic and crude oil into gasoline, diesel, asphalts and butanes. The refined oil would be shipped off to other locations by boat. As the oil industry grew and time passed, Alberta started using its pipeline, the Kinder Morgan pipeline. This all ties together by showing how much the oil industry has grow and the fact that the risks of a spill are getting higher.
REVISED PODCAST:
BEHIND THE SCENES:
As we were making the project, we needed to make a mini behind the scenes video. I’ve got to say that my group worked really well together and we had a lot of fun. We filmed a lot of our group working (proof we actually did work). This is just a fun video to wrap the whole project up.
While we were working on the podcast, each group was given a novel to read that was related to their topic of the project. The novel I was given was called, The Right to Be Cold by Sheila Watt Cloutier. We needed to read this novel by 4 weeks. While we were reading every Tuesday we had a meeting with our group to discuss the novel.
Also every week were were assigned to write a short book log of key events, things we enjoyed and things we didn’t like about the book. Overall I thought the book was interesting, and I definitely learned more about the Arctic and their culture. This book was all about how climate change can alter the way people live. For example the fact that the ice was melting affected their way of hunting. In my reading logs I go into further detail about the book and my opinions.
An example of my second reading log.
Overall I’m happy I read this book. It is a type of novel that I wouldn’t normally read. I also learned about a different culture. This novel made me realize how climate change affecting people’s lives, and made me more aware of my actions (make sure to turn off the lights).
The ESSAY:
Moving on to the next task. At the start of the novel, the plan was to write an essay about the novels. However many groups didn’t enjoy their books, so we ended up writing a letter to Terry Beech about an issue and to make a request. For example our group focused on the health risks and we requested that if the pipeline spilt, if any residents became sick because of the harmful fumes, our health care would be covered. At first we wrote our own individual essays, and then combined them with our group members from the project.
From this project I learned so much. From this project my speaking, podcast editing and knowledge of the city have grown. Something I had trouble with is the essay, let’s just say I’m not the best at writing essays however, this essay was good practice. Apart from the podcast learning I learned about the rights we have as a citizen, and how everyone has had a different experience of the emergence of Vancouver. From researching the past I can tell that there is a big difference of the rights of a citizen from now and back in the 1900s. Overall it’s fair to say that I leaned a lot from this project and had fun while working on it!
If you didn’t know, this week was Canada’s History Week 2017. By coincidence, we were making videos about Vancouver’s history. The project was called, Namesake video project. This was a group/partner project. I got to work with Mimi, and together we decided to do our project about the history of Robson Street. It had a lot of information behind it, and both of us shop there, so we were familiar with the street. Every group had to chose a different topic. Therefore, it was a race to get the topic you wanted.
Here are the all of the choices:
Keefer Street
Joe Fortes (restaurant / library)
Seymour Mountain
Stanley Park
Gastown
Caufield
Lions Gate Bridge
British Properties
Robson Street
Kitsilano
Lonsdale Ave / Quay
Waterfront
Cambie Street
Nootka Sound
SFU / Fraser River
Blood Alley
This was’t just some random video, we had to include historic facts. We had a list of things we had to include in our video:
Once we had our topic, we needed to decide what type of video we were going to make, Explain Everything, iMovie, etc. Mimi and I decided to make a Explain Everything/iMovie. A lot of research had to be done to make the video. We used a really useful website, that had a lot of information. I learned that many Europeans came post World War II To Robson. That is how Robson Street started to grow. More and more people came to Robson Street soon after that.
From making other previous videos/podcasts we knew the script was really important. It had to engage the reader, therefore using an intriguing hook. I have talked about hooks in my World War 1 blog, so you can go check that out. Our hook was, ‘Robson street. The place where you shop, eat, celebrate and make friends. But it wasn’t always like this. Robson street wasn’t always robson street.’ Our intention was, to make the reader wonder what Robson Street used to be like. We couldn’t make the script too long since the MAX time was 3 minuets.
As I said earlier, we used Explain Everything to make the video clips. To edit, we used iMovie. Something that inspired me was the Don’t blink video for the iPhone 7. I liked the way they used the text because it almost jumped out at you. We did something similar to the text using Explain Everything. After all of those steps we put together the first draft.
We watched all of the videos during class. We got some pretty good feedback! Our peers liked the music, and thought the video was engaging. Some constructive feedback we were given, was the text was too slow. Also every word was capitalized. I speeded up the text and got rid of the capital letters.
Here is the revised video:
I was really proud of our finished product. I thought it was interesting and creative. For example, I really like how we zoomed into Robson Street using Google Earth. I thought it gave it a personal touch. Also Mimi and I worked really well together, she wrote the script, and I edited the video. After making this video, I now how to use Explain Everything, which is a good skill to have.
On the educational side, I learned a lot about Vancouver’s history. It was really interesting to learn about Robson Street, since I go there often. Now when I go to Robson Street, I will think about what it has gone through.
In science we have been talking about identical twins. Did you know identical twins aren’t actually identical? In fact they have different finger prints. Believe it or not know one has the same finger print. In this blog, you will learn how this possible, especially if you listen to our end of unit podcast at the end. However to make the podcast we needed to know more about genetics. Throughout this unit we were using the Learning Guide for information and it had some activities.
I’m sure you are very confused with this picture. Infact, two sets of identical twins married each other and had identical children. Read this artical if you want to learn more. Something that I found very interesting was both of the wives got married on the same day and even wore the same wedding dress.
Building up to the podcast project, we were given many work sheets and activities to help us understand genetics. We started off by learning about:
– meiosis and mitosis (a review from last year)
– Karyotypes
– Blood types
– Pedigree
– DNA fingers printing
Some of the terms was a review from last year, however I there were some that I needed to look up. I didn’t know the definition of hereditary or a trait.
In class we also watched some videos for a better explanation on the topic. The first video we watched was about DNA structure and replication. This video gave me a better understanding what DNA looks like and key facts about DNA.
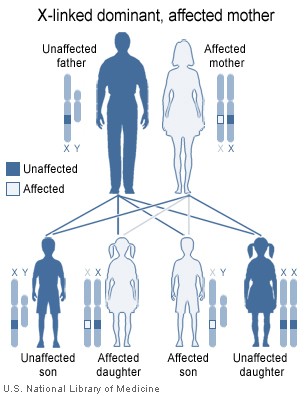
The next video was about hereditary. Hereditary is the passing on genetic traits from parents to kids. This video explained how you are a mixture of both your parents traits and how they are passed on. The Mendelian trait was mentioned. In Mendelian inheritance, a child receiving a dominant allele from either parent will have the dominant form of the phenotypic trait or characteristic.
The picture above explains that each child come be given their fathers trait or mothers. It is chosen at random. The child will have a mixture of both parents but they might have more traits from the father or mother. It’s all to do with dominant traits and recessive traits.
Here I’ll give you an example, having freckles is a dominant trait, that will give you a capital letter, for example (F). Not having freckles is the recessive trait for example lower case (f). Each person has two letters, for example your mum could have capital F and lowercase f which means she would have freckles because the capital F is dominant. The only way to not have freckles, would be to get two lowercase f’s, which would be called homozygous because both of the letters are the same. However, if the letters were different then it would be called heterozygous.
Here is a table I created to show what traits I got from my mother, and which traits I got from my father. A few of the answers I didn’t know. For example I was’t sure if my parents ears wear attached or not, so I just guessed. From this table it shows that I have more of my dads traits although it’s not that accurate, but at least you can have an idea of how to figure it out.
Now I will talk about Punnett squares, they are similar to was I have talked about:
This cart shows the likely hood of the bead cub having brown or black fur. There two words mentioned, genotypes and phenotypes. A genotype is the genetic constitution of an individual organism. A phenotype is the set of observable characteristics of an individual resulting from the interaction of its genotype with the environment.
The project:
Like I mentioned earlier, our project was to create a podcast explaining the following. At the end of the podcasts the goal was to answer the driving question, how does DNA and genetics determine the characteristics of living things?
It was pretty challenging to come up with an interesting way to explain twins, without the podcast being boring. In the end, my partner and I decided to do a interview. Basically I was the child of different two identical twins that married each other. Claire was asking all of the questions.
Here is our podcast and the script.
We got pretty good feedback on our project. Leading up to this project I learned a lot about DNA and genetics and the project tied it all together. It was a fun project and it wasn’t too hard.
In the course Planning I have talking about smart goals, but now it’s time to talk about work…
As you may know working can be dangerous and hazardous, believe it or not. It could be form working as an accountant to working on a construction site. Pretty much every job has its hazards. In this blog you will learn how to stay safe at work.
My work experience:
For me personally I haven’t had a proper job with a boss and all that, however I currently have a weekly babysitting job. To get this job I just needed to take the babysitting coarse. I took the course in grade 6, so a while ago, but I learned basic first aid that I still remember today. In the course it was pretty simple, you would go for a week for an hour a day and there would be a instructor teaching the class. They taught us skills when looking after kids or even babies. At the end of the week we took a test and you had to get 80% (I think) to pass. Pretty much everyone in my class passed.
My possible next job:
Last winter I took my level 1 ski instructor coarse because this year I want to teach skiing. There wasn’t any first aid involved in the course. Although, we were taught useful strategies to teach kids.
The course was four days long and in the end I passed! So this year I will be able to teach. There are definitely hazards for being a ski instructor, kids could get lost, get injured, I could get injured,etc, you get the point. In class we were talking about how to be safe at work and all of that includes the training you had.
The first worksheet I did was about our experiences and what our training we had was like:
In any job it is very important you know the hazards involved and what to do in any kind of situation. It is so important that someone trains you properly. If something isn’t right and you don’t feel comfortable doing something because it is dangerous, you need to inform your boss. Not being trained can be a very popular way of getting injured.
During class we watched two videos. The first video was about work hazards, and there were a few people telling their bad experiences with injuries at work. 1 in 21 young males are hurt on the job in BC. Let’s just say I could barley watch the video. It had some pretty intense injuries so only watch this video if you don’t mind watching a women get her fingers cut off.
Even though the video was pretty gory, it definitely made me think about many things that could go wrong while working in any kind of job. In the clip of women getting her fingers caught in the machine, it just shows that she wasn’t paying enough attention while using a huge and dangerous machine. Also she was working by her self with no one aroumd. She should have also been given her better training to make sure she knew what to do if that ever happened. As a result of the incident she lost three fingers at the age of 19.
Another accident that was shown was a man working on a wood site. He was transporting wood. He got off the fork lifter to lower the lifter and all of the wood can toppling down on his back. His name was John Higgins and he broke his back when he was 16. He should have had better training to tell him not to get off the vehicle when there is wood balanced on the fork.
Micheal Lovett was 18 when he lost his leg. He was working on a construction site at night and got his leg stuck in a chain, his leg was pulled in to a machine that destroyed his leg. Micheal definitely shouldn’t have been given a night shift on a construction site alone. Also in the video it mentioned that he had been working for 24 hours, so he would have been tired making him less aware on what’s going on.
We were given some pages to read. They were mainly about hazards. This one is about different kinds of viruses you get from being at work. You would surprised on how easy it is to catch a disease at work. All of the reading helped us answer the following questions:
After we did these questions we went over the answers in class. I got a few questions wrong, the one about the first aid, I thought that you had to be older for ten designated first aide required at all work places. I also didn’t know the answer the to the question that was about the noise volume.
Now I will talk about the second video shortly. The title was Young and New Workers. The video was about young people being trained and how it is so important it is for the workers to be properly trained.
To summarize all this information I have just given you, I made a visual to help understand our unit. To make this visual I used Explain Everything, IMovie and sketches pro.
As you can probably see, there are many things wrong with this picture. There are two of the main things that are causing these problems. The first one is the fact that it is 1:30am therefore, the worker would be tired, so he my not be thinking properly. The second one is he has his head phones on listening to music making him less aware of what is going on.
This will make him be less aware of what is going on, for example the stove is on the fire and the pot is over boiling and he hasn’t noticed. If you look will notice that there is a flammable liquid next to the stove, not a good idea. This person could very easily get injured. He also shouldn’t be working by himself at night and that is the bosses job to fix that.
This unit is definitely one to not forget. Before learning about this I never considered how dangerous work can be. If you feel like you are in danger while working, you have the right to tell your boss to fix something. If they don’t then you can refuse to work. Also before you start the job it is so important to be trained properly. Any disaster could happen at work and it is important to be trained to deal with dangerous situations.
This math unit was based on trigonometry. After learning how to solve trigonometry questions and how to find the angles of a triangle using trigonometry, the whole class was assigned a project. The project was, to build a solar panel and using trigonometry, we had to find the optimal angle that the angle would have to be placed at to get the most energy from the sun. We also had to do a write up of the information explaining our model. The question we had to answer/ show was, How can we use trigonometry to optimize clean energy technologies?
To help us have a better understanding on how you find the angle and side lengths, we did a lab. Using a wooden divider with a mini solar panel attached to it as a roof, and wooden blocks to slowly make the angle larger and larger until we found the angle that produced the most energy. To measure the energy, we were given voltmeters . We were using the lights in the class as the sun. Me and my partner concluded that using 8 blocks and having the angle at 35.7 degrees got the most energy from the lights. The hight of the triangle was 32cm and the length was 23cm. The voltmeter read .97 volts. Using under 8 wasn’t very affective, for example using 3 blocks. The angle was 21.25 degrees. The height was 14cm and the length was 36 cm. The voltmeter only read .89 volts.
We also did a few worksheets to figure out how to find the angles of triangles using trigonometry. There was a specific question that was a challenge to figure out, and in the end did it as a class. Here are the steps:
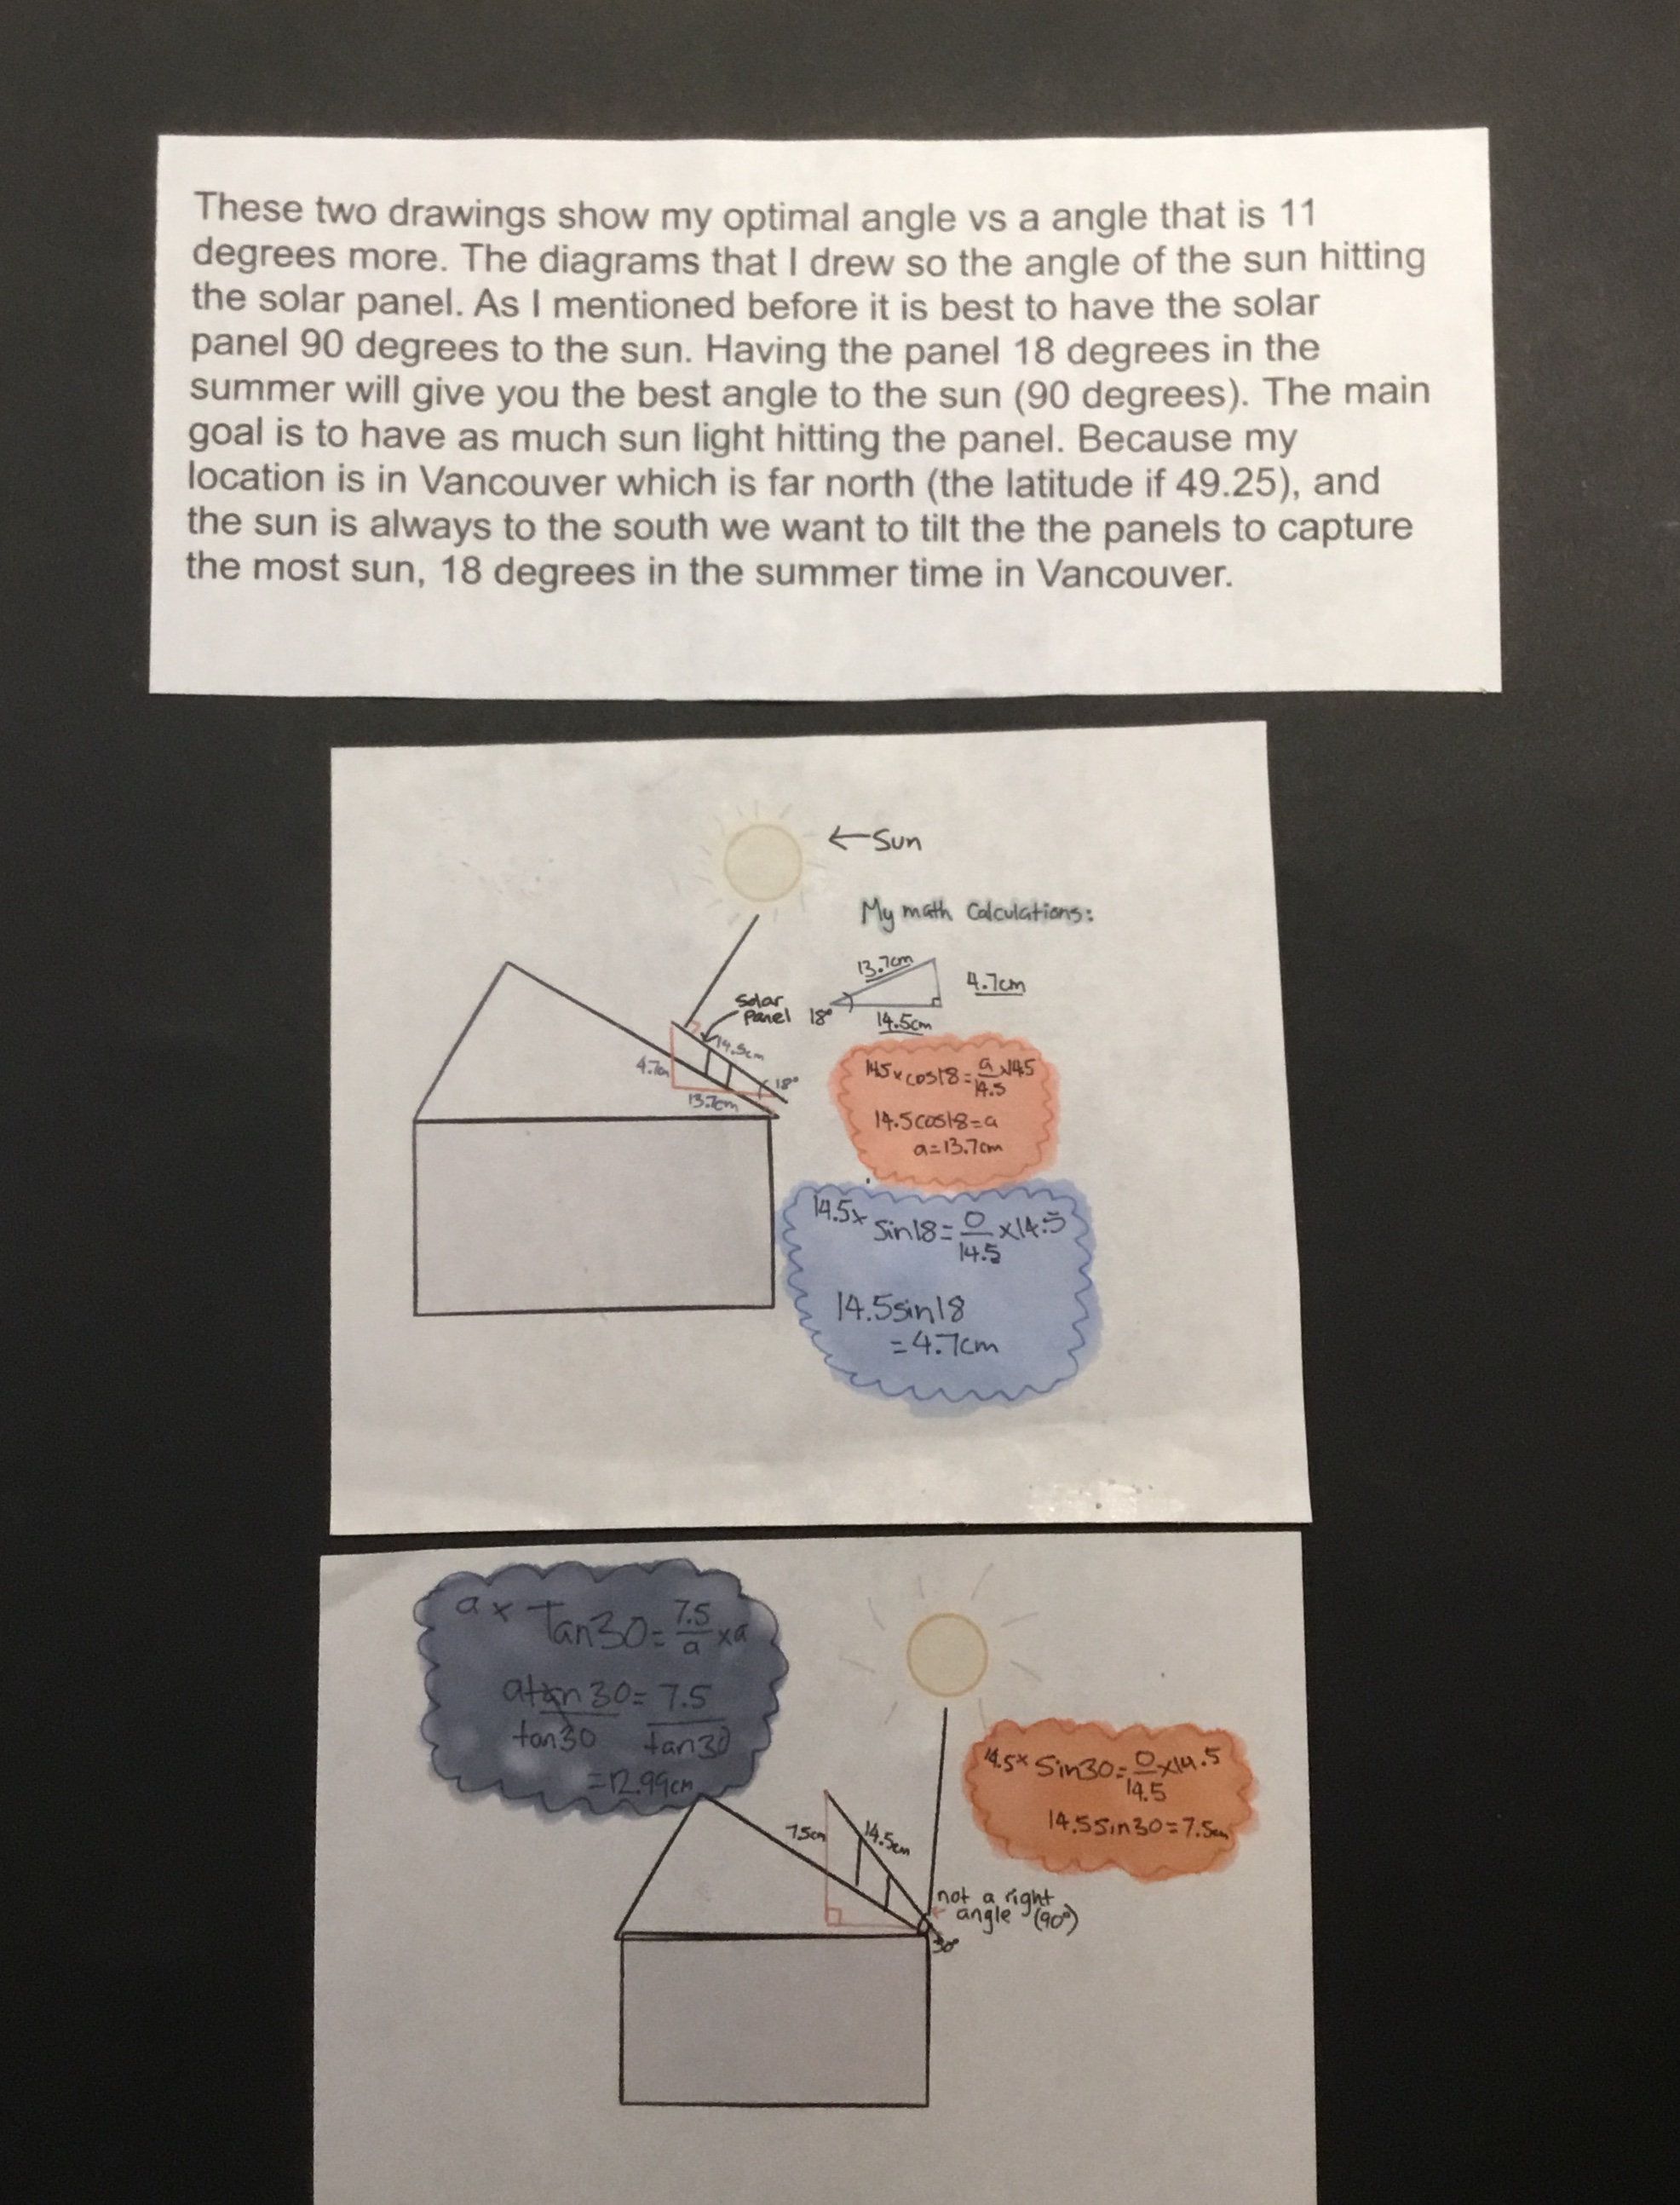
Before we started building our models, we needed to figure out what the best optimal angle was. We could choose the optimal angle for one season. I researched the optimal angle for all of the seasons.
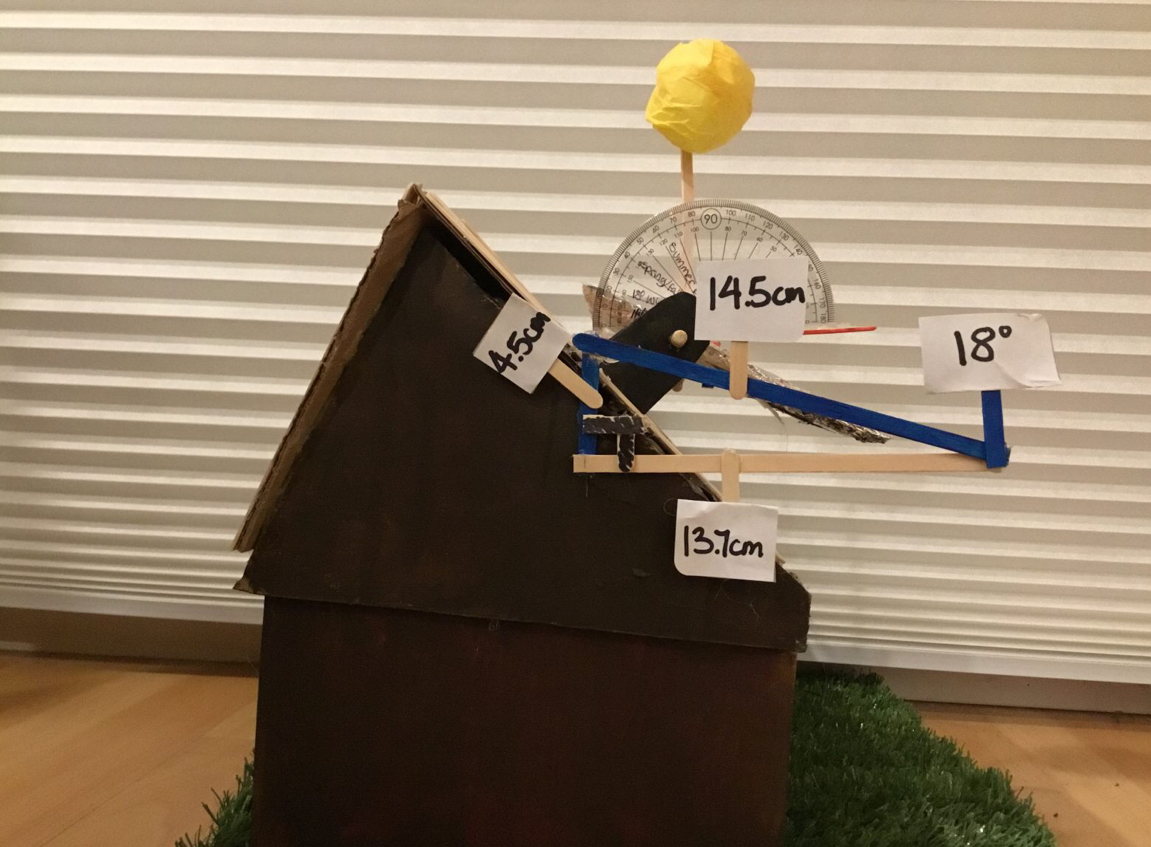
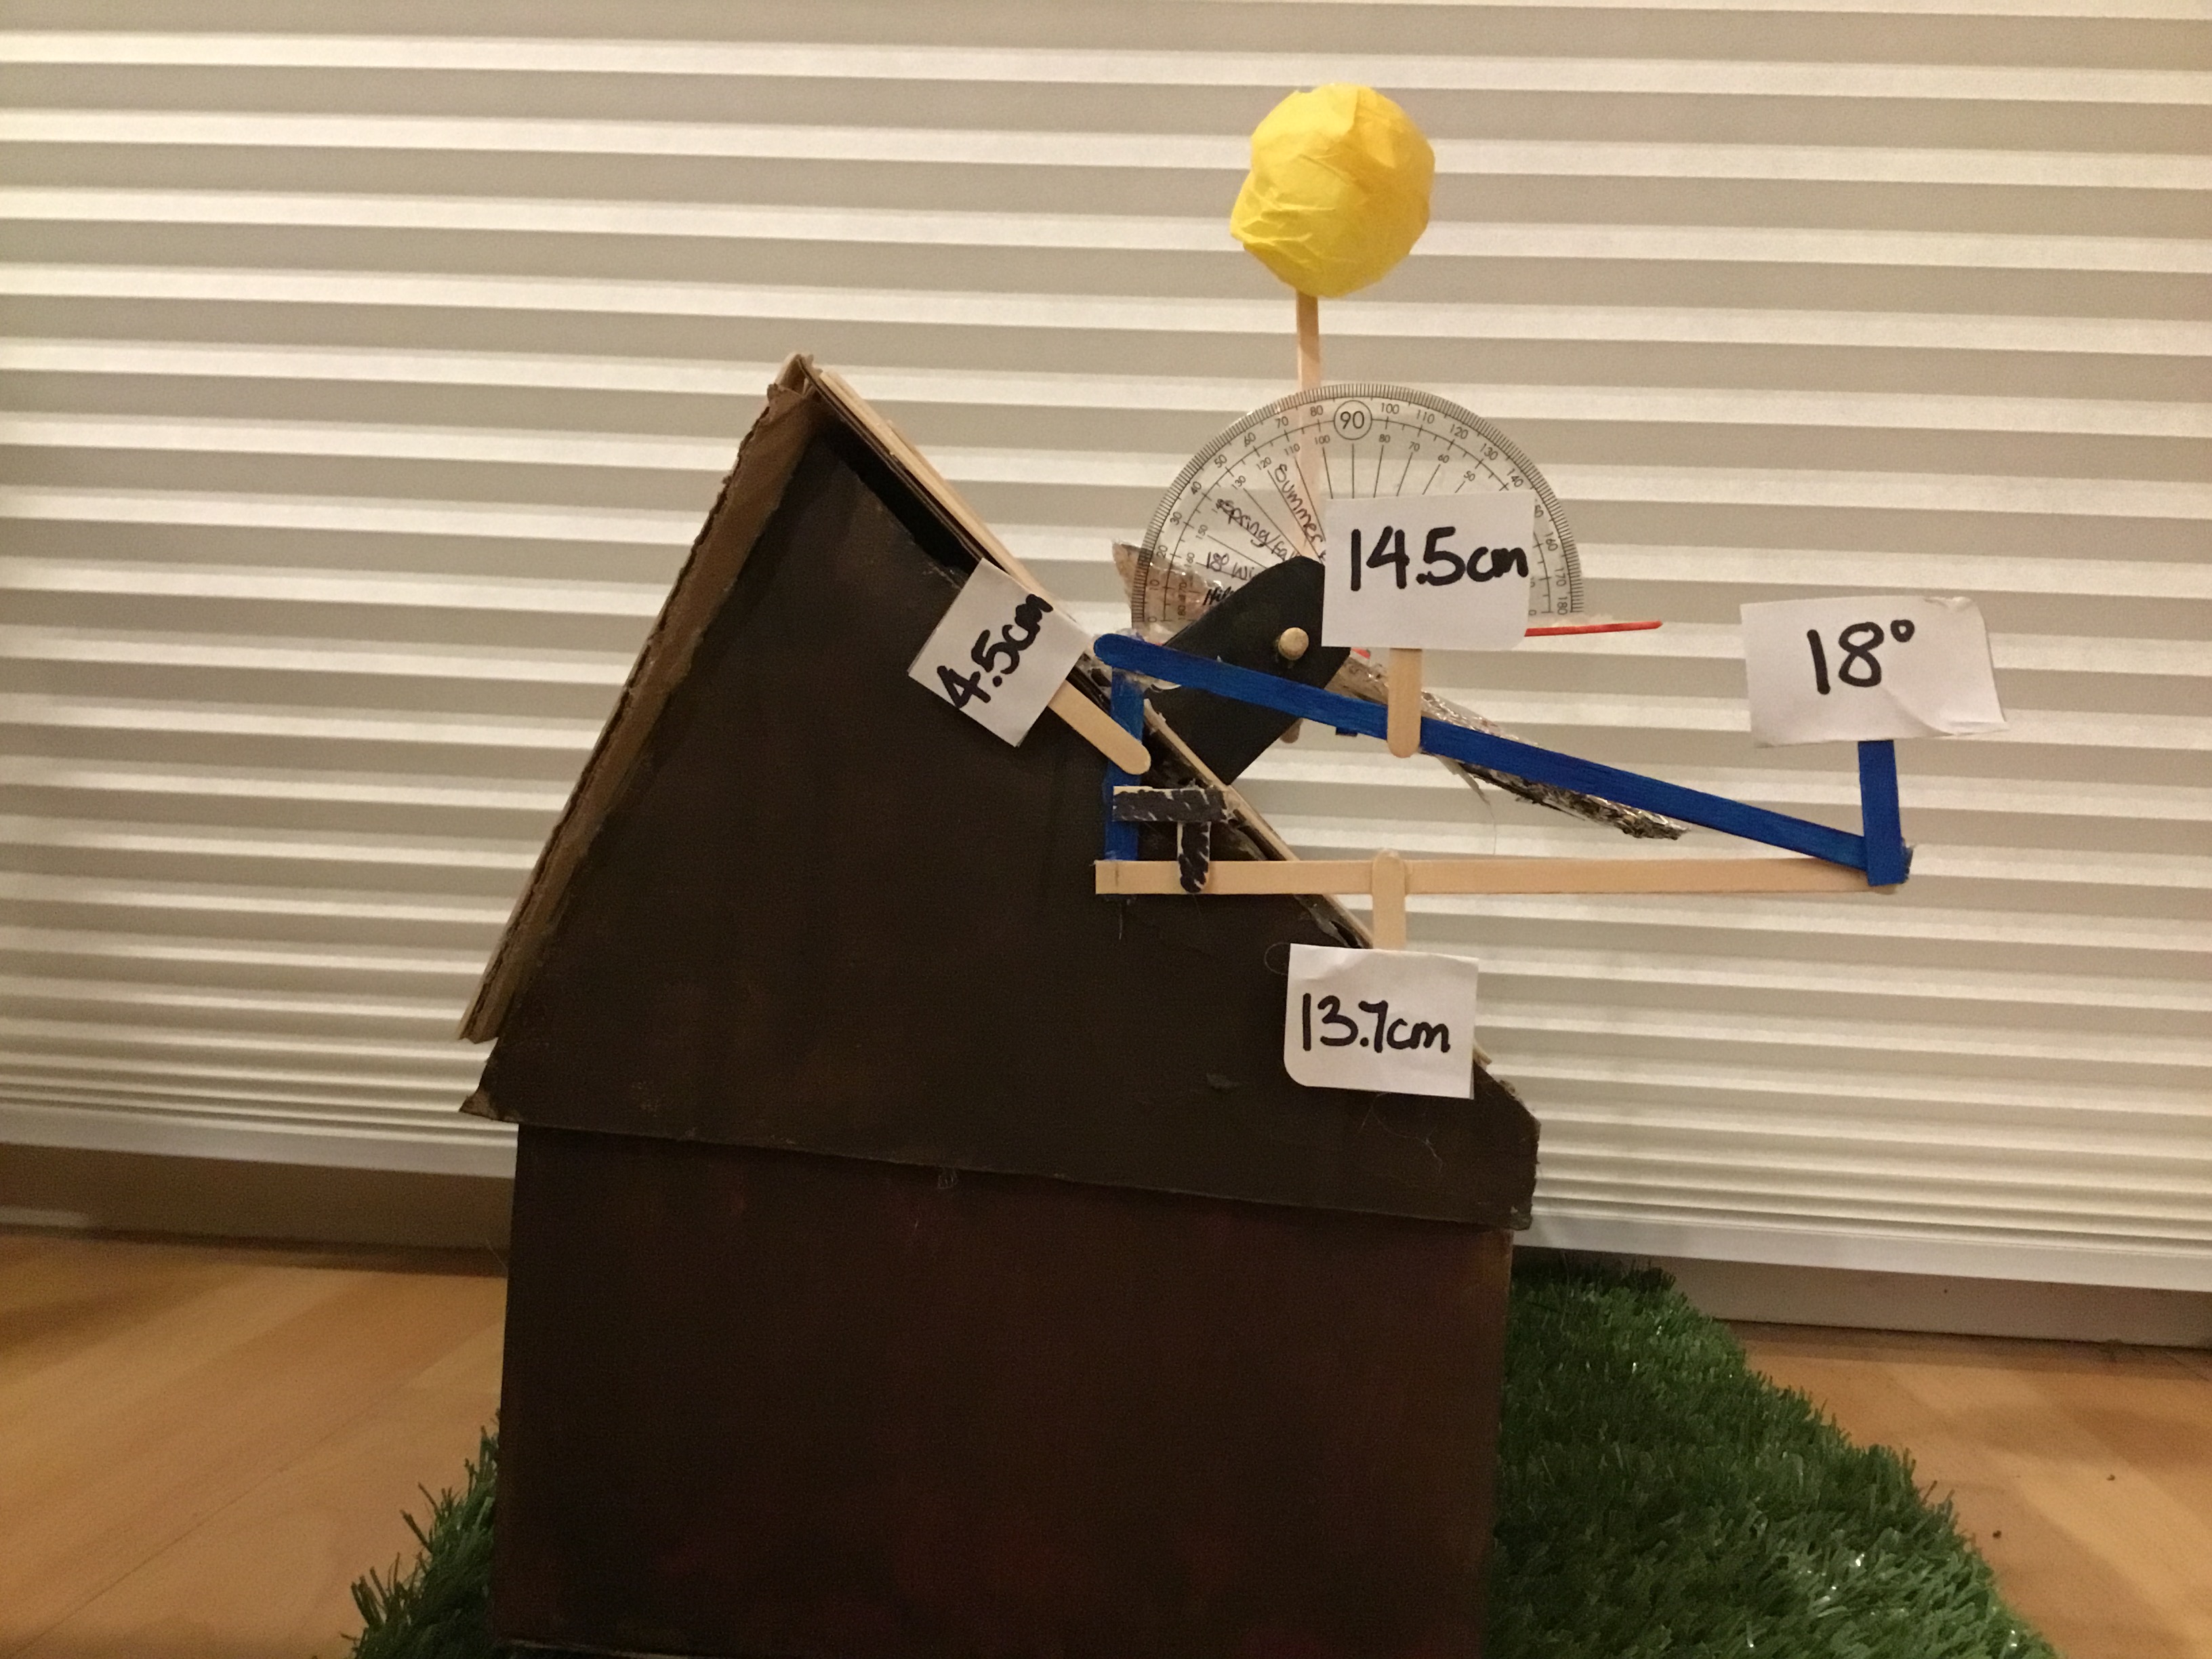
I chose to use the summer angle. The best optimal angle for summer is 18 degrees. For the solar panel to get the most energy the panel had to be 90 degrees with the sun.
Once we had our angle, using trigonometry we now had to figure out what the side lengths were for the triangle. Here are my equations:
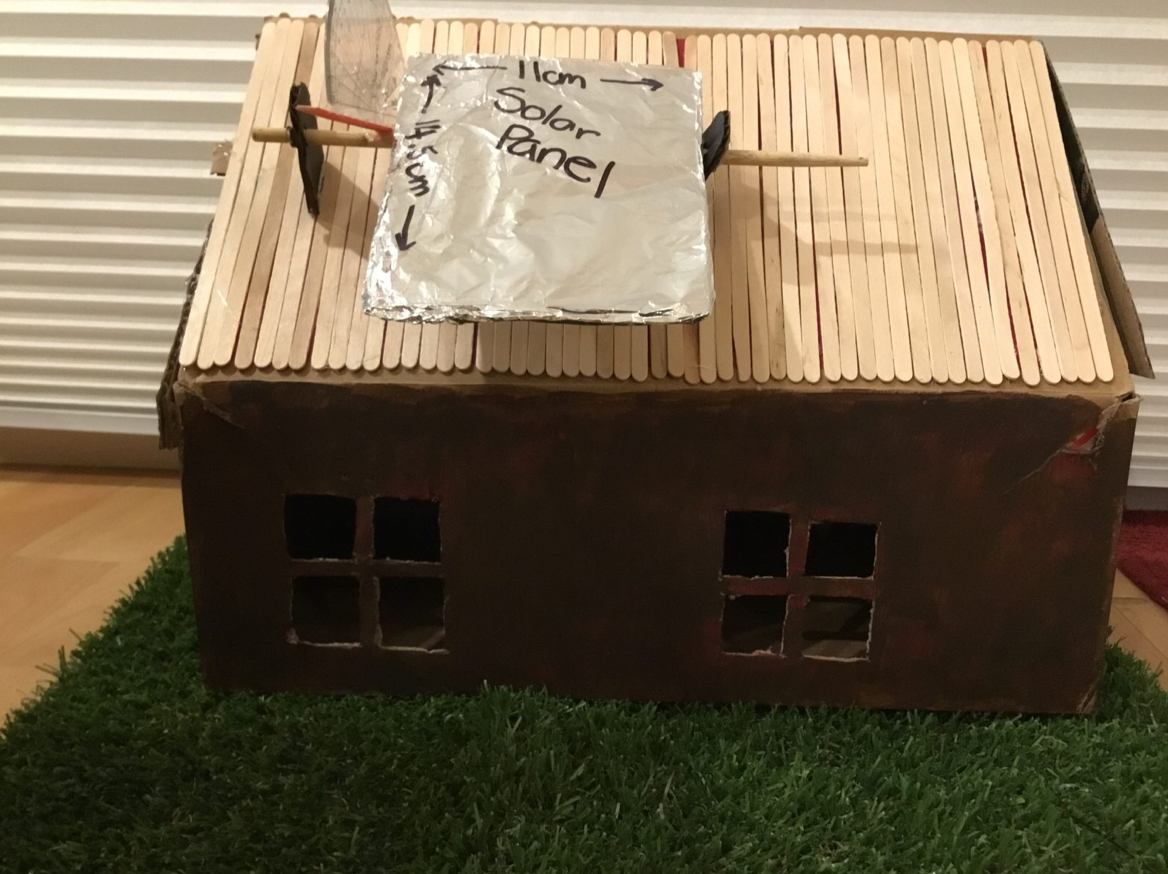
Now it was time to start building. I knew that would take me the longest time. I decided to make a house. For the house I used a shoe box for the base and to make it look like a house I cut out windows and built a roof out of cardboard. To make the roof look more interesting I glued lollipop sticks to it, the lollipop sticks also gave it more of a roof affect. I just painted the shoe box brown to make it look like a wood house. In grade 8 for a project I used fake grass and I had some left over so I put the house on top of the grass. To show that the sun had to be 90 degrees with the panel, I made made a small model of the sun out of tissue paper.
On our models we needed to show the angle, and the right angle triangle. We also had to label all of the side lengths. I used lollipop sticks to make the right angle triangle. When our teacher came around to mark them, he measured the angles and side lengths of the triangle, to make sure your measurements were correct.
As Sydney and I were working on our projects, there was a power cut. We had no wifi, my iPad was low on battery and I needed to glue gun my model together. The glue wasn’t working because I needed power, so in the end I had to leave it for a bit. The power cut was longer than we thought, and we both had to finish our projects because they were due the next day. By the end we ended up going to Parkgate library, to finish the write ups. Luckily when I got home the power came on and I was able to finish my project.
On my write up, it explained the optimal angle and why that is. I also explained how my model would be different if I was to build a real life building. I would, change all of the centimetres to metres. For the materials I would use wood for the structure and sleet for the roof lastly the solar panel would be real one.
When we were done I got a pretty good mark, I just needed to add more detail about the connection between the solar panel angle constraint and the sun.
I enjoyed this project because we got to be very creative and personalize our models. I learned how solar panels work and how there is a specific angle for each season.
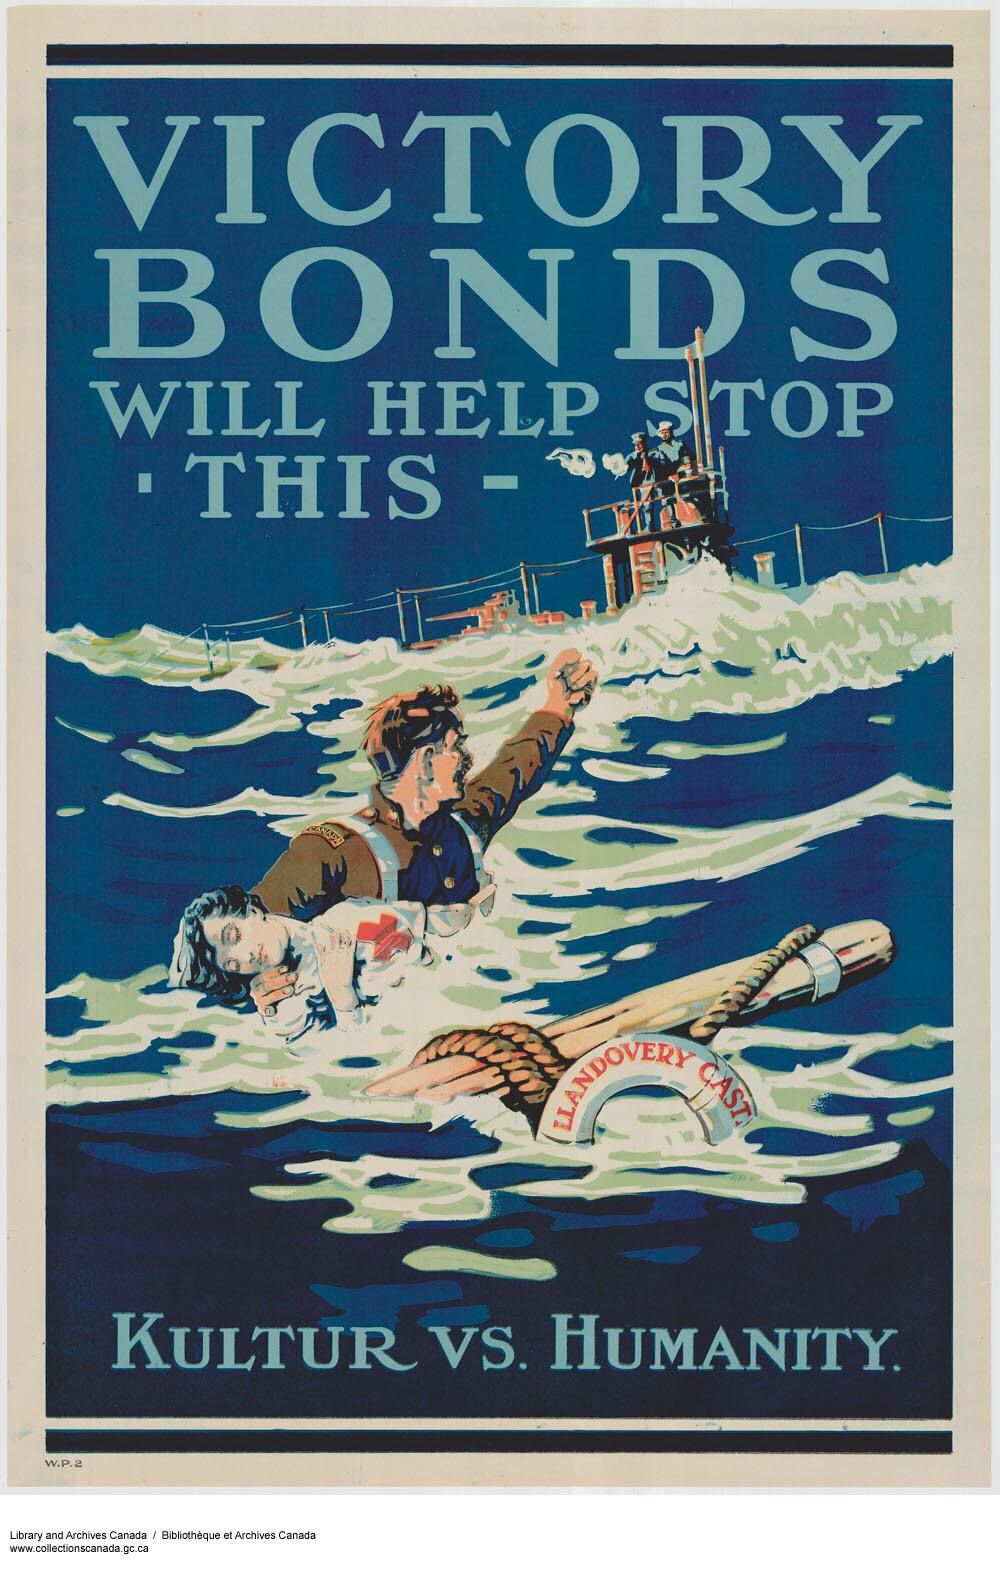
To end off our unit of World War 1, we have had many assignments and small projects leading up to one big project, the Soldier research project. This project involved making a podcast that answered the question, how did WW1 shape Canada’s identity as a nation? Before I talk more about the podcast, I will talk you through the steps leading up to this point.
Right at the beginning of this unit we had to get a good understanding on what happened and what life was like during the war. One of the first things we did was read a short novel/comic, called shattered ground. It was written by Leif Kaldor. Shattered ground was about a boy named Kevin who found his Grandpa’s diary and pictures from WW1. In the novel/comic I thought the pictures were very detailed and told a lot of the story.
Throughout the story there were primary sources from the war that I found so interesting, because they gave you a better picture of what the war was actually like. One of the primary sources that stood out to me, was the picture of the soldiers playing cards in the trench. The soldiers weren’t fighting, they were just being people playing cards.
Canadians enjoying a game of cards in a shell hole on Vimy Ridge. Apr. 1917/Vimy Ridge, France. Photo credit: Canada. Dept. Of National Defence/National Archives of Canada/ PA-001181 Can be used with Richard Foot (CanWest) Vimy series
Shattered ground really helped me understand more about what the war was like. I also learned about some of the key battles.
To learn about each war, we read a passage and filled in a chart. We read about the Battle of Vimy Ridge, Passchendaele , Ypres and the Somme. Our main focus was the battle of Vimy Ridge, because it was the Canadians most significant battle.
Here is the chart with all the battles:
To go into more depth about Vimy Ridge, in class we watched a video about the battle. The video was very helpful because it explained the key events, and also included some primary sources. Primary sources are useful because they give you a better understanding on what the war was like. The video had a lot of information so we had to make notes about what stood out to us.
A fact that stood out to me was, the fact that 60,000 Canadian soldiers were killed during the battle. So many Canadians sacrificed their lives to win. After the war was over 60,000 trees were planted at Vimy Ridge in memory for all the soldiers that died. A specific primary source I remember was when the soldiers were loading and firing the cannons. To be the person loading them must have been terrifying, you could easier get your finger stuck, drop the bomb on your foot, also their ears would have hurt from the noise. The explosions were ginormous. In the video it showed that even today there are indents in the ground from the shells. You can also still see where the trenches were, it’s amazing how they are still (sort of) there.
Life on the home front:
Moving along, we read about life on the home front. One of the sections was about changing the roles of the women. Since most of the men were out fighting, the women took on some of the roles of the men. Women worked as bankers, police officers, teachers, accountants, factory workers, and labourers. Some even worked to bring in the harvests from farms. Also during the war the women got the right to vote.
To get into more depth about life of the home front, our teacher split the subject up into five sections, Voice for Peace, Recruitment and Conscription, The war economy, Enemy aliens and government intervention. Each person got assigned a group and had to read the passages of text and create a keynote with 3-5 slides. Sofia, Kyle, Adam and Willa were in my group and we were assigned, The war economy. Sofia and I, were in charge of making the keynote and the rest of the group members wrote the script. In our slide we decided to split it up into four slides, before, during and after. I learned that even before the war Canada was already in a recession, and they didn’t have a budget for the war. During the war there was a economic crisis because the war was so expensive. Canada had to use war bond to raise money. After the war it didn’t get much better, the country’s dept reached to 1.6million dollars, and it took them 10 years to recover from the unemployment and dept since they were out of jobs after the war. We presented our keynote to the class and took notes from the other groups.
Here is my groups presentation:
While were doing these activities we were starting to think about a soldier to research from World War 1. For the World War 1 podcast, as I mentioned earlier we had to answer the driving question, How did World War 1 impact Canada’s identity? For the project there were many steps leading to the final product.
Step #1
Using the Government of Canada’s website we were able to find a list of all the soldier that died or lived in the war. I think finding the soldier was one of the hardest parts of the project. It took a lot of time looking through all the names and finding one with a lot of information about them, so I could tell a story in our podcast. For each soldier there was a picture of the form they used to get in the army.
My soldiers forms:
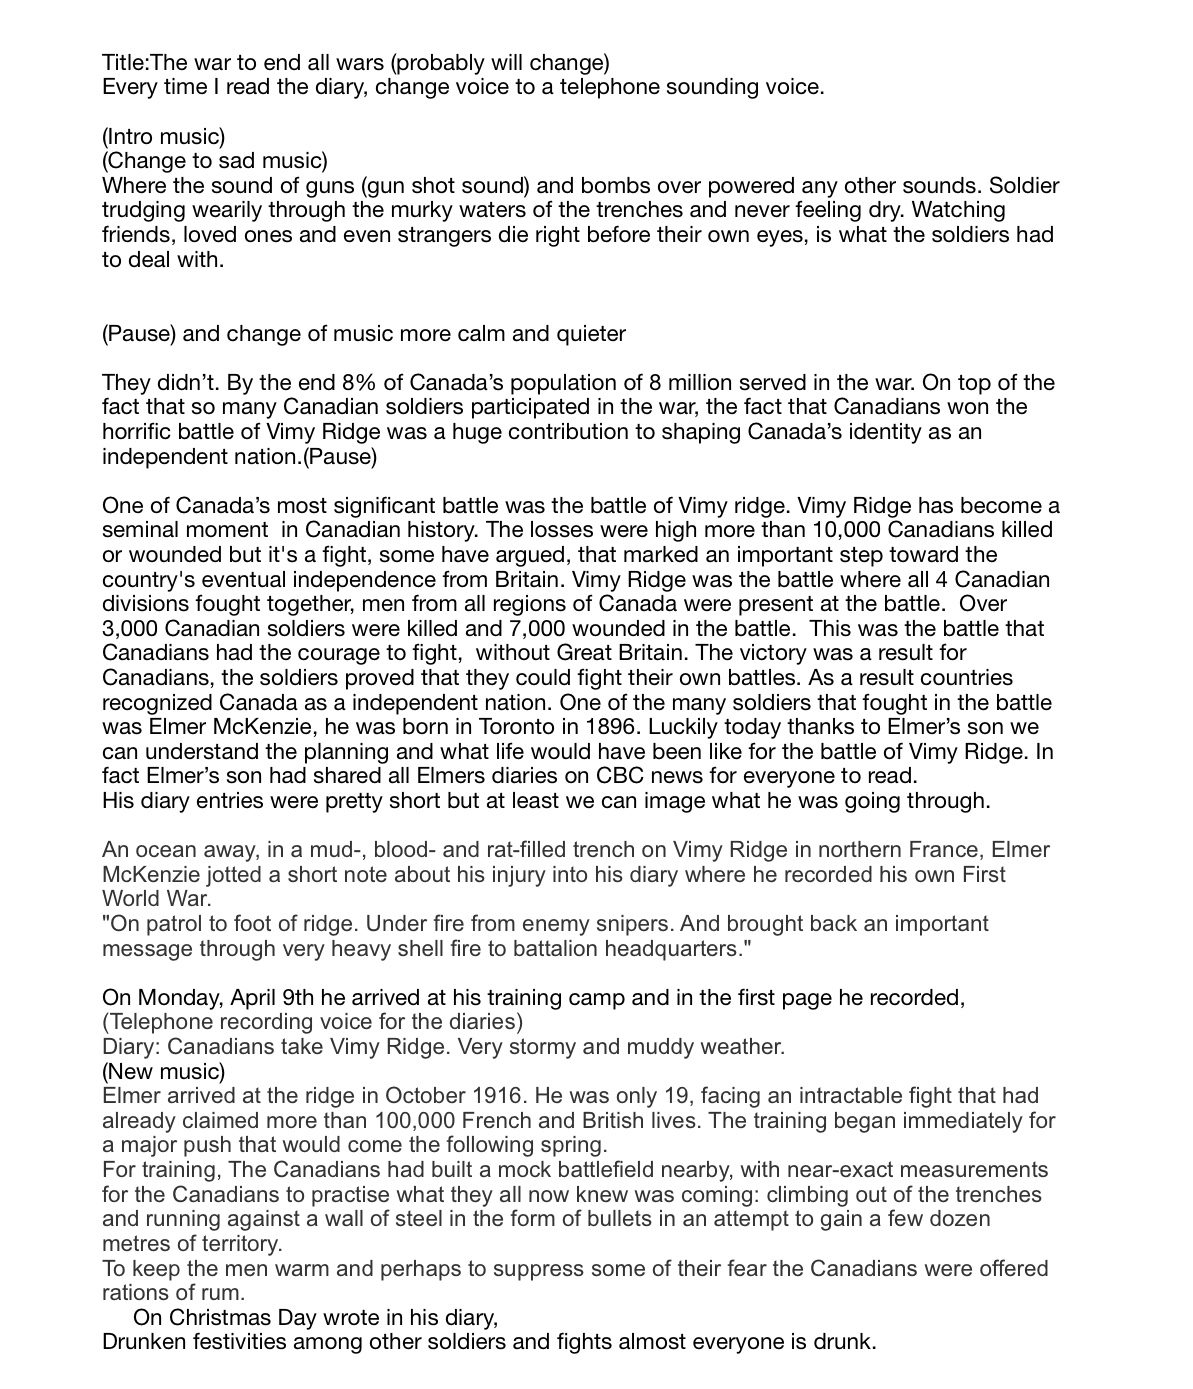
I researched soldiers with my family names but I couldn’t find one, so in the end I used one that I wasn’t related to. However, he had a really interesting story and had a lot of information about him. His name was Elmer McKenzie and he had written diaries while he was in the was. His diary was posted by his son, Paul on CBC news. Elmer fought in the battle of Vimy Ridge. That was another reason I chose him because I believe Vimy Ridge helped shape Canada’s identity, since it was Canada’s most significant battle.
The picture on the left is Elmer McKenzie (the soldier I researched) and his brother Doug McKenzie. The other image is a picture of Elmer, Doug and five other Toronto teens they signed up with. All seven of them were considered the Sunday school boys because they didn’t drink, smoke, or swear. A devistating story that Elmer recorded in his diary was, all of Elmer’s friends were killed because a shell hit the group directly. Elmer, however didn’t get hit because he was informing his soldier about how he saw the Germans planning a counter attack. In my podcast I go into more depth about that devastating story.
This picture (the one above) is one of the many pictures of the diaries that were posted on the CBC news. It is really hard to read the writing in the diary, so below someone had translated the writing so you could read it. The diary entries were mostly what he did each day or the big events that occurred.
Step #2
After we found our soldier we wanted to research we needed to start writing a script. The script took me a long time because I needed to think how I could make my story interesting, as well as relate my soldier to the driving question, how did World War 1 impact Canada’s identity. In class we talked about what a story structure should look like, they should include a, beginning, climax, falling climax and finally, the end. That is the structure our scripts should follow.
Also, to help write the script we listened to a few podcasts in class. One of my favourites was, ‘Sometimes the rain just doesn’t stop’ by Jay Barnes. The podcast was about the Hurricane in Florida. It followed the story structure, as well as include the five senses, it made you want to hear more and gave you a picture in your head what it would have been like to be in the hurricane. While we were listening to the podcast we made note on what we liked and didn’t like to help us with our own podcasts.
This is the cover photo for the podcast, Sometimes the rain just doesn’t stop.
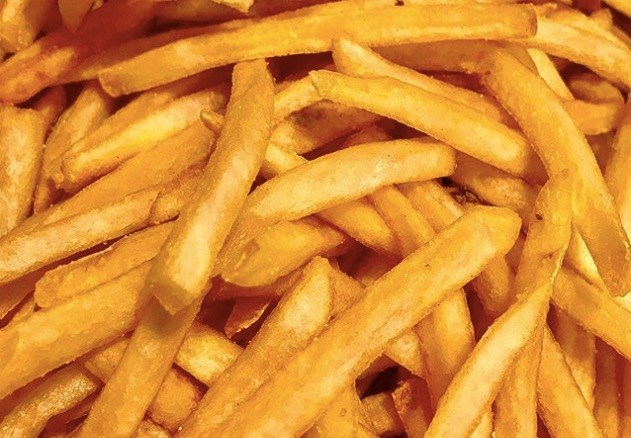
The podcast was about McDonald’s french fries and how they betrayed him (Malcom Gladnell). Over the years the french fries had become more unhealthier than the original fries. It was an odd topic, however surprising was very interesting and made me very hungry. I recommend the podcast!
This podcast we listened to follow Dan Harmon’s story structure, and was inspired by Joseph Campbell’s hero’s journey. There are eight steps for this structure. Many hero movies follow this structure. Here are the eight steps. While we were listening the podcast, we had to take notes on how the Malcom Gladnell’s podcast followed the Hero’s journey.
#3 THE PROJECT
After to listening to many podcasts and talking about story structures, we were ready to write our first draft of the script. Here is my first draft:
As you can proberbly tell, my script was way too long. The time limit for out podcast was around 5-6 minutes. Making the script was very difficult because we had to make it into a interesting story that would make someone actually want to keep listening. In class, we did a peer edit, and they gave us some feedback.
From looking at the feedback there were things that I needed to improve on. For example, I needed to make my story more clear and explain more about the war. I also had to talk more about the driving question, How did WW1 impact Canada’s identity.
Step #4 recording our first draft
Now that I had revised my sctript, it was time to start recording our podcast. To record I borrowed a small microphone to make the sound quality better. To record, I had to find a quiet place so there was no background noises. Not only did we have to record, we needed to add music to set the tone of the podcast. We were told that we weren’t allowed to copy song, so we had to compose our own music, using Garage Band. Here is my first draft of my podcast:
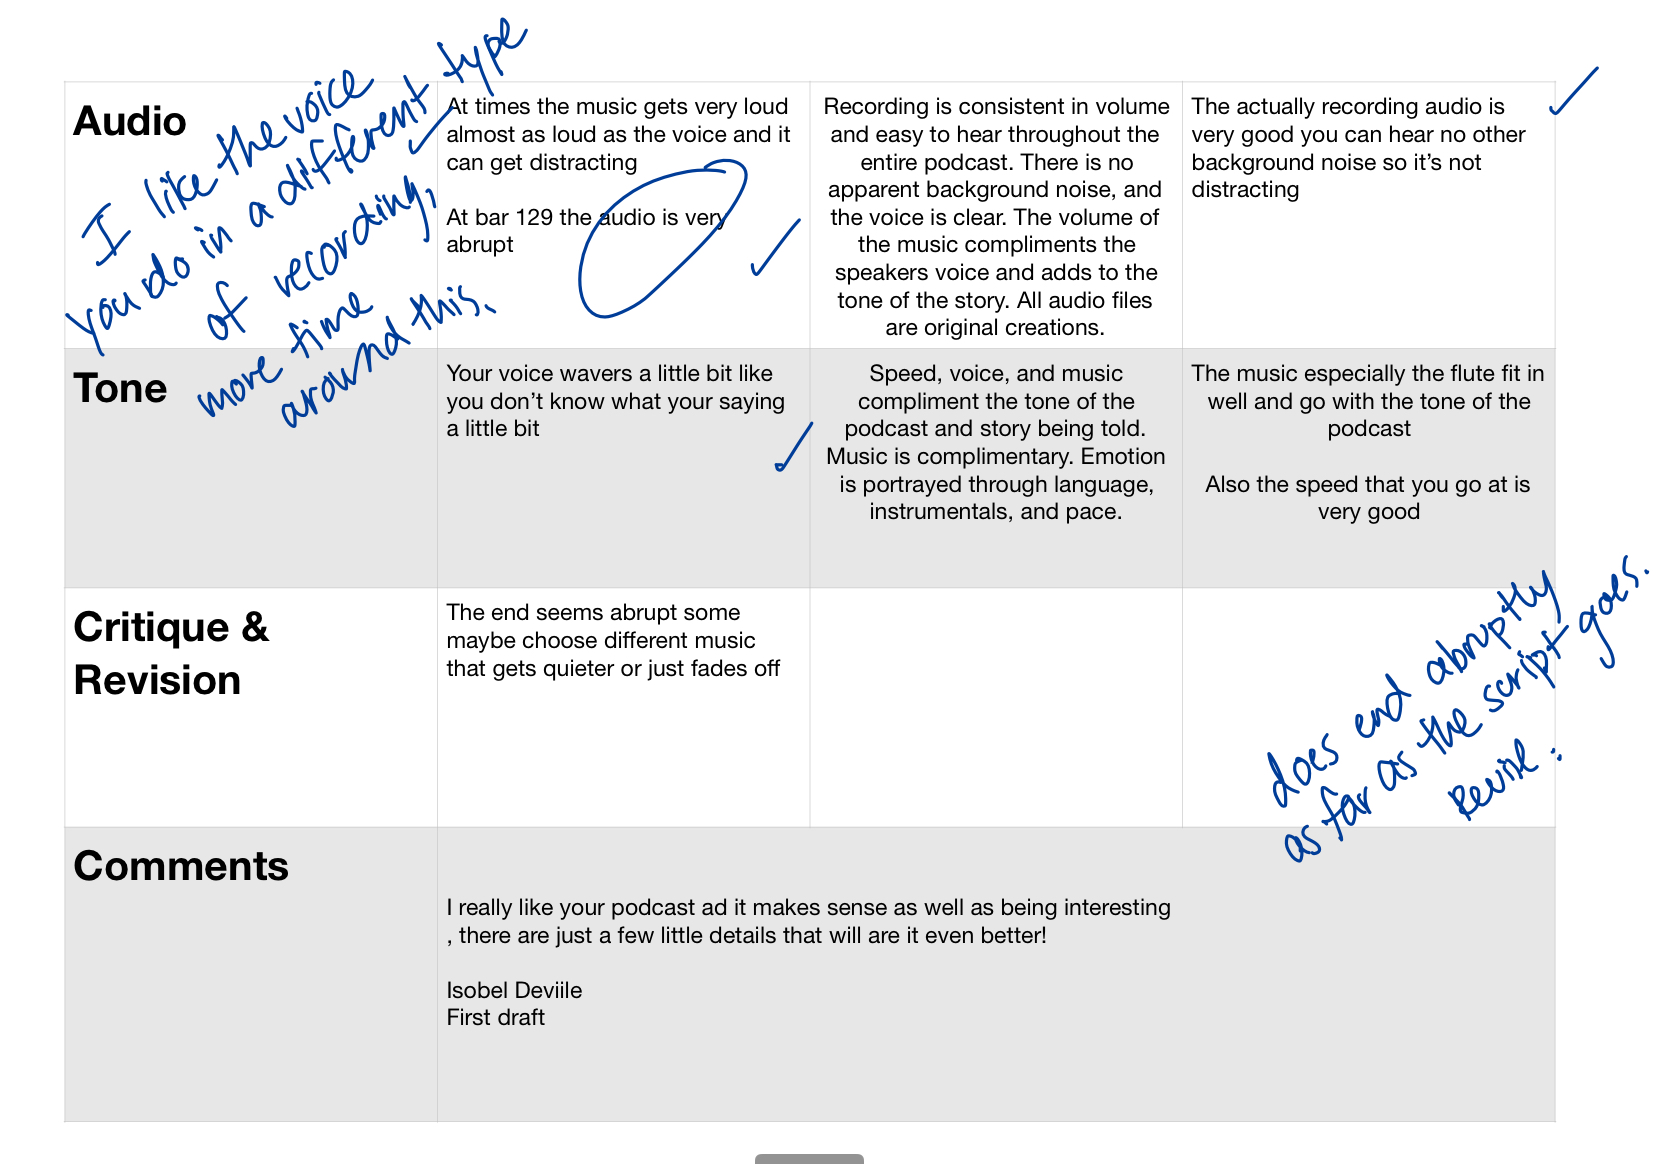
Once we had finished our first drafts, in class we did another peer edit. We were given another chart to fill out for feedback. For mine, I needed to revise and maybe use different music to set the tone. Also voice pacing and the audio. Another aspect the whole class need to work on was, speaking with passion and not sound like we are reading right off a script.
Step #5 The HOOK
Have you ever realized that when you listen to a podcast, you listen from the beginning to the end. The reason for that is because you are interested in the topic and the speaker draws you in right at the beginning. The speakers use a hook, to draw in the listener. The hook can either be a question or just a unique way to start the podcast. After we listened to our peers podcasts, everyone agreed that we all needed to work on our hooks. To help us get some inspiration we did an activity. The activity was to listen to the first 30 seconds of ten podcasts and write what the hook was.
While talking about hooks, I needed to decide what type of podcast I wanted to make. For example, an expert interview, round table, non fiction narrative storytelling, solo, multi-host, fictional storytelling and documentary.
This chart shows all the different options that we could use. The class added some examples of podcasts. In the end I decided to tell a non fiction/ documentary podcast.
Everyone in the class needed to make their first 30 seconds of their podcast. We listened to them all in class. The feedback for me was to make my pauses shorter, and turn up the music.
Step #6 Voices
To practice our speaking skills, the whole class made a podcast. The podcast was about the Halifax explosion on December 6th in 1917. All the sections in the readings were split into nine groups. Although one member of the class was responsible for the intro and another responsible for the editing and adding music. My group was assigned to read about the explosion and tsunami.
For the podcast we just had to read our section out loud and record our voices. Since our section had a lot of paragraphs, each member of the group read one aloud. It was pretty hard to find a quiet place in the school to record. We ended up recording in the back room. After three of us had recorded and we found out that microphone wasn’t plugged in properly, and had to re-record the script. We also decided to change locations because the class next to us were getting too loud. So that we finished faster, the group split up. Me and Isobel went outside and Sam and Ethan went somewhere else. It was a bad idea to go outside because it was raining and you could hear the rain in the audio, however we had no time to re-film. When we listened to the podcast in class you could tell if the group had a good place to film and which groups didn’t. It was also interesting to hear all the different types of voices and different paces.
Here is our class podcast.
Step #7 good copies…
Now that we had done so much leading up to this point, it was time to start recording our good copies of our podcasts. I kept some of my script the same, however the intro was completely different to my very first draft.
This concludes my blog on World War 1. This whole experience has improved my knowledge of the war, skills in podcast making, and writing blogs. I hope you enjoyed reading about my soldier and the World War 1.