Angles Of The World


Our most recent math project has revolved around the concepts of trigonometry and calculating angles, as well as using solar panels and incorporating them into a scale model. The project required me and my partner Adlih to research a location of our choice, find the angle of the sun in that location, design dimensions for the support structure for a model that we would then build with labeled measurements, and finally we would create an instructional video to teach people about the ideal angles for solar panels in their location

When creating the model aspect of our project, me and my partner had to use trigonometry to find the degree of the angles as well as the side lengths of our structure. I learned a lot about this subject during the process, as well as a lot about myself and my learning habits. I learned that I memorize information very slowly and it takes more effort for me to understand a concept that it would for a lot of other people. With this in mind, I tried my best not to let this hold me back and kept trying. I even spent many days after school researching online and trying to better understand how to do trigonometry. By the end I was finally caught up and now I’m pretty decent at trigonometry, which may not seem like much but this was a big accomplishment to me because at the start I thought I would never be able to figure it out. 

Below is a mind map on trigonometry and everything I learned about it.


We created our model based on the location that we chose, which for us was Kharga Egypt. We decided to make our support look like a shipping container because we thought it would be more ethical, and we made the support white so that it wouldn’t absorb more light and make the inside extremely hot. The rest of the information is featured in our video which I will link to below. 

Causation and Correlation

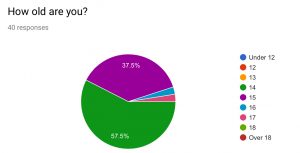
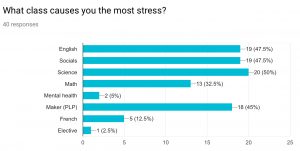
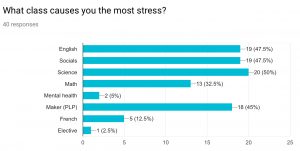
Our most current math project was out Causation and Correlation project. My partner Melanie and I were tasked to create both a Causation and a Correlation that we would then collect data for and make graphs to show this data and prove our hypothesis. You may be wondering, what is a Causation? Well a Causation is when a variable causes another variable. For this portion of the project, we created a survey on the topic of how school and homework effects our stress levels, and made the assumption that school causes rising stress levels in students. 

We created many pie charts to showcase our data from the survey. The data from these charts was mainly collected from grade nine students, and almost all of them put down that stress about homework has prevented them from socializing, performing everyday tasks like cleaning their rooms, and have confirmed that most homework is assigned in the months of April and June.


In our survey, we also had many bar graphs that show us which classes cause the most stress, give out the most homework, and what stresses people out the most, which judging by the survey would be schoolwork. With all of this data, I think it is safe to say that school definitely does cause rising stress levels in students, and our Causation was valid. 


Next, we created our correlation. A correlation is when two variables correlate with each other, but do not cause one another. Just as an example, lets take two random variables like the amount of car crashes per year and the population of pelicans. These two things do not cause one another, but maybe their numbers in the data correlate with each other and have the same pattern. This example is definitely not a Causation, but could be a good example of a correlation. For this section of the project, we chose to compare the amount of earthquakes to the population of whooping cranes. We graphed the data that we found online, and put it into a graph. As you can see, the numbers are very similar, but it is still a correlation and not a causation because the population of whooping cranes has no effect over earthquakes whatsoever. 

This has been our Causation and Correlation project. It has been a great learning experience, and I am proud of the work that my partner and I had created.

Cloning new life

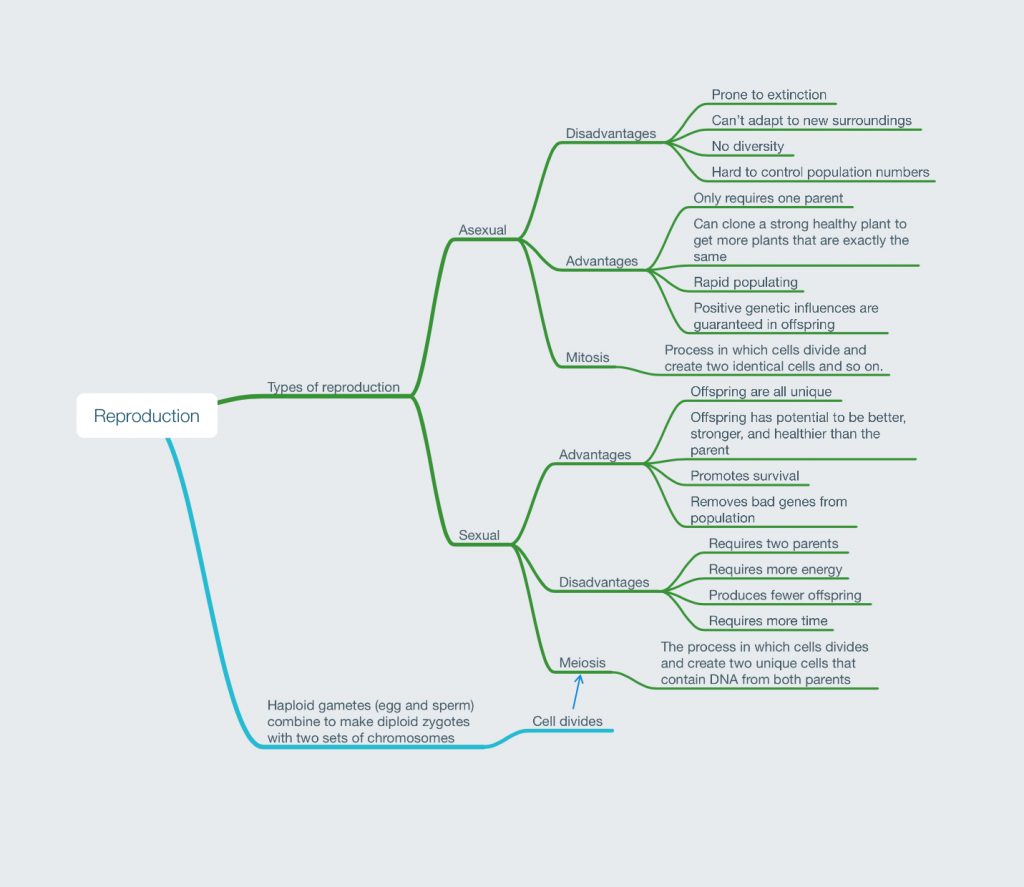
Our most recent project in science was a project where we got the chance to clone Dandelions using asexual reproduction. Asexual reproduction is when a plant reproduces without a partner, using a process called Mitosis. Mitosis is when a cell divides, producing two clones of itself and repeating this process over and over until life is formed, which is what happened when we cloned our dandelions. But don’t let this be confused with Meiosis, which is similar, but instead of making clones of itself, each time the cells split they create cells that contain DNA from both the parents and each cell is unique. Asexual reproduction can be beneficial in that it only requires one parent and creates plants that are exactly the same, but there are some downsides. If the parent plant has any weaknesses or mutations, the clones will also possess those bad qualities. Also, if the parent plant can be easily killed by a certain illness or disease, then killing off all of the clones wouldn’t prove to be that difficult. That’s where sexual reproduction comes into play. Sexual reproduction requires two parents which makes it more difficult, but each offspring is unique and contains DNA from both parents. 

When cloning our own dandelions, the first step was to plan out a list of materials that we would use. When doings this experiment, we needed soil, one solo cup, some sort of digging tool, scissors, and water. To begin our experiment, we went outside and dug up a dandelion with the roots intact. We took the roots and cut them into five different stocks, each having been cut slanted at the bottom. The reason why we make a slanted cut on the bottom of the piece of root is to help us remember which side should be at the top when we plant the roots. We took out root fragments, poked holes in the bottom of a solo cup, fill it with soil, and plant the roots in the soil. We had five clones in total, and only two of them ended up sprouting. We watered them everyday, giving the ten to fifteen squirts of water depending on how dry the soil was. Although only two of our dandelions sprouted, it’s still pretty amazing that we were able to successfully clone a plant that had the exact same DNA and its parent


Dandelions weren’t the only plant that we cloned using asexual reproduction, we also cloned blackberries with that same process. We started with two blackberry plants, but only one of them survived. I’m not quite sure why, but it might have possibly had something to die with other the temperature in the grow box, or maybe it was a problem with how much water was given to the plant. Whatever it was, we were still lucky to have one of them survive and show significant growth. In my opinion, it was another successful experiment.


All in all, I think that this project was a great learning experience, and taught me some very useful knowledge. The picture above shows a mind map of all the key topics that I learned in this unit.


Polynomials and like terms project

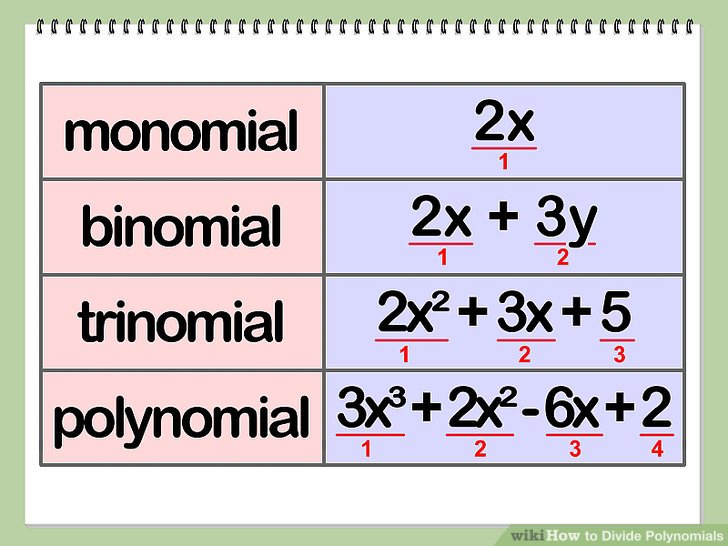
Our latest math project had revolved around the concept of polynomials, specifically like terms. Polynomials are equations with two or more terms that are separated by plus and minus symbols. For those of you who aren’t aware, the terms of an equation are the different sections of algebraic expression that are divided by symbols of addition or subtraction. An equation such as 13b only possess on term, therefore it is called a monomial. An equation like 13b+72c has two terms, and is therefore called a binomial. One with three terms is a trinomial, and anything with four or more terms is simply just called a polynomial.

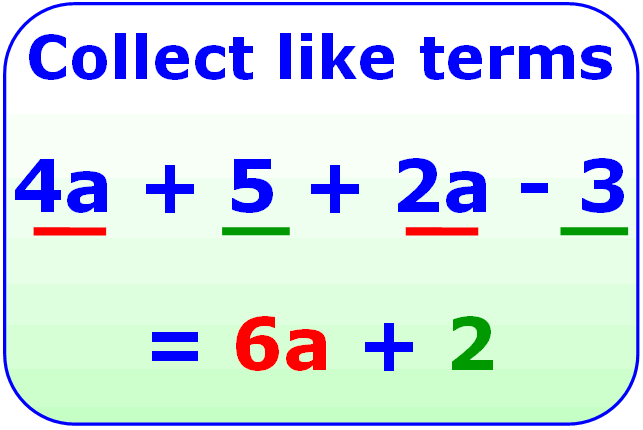
We learned a ton about the different parts of a polynomial equation. There’s the degree which is the highest power or variable in the equation, exponents which are the amount a of times a number is multiplied by itself, and the coefficient which is the number that is used to multiply the variable. Some other words that often come up when talking about polynomials are constants, the number or numbers that is on its own, has a constant value, and does not have a variable beside it. These were just some of the things we had to learn before starting our actual project. The last thing, and possibly one of the most important things we learnt about were like terms and how to combine them. Like terms are terms in an equation that have the same type of variable and can be grouped together to simplify the equation.
Using our knowledge of like terms and polynomials we had to come up with a driving question that we would base our project around.

Me and my partner Owen, came up with a driving question of How are polynomials and like terms used in the workforce. After spending many classes researching and getting information, we narrowed it down to three jobs in particular that used these se jobs were forestry, Financing, and Engineering. We took all of the information that we found and put it into a keynote. I had spent a lot of time editing and formatting this keynote to be as close to perfection as it could possibly be. In the keynote, we talked not only about how these jobs used polynomials and like terms, but also about the math concepts themselves, some polynomial language, how to combine like terms, and why they’re important.

Overall, I think that this project was a success. It helped me to better understanding the concept of polynomials as well as like terms in a way that I could more easily remember the information. It also gave me some insight into why we learn these concepts in the first place, and where we might use them later in life. Although some small changes still need to be made in order to perfect the keynote, the project itself was a fun learning experience and was an was in my opinion successful.

Chemistry, a new way of bonding

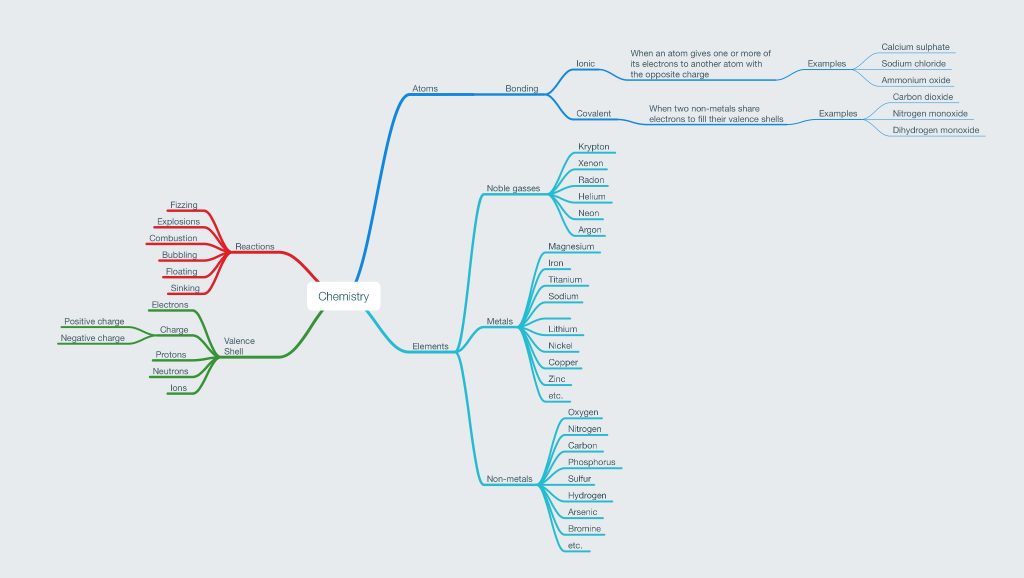
In our science class, we have currently began working on a chemistry animation video. This video had to be over three minutes, creative and personalized, and had to feature both covalent and ionic bonding. A covalent bond is when two non-metals share electrons in order to become stable, and an ionic bond is when an atom gives one or more of its electrons to another atom with the opposite charge. We had to demonstrate the steps of these bonds in our animation. Me and my partner Alivia decided to split up the work so that she would mostly work one writing the script and editing the video, and I would focus more on creating the animation itself. We started this project off by brainstorming ideas of what the story of our video could be.

After brainstorming all of our ideas and coming up with a storyline and plot, I started to think about how I wanted to approach the animation and wether that approach be stop motion, live action, drawing, etc. I ended up going with drawing because I felt that it would show more creativity and would look better that if I were to do anything else. I used an app called explain everything, drew out all of my characters and setting, and moved my characters around using different settings on this app. It took much longer than I thought to complete, but I was very proud of my end product.

Once I had completed the animation, it was just a matter of editing the clips, putting them together, and adding audio. Once we completed that, our video was finally done and ready to be presented to our peers. Underneath a copy of our finished chemistry animation.

This project has been vital to my learning of chemical bonding, atoms, and elements alike. It has shown me my strengths when it come to artists ability, and has helped me grow in the area of better managing my time. All the things I have learned not only from this project, but from this whole unit have been displayed on a mind map of my creation, marking the growth in learning from the start of the term, where I also created a mind map of everything I knew about chemistry. There was an obvious increase in the amount of knowledge I possessed on the subject that can be seen by looking at the two mind maps side by side. Underneath is a copy of both the mind maps.

The Illest Road Trip Of All Time

A new project has come about in math and it is called The Illest Road Trip Of All Time. We were offered money (imaginary money) to create our own super cool road trip of a life time. A  lot of work went into creating and planning out the most amazingly awesome road trip of all time, and the first thing I had to figure out where I was going to go. I decided that I wanted to take a long trip to somewhere tropical that I had never been to before, and ended up deciding on Costa Rica. The criteria stated that your trip had to start and end in New York City, but before I could plan out where to visit along the way, I had to figure out how much everything would cost. I was given 10,000 dollars to cover food, luggage, accommodation, transportation, and any activities that I might want to do along the way. To calculate all of these costs. I also earned a bonus 8000 dollars from a math mini challenge that my group succeeded in.

I had to pick what kind of food, lodging, and baggage I would purchase, than total up these costs. My overall baggage ended up costing 75$, and food and lodging came to 200$ per day. I then took these answers and created a total expense equation. The way I did this was by taking the cost of lodging per day (200$), multiplying it by the number of days in the trip (X), and adding the cost of baggage (75$). My equation was y= 200 X + 75, and once I figured out how many days I wanted this trip to last, I would know how much everything would cost. In my case, the cost would be 7075$ because I wanted my trip to be 35 days and 200 x 35 + 75 = 7075$.


Another thing I had to take into consideration cost wise was my transportation. I had a choice between five cars, some cheap, some expensive, but I went with the Cadillac Escalade Hybrid. The reason for this was because the car is nice and spacious, which could be useful if I needed to sleep in my car for a night. To calculate how many gallons of gas I would need for the trip I had to add the cost of the car per day to the amount of days in my trip then divide by the total gallons needed for the trip. My equation was y = 98 x 35 + 1135.96 and the answer is 4565.96$.

I took the two totals from both of my previous equations, put them on a graph, and this is what I came up with.


Next I had to plan out all the stops that I would take between New-York and Costa Rica. For each day, you are only allowed to drive for ten hours before stopping. My first stop is in Philadelphia where I will visit the Philadelphia zoo (tickets cost 17$), then stay the night at a hotel. After Philadelphia I will make a quick stop in Kingsport for gas and get back on the road. My next stop is Mississippi, and there I will visit the town of Gulfport. I’ll then go to Houston Texas and check out the Downtown Aquarium (64.51$ for a ticket) and Space Center Houston (admission is 29.95$).

After Houston, I will go to General Escobedo, which is a small town in Mexico. I’ll stay there for a night and tour around the small town. My next stop is in the middle of a highway in Mexico, and the only reason I would stop there is to sleep in my car because there aren’t any hotels around there. After that I’ll stop in a small town in Mexico called Metehuala. I will stay the night there, wandering around the town and seeing what it has to offer before I head out again to yet another small town called Soyaniquilpan de Juárez. And after Soyaniquilpan de Juárez, i will go to a town called Tres Valles and hike around there, then I will stay the night at my next destination, Chiapas. Chiapas is filled with beautiful waterfalls, dense forests, beautiful mountains, and a quaint little towns. I will explore all of this when I arrive there, and will stay there for a couple days. San Cristóbal is the next beautiful town that I will stay at and explore before I find my way to Guatemala City. When I get to Guatemala City, I will visit the Cathedral of Guatemala City, National palace, and the Pacaya Volcano. I will also take a day to wonder around the city before I leave for the next place on my list. Teguicigalpa is the capital of Honduras and I plan on stopping by to see the city and walk around befor I go to Managua, the capital city of Nicaragua. There I will visit all of its beautiful beaches and cool monuments, before I reach my Final destination of Costa Rica.

I will stay in Costa Rica for around ten days and will get a seven day tour (tour costs 749$) then will explore on my own for the remaining three days. I will take the same route I came on when traveling back to New York, except I won’t be touring around, ill just stop if I need gas, food or sleep, but that was my complete road trip.

The last portion of the project were the sponsorships. We were offered three sponsorships to choose from, Coca Cola, Pepsi, and Snapple. Each sponsorship offered money each day and we had to take this information and create an equation for each sponsorship. Underneath is a picture of the cost information of each sponsorship

For Coca Cola I found the answer by multiplying the mount of days by six, and then seeing how mush more I would have to add or subtract to get the correct cost. My equation for the Coca Cola sponsorship was Y= x6+104. Then I took my answer and tested my equation with the different amount of days and proved that my equation was correct because the costs were the same as the ones in the table. I did the same thing with the other two sponsorships and for Pepsi, the equation was Y= x10+60, and for Snapple, the equation was Y= x22-228.
I took this information and created a graph featuring how much each sponsorship would go up every five days. To find out the answers, I took the number of days and put that in place of the x in the equation. The answer to that would be the number that you would put on the graph. This is the graph that I created.

This project has inspired me to travel to these places in the future and has been a great way of enforcing the laws of linear equations in a fun and informative way.

It’s time for mPOL’s (mid-year presentations of learning)

They’re back! You may be wondering what in the world I am talking about. I’m talking about only the single most important thing in PLP history! That’s right, its student led conferences. I am prepared to share with you examples of work that I have completed this year which all reflect back to my driving question, “How am I going to progress as a learner before the end of the school year?”
I have four main PLP classes which are maker, humanities, math and science. The very first example will be a project that took place in my maker class. When referring back to past projects that I have done in this particular class, the decision of which one to talk about was not hard. I picked the Star Wars exhibition project because it was, in my opinion, the most interesting. I got to show off my creativity and love for art when hand painting my backdrop, and creating my three sculptures out of clay. It was also quite interesting to learn all about the realm of Star Wars. Keeping this in mind, there is always room for improvement. I know that even in a project like this that I enjoyed so much, I could still improve upon several things such as the décor of my station, of which could’ve been a bit more detailed, and the quality of clay that I chose; one that didn’t crack and fall apart so easily. Also, I would leave myself more time to edit and revise the written portion of my display.


Another big part of the process of making this good project great, was working with the eighth grade PLP kids in order to decorate the room and plan out the night of the exhibition. Through working with the grade eights, I realized that teamwork is really vital to the success of our projects. In order to have a team run smoothly, you have to be able to compromise when it comes to ideas, make your team members feel heard and appreciated, and definatly make sure that the whole team is in the loop about anything and everything, in regards to decisions made or even who’s bringing what.
Additionally, throughout the process of planning and building this project, I learned some valuable skills, not only about group work, but also about time management and the wonders of planning ahead. I feel that improving my pre-planning skills is an important part of helping me progress as a learner throughout the school year.
My next example is a project that was a mixture of humanities and math. This was my metaphor machines project. Although not all aspects of this project reflected my best work, I had learned from both, my successes and my challenges during the process. For the most part, I was pleasantly surprised with the direction of this project, and it reflected e skills that I had already learned, such as how to work successfully with my team members, and most importantly, how to remain calm under pressure.

In this project, however, the most improvement could have been made in the final video. While keeping in mind that this was a group project and I didn’t have complete control over the making of the video, I still know that I could’ve taken more time to revise and edit the video to fix some of the glaring mistakes (obvious to me, even if others couldn’t see them).
One skill, in particular, that that this project demonstrates that I could benefit from working on improving, is my time management. I often feel that this has a lot to do with my mindset. When a project seems initially complicated, I sometimes convince myself that it’s a lot harder than it would be if I just split up my work, and took it a little bit at a time. I feel that the first step to overcoming this challenge is to stop overthinking things, start my projects earlier, portion out my work more evenly throughout the amount of time that was given for the project and in a way that ensures I get it done on time.

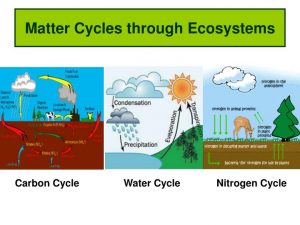
The last example a project that, much like the metaphor machines project, was for mixture of two classes, humanities and science. I found this project to be on the more difficult side. Although the research and script were fun to do, the process of creating the final video was quite overwhelming for me. This was for two reasons, I had many bad experiences in the past with the filming app that we were supposed to use, and again, I had difficulty portioning out my work time. Another helping factor to my stress during this project was the fact that I decided instead of filming regularly like most others did, I would draw out and animate my video. Note to self, it’s not as easy as you think. Although I had a great deal of struggle trying to complete this project, the learning that took place made up for that. I had learned not only about the land, climate, and wildlife of all different regions of Canada, bit I also learned a great deal on all the different matter cycles and their importance.

In this year, I have pin pointed weaknesses and developed ways to overcome them, but have also exploited my strengths and learned how to use them to my advantage. I now have a plan to overcome my time management in three parts. I will look at each major project within one to two days, ask questions if I need any clarification on anything, then not only break down the work into portions, but put it on a calendar so that there is something physically there to motivate me. I feel like this plan will help me further progress as a learner, and will be something that will not only benefit me this year, but will become a habit that will sticks with me all the way from high school, to university, and beyond.

Nothing like a TPOL (transitional presentation of learning) to end the school year

Today is the day where I give a conclusion to the year, and get to share with you the reasons why I feel I am ready to move on to grade nine. Throughout the year I have grown a lot, not just as a learner, but as a person. Through my many activities and classes i have grown confident in both myself and my work. At the beginning of the year I was more of a quiet, keep to myself kind of person. It’s only fair when you find your self at a new school that is so much different than elementary. It was a little scary at first, but now elementary school seems boring compared to the wonderful freedom of high school.

Each different class teaches me not only the concept, but how to be a more efficient and effective learner. Some examples are shown in work done from my different classes

Scimathics (science and math class): in scimathics we have done many amazing projects such as our door project, and our minecraft project. I feel that the one project that I have grown from the most would have to be my most recent exhibition. This science light exhibition required me to choose one of the many subjects to do with light. I chose the topic of bioluminescence. Within my group, all of the group members had to choose a subtopic, and I decided to choose how how bioluminescence was used underwater. Made a poster explaining all of the different functions of bioluminescence and how it was used, and I also helped with an experiment using live bioluminescence bacteria. This project helped me grow as a learner by not only showing me how to be a more confident speaker when presenting, but also taught me some good work habits like breaking up your work and knowing what you want to accomplish on what days. I very much enjoyed this project. I loved seeing the bioluminescence bacteria because they are so interesting, and I also loved sharing my knowledge with all the people that came to the exhibition and seeing how they were actually quite fascinated with what I had to say.
Humanities: humanities has been the most busy class and has given me many interesting projects such as our sales pitch, Julius Caesar body biography, and our comic. There are so many that it is hard to choose just one that I have learned the most from, I have learned a lot from them all. With that said there is one that stands out a bit more than the rest and that was my notebook about how epidemics fuelled medical advances throughout the ages. In this project, me and my group came together to answer a driving question of how epidemics fuelled medical advances and figure out how it caused tension upon the masses. We research for weeks and put our information into a note book styled keynote. I was taught in this project about team work and and how to compensate for others when they can’t be there themselves. I feel that I will need these skills in grade nine and that is why I chose this project over any others. Although during this project there were some rough patches, I still really enjoyed getting to know the people in my group and working on a topic that I was passionate about.

Maker: I have had some pretty huge projects in maker, like both the winter and the spring exhibition, but the one that I learned from the most was destination imagination (DI). DI was a project ptournament that PLP does every year. Although it was long and hard, I got through it. And I think that that is a skill in itself. I learned a lot of team building skills and even learned about how to handle disagreements in a calm fashion, I feel that this is a skill that I am going to need even beyond high school and university. I also learned a whole bunch on time management when I had to help plan out our presentation, and about being organized, because if you stuff was not organized, it would get lost, ruined or taken by accident. With all the difficulties that came with DI, there were some parts that I quite enjoyed such as venturing around the different schools that DI took place at and watching everybody else’s presentation and seeing how relieved they were when it was over.


Overall, PLP was a great experience for me and I am stoked for next year. I went through the good and the terrible, but I made it through. Not to say that there aren’t things I would have done differently. If I were to redo this year, I would’ve wrote a bit more on my learning portfolio, acted a little more calm when it came to presenting, and maybe volunteered a bit more, but these are all things I can work on for next year. That said, this year wasn’t all that bad, I learned a lot about myself and my work habits. For one, I am not very good at explain everything, but I am rather good at dissections which I would have never known unless i were in ms klausens scimathics 8 class. With all the skills I have learned this year in PLP I strongly believe that I am ready for grade nine.

Earthquake proofing with minecraft!?!

This was my Minecraft project. In the picture below, is the criteria for this project. Me and my partner Alivia, created our structure. We created this structure to replicate a west coast long house. The long house was made out of oak wood, rubber, and granite. The reason we made the structure out of oak, was because oak wood is native to the area our structure was built in(west coast). The perimeter of the bottom of the structure was 125×80. Since we needed to earthquake proof it, we added a rubber and granite base to take the seismic waves in through the rubber and the granite would dissipate it. We also added some x and y beams to direct the force of the earthquake down. this helps the building stay up and not collapse during a quake.

I learned a whole bunch in the process of this project, about both earthquakes, about engineering, and about learning how to calculate data on spread sheets. If I were to do this project again, the first thing I would change would be to add some more details and designs to, the inside of our structure, and to spend more time building the walls, instead of using it to make the squishy ground.

The next big project that I did was the door, where we had to increase the size of our classroom door by three folds. The criteria for this project is in the picture below.


I was working in a group of three with two of my class mates, Jamie and raina. Our group decided to create one big cylinder, twoAt the beginning, we were having some trouble with getting the shapes to be the right size and measurement. We eventually worked out our mistakes using some of the data from our other class mates, and hard math to figure out where we went wrong. The biggest and hardest part of this project was getting your measurements to add up to what they are supposed to, but the number on you calculator matches the one you came up with, believe me, it’s the best feeling.

In this project, I experienced how to be comfortable with being uncomfortable. Throughout the year, through many projects and assignments, I have been given some work that had a concept that I had never learned before and at first and I was uncomfortable. Anyone would be uncomfortable if they were given something that is completely new and looks complicated, it’s not abnormal, but through being in mrs Klausen’s class, I have learned to have a calm mind. To be successful in anything new, you need to be okay with the fact that you aren’t always going to know how to do things right away and your work might not be perfect, but you’ll get there!