MITOSIS VS. MEIOSIS

Hello readers, and welcome back to my blog. Today’s post is about the recent project we’ve completed in Scimatics 9. This project was called, “Meiosis models”, and was about meiosis and mitosis, and how they are similar and different. To shoo our understanding we made models, conducted experiments, and created a narrated video to show our understanding. The driving question in this project was: “How is the reproduction of cells essential to the survival of organisms?” It’s essential because if the species ceases to reproduce, the species becomes very weak and more vulnerable to extinction.

To start of this project, we created a “project start mind map”. In this map, we added our thoughts, questions, and examples.

Here’s what mine looked like:

My understanding was pretty low at the beginning, so I had a lot of questions about this topic. 

Then, to begin to build our understanding, we did a workbook. These workbooks had info about meiosis, mitosis, and how they are used everyday. This workbook helped me lots in understanding the project as a whole.

Then to test our knowledge, we did a Khan Academy quiz. It seemed that there was a lot of new content in the tests, so it took me awhile to get a good score. In the end, I got a solid 8/9.

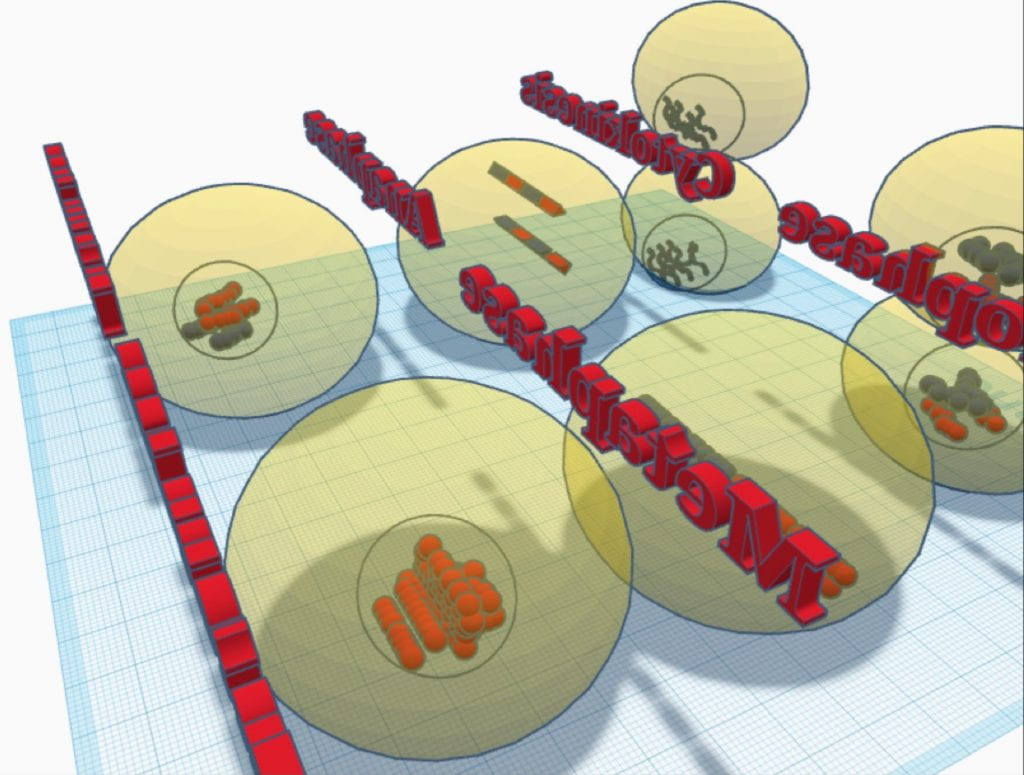
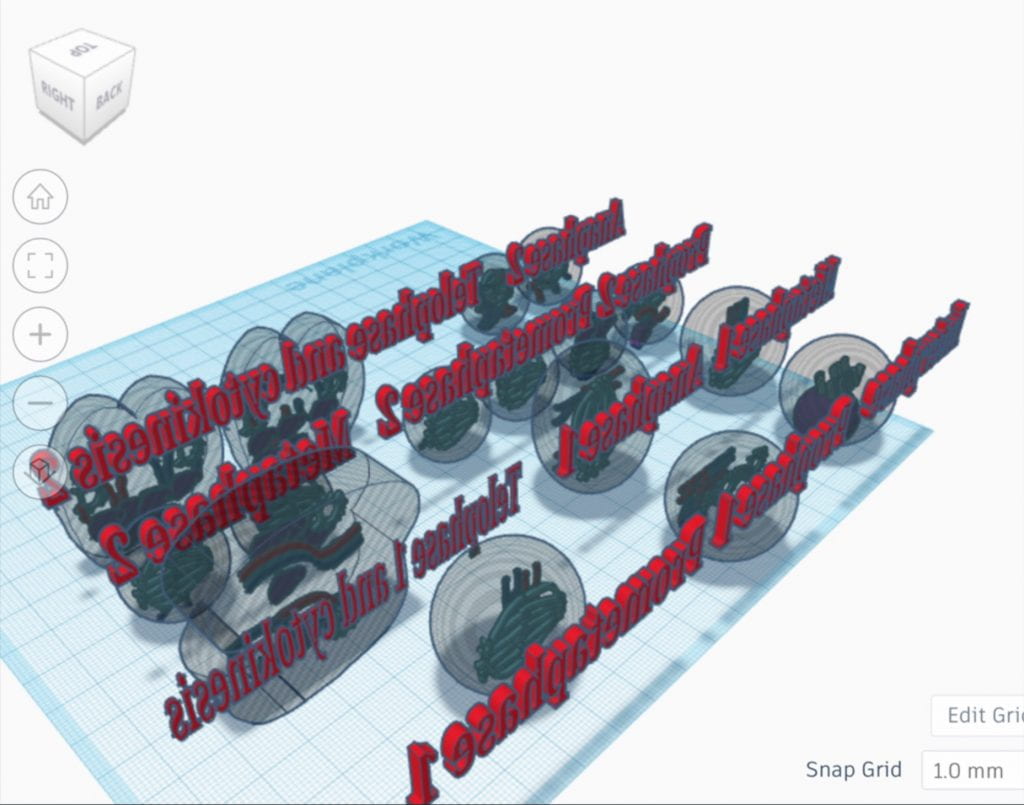
The next step was completing our Meiosis and Mitosis models.

In this milestone, we used “tinkercad”, a design software, to create these 3D models. 

Here’s my models:

Now to go over the competencies of this project:

The competencies were: Questioning and Predicting, Planning and Conducting, and Scientific Communication.


Questioning and Predicting:

I demonstrated a sophisticated understanding of this competency. I used my class time well, finished assignments early, but most of all, created really good work. There wasn’t really a tie where I was off task, but next time when I have nothing to do, I could look forward to other assignments/projects.

Planning and Conducting:

I demonstrated an extending level in this competency. At first, I didn’t understand the experiment all that well, and I made many mistakes. But, I asked others for help and eventually understood the procedure. I didn’t get the greatest of microscope results, but we later did another experiment, and I got much better results. As my first microscope experience, I think it went well, and I learned a lot.

Scientific Communication:  

I demonstrated a solid, sophisticated understanding in this competency. My video effective showed my understanding, I used good vocabulary, and effective transitions. I also used my models to explain both Meiosis and Mitosis well. My voiceovers were concise, and were synced well. 

The final step of this project was the Final narrated video. In this video, we combined our knowledge of the processes, our models, and our experiment photos to demonstrate mitosis and meiosis. I created my video in iMovie, a software that I’m pretty familiar with. 

Here’s my final video:

I’m pretty proud of my video, even though I didn’t do some things that well. For example, my final models could’ve been more detailed, and I mispronounced some words in my voiceovers.

To summarize, I learned lots about reproduction in this project. At first, I had no idea what mitosis or meiosis were, I couldn’t even pronounce them. I learned how to use a microscope, use tinkercad, and used iMovie more in this project. The toughest part of this project had to be the Khan academy test, as it really tested my knowledge. There was alot of new content, so it took me a while to understand. My favorite part of this project was making my narrated video. I always find video making a fun thing, so I put a good amount of effort into my video. 

Thanks for reading!


War to end all Wars Post

 Hello readers, and welcome back to my blog!

On this blog I write about my progress in school, and what I learn from every project.

Today’s post is about the recent project we’ve finished in humanities, “a War to end all Wars”. This project was all about World War One, which occurred from 1914-1918. The driving question in this project was: “How might we use graphic novels to understand Canada’s involvement in WW1?” We use them to learn, build ideas, and understand key topics of WW1. In this project we used a graphic novel called: “World War One”, by Alan Cowsill. We used this graphic novel to build ideas for our OWN graphic novel.

To demonstrate my learning, I’ll highlight the milestones/stepping stones that helped me answer the driving question best. 

First we had to understand cause and consequence, since it is one of the historical thinking concepts. To understand what it meant, we did a class activity. We wrote what we thought each term meant, then we shared out. 

We then started to read the graphic novel. I finished it pretty fast, since it was pretty short. I also found the storyline interesting as well. 

As a reflection for the first part of the book, we filled out a 3-2-1 chart:


 We then chose our comic topics. I chose “the battle of Vimy ridge”. I chose that as my topic because its one of the greatest Canadian moments ever, and I thought it would be cool to demonstrate. 

To develop an understanding of our topics, we filled out a “Five W’s chart”:

This chart gave us an idea of the people involved, specific dates, and why this battle began.

It really helped me in developing an understanding of my topic.


We also filled out a “story spine”. This spine was a bit of a rough outline for our comic.

Then, we started building the final product. For our final comic we had to have at least 10 panels, and have a splash panel and a open panel. We also had to have 2 characters in our story, (fictional or non-fictional). 

I then built my really rough storyboard:


As you can see, my drawing are really bad in this draft.. But I think I got my ideas out. 

I handed this in, and began my final comic.


For our final comic, we used “Comic Life”, a good app to create different comics. This app had templates to start you off, so it was pretty easy to get started. One thing I realized from this project is how long it took me to do my drawings. It took me an hour to draw my title page! Also, the story was another important aspect that was needed. 

After all those hours, I had completed my comic!

Classic


After submitting our comics, we did a peer critique activity. They said that my story was solid, I used accurate dates and times, and that my drawings were well traced. However, my drawings were a little inconsistent at times. 

I think I should’ve spent more time on my drawings and used my time better. But, I’m proud of my story.

In summation, I enjoyed learning about WW1, as I’m really interested in wars. Also, I liked making a comic, and using comic life. I learned lots about my topic (the battle of Vimy ridge), which is one of Canada’s greatest moments. I got familiar with more sketching softwares, such as Sketches Pro, and Keynote. In all, I learned lots about WW1, and I’m proud of my final comic!

Thanks for reading!

Vibrant video post

Hello readers, and welcome back to my blog.

Today’s post is about the recent post we’ve finished in Maker 9. This project is called “Vibrant Video”, and was all about video creation. During this project we learned about use of angles, sound, and we learned about movie history. We also made some movies as well. 

Firstly, we had to lay the groundwork for this project. In class, we filled out on whiteboards our knowledge of movies. We put down definitions, and examples that demonstrated our understanding of these terms. 

Here’s what my group wrote about film:

Our next task was Skill 1, think like a moviemaker. For this assignment we had to create a video that featured our hobbies. My video was about working out:


This of course was my first time really making a quality video so I was proud. I made sure to include multiple angels, and different sceneries. However, I could’ve used more effects that “clips” provided. 

The next milestone was Skill 2, Silent movie. For this skill we had to use one setting, use different angles, and use an “aged film” filter. 

Here’s my film:


I was really proud of my video in this skill. I thought the scenery in my film was good, my soundtrack was good as well. Also, I used some creative angles, and included lots of “b-roll”. In all, I thought this film was a big improvement from my previous one.

The next assignment, my favorite one for sure, was Skill 3, Tutorial video. This was a group effort, my partners were http://www.blog44.ca/tevab/, and http://www.blog44.ca/cooperk/.

We had freedom as to what our video was about, so it was pretty fun. We based our video around drinking water. However, we had to follow a strict storyboard format, which we then transferred our clips to iMovie. 

Here’s our amazing video:

As you can tell, our video was a bit ridiculous….

There were a couple of things that didn’t go all that great. For example, our edits weren’t that smooth, since that was our first time using that specific template in iMovie. Nevertheless, I thought our video was hilarious and followed the requirements well.


Furthermore, we had to do these different challenges during the project. I did the “add a song challenge”and the “play with angles” challenge.

Here’s what I created:

IMG_2368


And here’s my “playing with angles” challenge.

IMG_2414


Finally, the last skill, Special effects sequence. This was another really fun assignment, as we were allowed to use all sorts of effects. My group used lots of green screen, as we green-screened things like water, a dock, and a shark.

Here’s our vid.

As you can see, this video’s pretty funny as well. Looking back, we should’ve used more settings and more effects in our video. We also could’ve incorporated more characters.  

In summation, I learned lots of things about film during this project. I learned about angles, story boarding, and how to shoot in different settings. Also, I learned how to further use iMovie, as well as clips. I’m most proud of my silent film, as I thought I used angles well, and told a good story with a twist.


Believe in Good Post

Hello readers, and welcome back to the blog. Today’s post is about the recent project we’ve finished in Maker 9. This project was called “Believe in Good”, and was centred around the book: “7 habits of highly effective teens”, by Stephen Covey. This book suggests you ways to improve your quality of life. For example, how you handle problems, organize your life, and work with others. The driving question in this project was: “How can I be my most effective self?”. You can do this by organizing your life, working in synergy with with others, and renewing yourself regularly. 

The activities that helped us to answer the driving question were the workbook and the assessment choice board activities. 

The first understanding was the “Set-up”. This section was all about getting familiar with what the habits meant, and how to apply them. The main idea for my assessment choice board activity was “what I balance in my life”.


We also created a personal mission statement. A personal mission statement demonstrates what you want to do with your life. This statement interlocks with habits 1 and 2, be proactive and begin with the end in mind. For our our personal mission statement table, we had to include at least 5 figures that have inspired us.

Here’s my table:


The next topic that we explored was the “personal bank account”. The “PBA”, is how you feel about yourself. It’s like a savings account, you can make deposits and withdrawals with the things you say and do. So you want your PBA to have a high number.  

Here’s a picture of my PBA:

The next section that we covered was the “Public Victory”. This section is about the “relationship bank account”, which is like the PBA, but it’s about how you treat others. For my assessment choice board in this section, I created a keynote slide that had examples of deposits and withdrawals in your “RBA”. 

Here’s that slide:

The next section was “Renewal”. This section is cantered around four pieces, Mental, Physical, Social, and Spiritual. Renewal is one of the most important pieces of your life, cause if you don’t stop and look around once in a while, you’ll miss it. 

Here’s my renewal assessment choice board activity:

The next section of this project was the Final Product. 

For the final product, we created 3 pieces of learning that demonstrated our learning for each habit. We had to create one visual piece, audio, and kinesthetic piece. 

For my visual pice, I choose to create a keynote slide that listed good and bad examples of habits 3, 4, and 5. 

Here’s that piece:

For my audio piece, I did a podcast about Habits 1 and 2. I talked about how I use these habits in my life.


And finally, for my kinesthetic piece, I did a video of myself and my sister canoeing, to represent habit 6, synergy.


To summarize, learning about the 7 habits taught me many things. It taught me how to express ideas and understanding through media, and how to influence positivity into my life. When we were first assigned the 7 habits reading, I didn’t have much interest in the topic. To me at the time, it was just another book that we had to read for school. I quickly discovered that these habits really related to aspects of my life. I found that these habits could really have a positive effect on myself.