Category Archives: Individual Project

Letter to Grade 8’s

For me, grade 8 was overwhelming. Based on some of the conversations from last week, it seemed like most of you guys weren’t feeling the heat. Some of you mentioned that high school is the same as elementary, just with more classes. Or that the transition to PLP was easy since you had used iPads in Grade 7. Well I guess everyone has a different Grade 8 experience, some find things harder than others.

Here’s a quick list of concerns I had in my first year at Seycove:

1. Lockers (how the heck do they work) I still barely know how to open one.

2. Homework (finding the time to actually do it)

3. Meeting new friends (I had gone to a French immersion school and most of my friends went to Windsor)

Being a PLP student adds a whole new dimension to being in high school. For example, the program generates students from all sorts of elementary schools, far and close to Seycove. Over the years, I’ve grown closer with lots of my friends through PLP.

One place where you’ll bond the most is through field schools. The photo on the right is from our recent PLP 10 trip to DisneyWorld. It was an amazing experience where I got to know lots of my peers better. You guys have your trip to Oregon to look forward to, I’m sure that’ll be a great learning experience. Sadly cause of Covid we weren’t able to go on that trip…

There are some projects that will test you as a PLP learner. One to be mindful of is Destination Imagination, which is a highly demanding project. In this project, you have to solve solutions and work collaboratively as a group. When I did this in grade 8 I was overwhelmed, to say the least. There was a whole bunch of things we had to do, but it seemed to bring the best out of our group. We ended up winning 1st place!

https://youtu.be/vGGfAE-8Cfk

In summary, being a high school student is exciting and you have lots to look forward to! Especially being a PLP learner, there are so many new opportunities and topics to learn about. You have your first-ever field school, new and exciting projects, and a whole new community to be apart of!

Lies and Incongruences Post

Hello readers, and welcome back to the blog.

Today’s post is about the recent project we’ve been working on in PLP 10. It’s called Lies and Incongruences, and is about First Nations in Canada.  The driving question in this project was: “How can art and text reflect both the history and our current place in time?” It can do this by demonstrating the realities and truths about our society. Also, we can connect to other past events and compare and contrast our ideas. The final product for this project was a art collage, digital or physical that represented the idea of truth and reconciliation. 

For keystone 1, we were tasked with reading “the Marrow Thieves”, by Cherie Dimaline. This book is a dystopian future where all Indians are refugees from the white people. It is directly tied to the residential schools of Canada’s past. Along with keeping up with our reading, we had to do a weekly journal that contained our thoughts and ideas on the book. We also did “contributions” where we created something that embellished the theme of the past chapters. 

 Near the end of the project, we did a full reflection on the book. Here’s a link to mine: Reading Journal

In keystone 2, we began to connect art and test with one another. There were 3 parts to this milestone, History and art, Contemporary issues and art, and civil dispute and art. For each of these assignments, we had to research a topic that interested us, then create a reflection. 

(Here’s a link to each of my reflections)

Outside of the classroom, we did the “blanket activity”. The blanket exercise is a activity that teaches about colonization in Canada. The program was created in response to the 1996 report of the Royal Commission on Aboriginal Peoples, and is used as a teaching tool across Canada. This activity really opened my eyes and I made many connections.

It took lots of critique and revision to complete my pieces, it was quite the grind. But it was all worth it in the end, cause I had created quality, sophisticated work. 

Then it was time to craft our final art collage……

I chose to do mine as a physical piece of art. I based mine off the place I live, the Indian arm or “Say Nuth Khaw-yum”. Indian arm used to be a hunting ground for First Nations people many years ago, and holds deep roots in their culture.

For my draft, I cut out my poem from earlier in the project into magazine letters. I then put them on an image of the arm.

That was the first layer, I then layered a duplicate image with First Nations art on top:

This art will be part of our PLP spring exhibition, an event where we present our learning to friends and family. I can’t wait!

In summation, this project was interesting and I learned lots about Canada’s dark past. Specifically in the blanket activity I heard some shocking facts about our government and the way we treat First Nations. I actually enjoyed the reading and the plot was really interesting, it was unlike most school novels that we’ve read in the past. As for my art, I’m proud of it, and I’m hyped to show it off during the exhibition!

Thanks for reading!

Save Juno Beach Post

(Insert craft link here)

Hello readers and welcome back to Maximus the Greatest. Today’s post is about the recent project we’ve been doing in Humanities, Save Juno Beach! This project was all about the history of WWII and discussing which events are most significant and why. The driving question to this project is: “Why is it so important to preserve the Juno Beach Centre?” It’s important because it displays Canada on the world stage and tells our story. Also, it shows how we aided the war effort in France. The final product for this project was a persuasive writing piece. 

To begin this project, we learned about WWII and significant moment of the battle. We learned about Canada’s involvement, the war in Eastern Europe, and D-day. We “made” these notes in Craft, an app that is a useful tool for notes. After gathering all of this knowledge, we wrote about the 3 most significant events of WWII, I chose the Great Depression, D-day, and the rise of authoritarian leaders. 

Here’s what my keystone 1 looked like:

The next step was to understand what “rhetoric” meant, since our final product was a persuasive text on Juno Beach. It was important to have a good understanding of rhetoric to craft an effective piece. To work on this, we did a rhetorical analysis on this piece called “thanks for not killing my son”, we also did this activity in craft. For this assignment, we had to identify how pathos, ethos, and logos were all used. 

After gaining this knowledge about rhetoric, we then began to craft our first drafts of our persuasive texts. All of us were writing about Juno beach, but we had a choice on what we wanted to write about specifically. I chose to write about how the Juno Beach centre represents Canada on the world stage. Using the knowledge I had, I made my first draft, and at first I found it to be too short and not meeting the requirements. So, I made an improved second draft and I also received peer feedback from my classmates. I found the feedback to be very beneficial, as I was able to improve and make it way better. 

By the end of this whole process, I had created my final draft:Insert craft link here)

Once we were all done our drafts, we published them on a public website. The whole purpose being to educate others about the Juno Beach Centre, and emphasize it’s importance. 

In summary, this project was interesting, and I learned lots about WWII and other important  events in history. I discovered more about Canada’s importance, and how they were key in beating the Axis powers. I enjoyed writing about the Juno Beach Centre, and conveying my opinion to the public. 

Thanks for reading!

Marketing You! Post

Hi there readers, and welcome back to Maximus the Greatest. Today’s post is about the recent project we’ve been working on in PGP, which is our careers class in PLP. This project was all about marketing ourselves by creating resumes, business cards, and cover letters. The driving question was: “How can I effectively market myself to employers?”. You can do this by creating effective media that describes your values and experience. Also, by using the resources available to market yourself in the best way possible.

Starting off, we began to craft new resumes. I had already created one in the past for previous job applications, so I just built off my old one. For my new version, I used Canva as my app of choice. Canva was really helpful as it had lots of resume templates to use. To add some flair to our resumes, we added portraits, here’s what my resume looks like:

We also did an activity where we created a resume for a character of our choice. My group and I made a Dallas grey resume, and it was pretty interesting!

We then began to work on our Business cards, we used Canva to create these as well. Using these templates, I tried to create a logo that went well with the colours of my card.

Here’s the cards that I created:


The purpose of these cards were to market ourselves in positive, descriptive way. I found it to be really helpful, as it’s something I have to consider for my future career.

The next step in this project was to create an effective cover letter, or an email template. Essentially, this is a short paragraph that displays you as a person. I had previously crafted a cover letter for a job application, so I was on the right track. All I had to do was some slight adjustments and fine tuning.

For the final part of this project, we were tasked with creating “mock interviews”. These interviews had to follow the proper principles of a interview, in which 1 partner was the interviewer, and the other the interviewee. My partner in this was Zach.

At first we had an idea to make our interview “the office” themed. This meant we would emulate the same aspects of the show, meaning it would be goofy. After making a few drafts, we found that our interview was TOO goofy. The feedback that we got was that it was too off track of what the interview should look like. So we applied this feedback and made this final version:

We were proud of our work and had made it less goofy!

In summation, this project was very beneficial and was a good learning experience. I found it good to learn about things that we will implement into our future careers post-secondary. I thought the mock interviews were really fun to make, I had a good time making my office parody!

Thanks for reading!

Five Trend Videos Post

Hello readers, and welcome back to the blog. Today’s post is about s project we completed during our field school to Disneyworld. This project was called “five trend videos”, and was all about making trend Tik tok’s during our time at disney. The driving question was: “How do I make effective personal design choices?” I can do this by finding trends that coincide with my interests and passions. Also, by researching and planning out what my videos will look like.

The first “investigation” was our Personal productivity system. This was all about setting up the tools on our iPads, and using them effectively. This included organizing “things”, clearing our inbox, and setting up our calendars. This was getting us ready for Disney world, as we would have to carefully plan out our videos.

Here’s what my maker section in things looks like:

The 2nd investigation was all about researching and planning our videos. We used the web, and examples from our teachers to conduct thorough research. The requirements for our videos is that 3 had to be independent and 2 had to be “squad videos”. Here’s a link to my document of video ideas:

I tried to make my video ideas trends that were well known, and that people could relate to. I also wanted to have a mix of comedic, dramatic, and serious videos. 

The 3rd investigation for this project was to make our video prototypes. At first I was confused as to how we would do this, since our scene looked nothing like it would at Disneyworld. However, the whole purpose of this was to visualize and see what we could fix in our videos. Here’s an example of one of my prototypes: IMG_2852

We made do with the PLP classroom as our scene, and performed our great dance!

Then for the last investigation, which was making our final drafts! We arrived in Disney and we began to craft our videos. We had to make sure we were diligent with our time, and didn’t get carried away in the magic of Disney. On the first day, I filmed my first video in front of the magic kingdom castle: Just Wanna Rock dance

Here’s the rest of my completed trend videos:

Biergaten review

Blizzard Beach vlog

Disney Hotel Room Tour

Me vs. What’s playing in my AirPods

To summarize, this project was lots of fun, and I learned about video editing, and video creation. Doing this project made me realize how much effort has to be put in for these “influencers” on Tik Tok. I found that it took lots of planning, organization, and putting our plans to action while we were at Disney. Looking back, I could’ve planned things a bit better, as I sometimes found myself doing things on the fly.

Thanks for reading!


Gold digger Post

Hello readers, and welcome to my first blog post of grade 10! This year so far has been a lot different, and I’m excited to write to you guys this year!

Our first project of the year was called “gold digger”, and was all about the gold rush in BC. Specifically, the Fraser River gold rush, and the Cariboo gold rush. We started our project by establish our need to knows. We did this while watching a documentary called “Gold fever”. This doc explained gold in BC, how it was discovered, and which groups were involved. We also wrote some preliminary notes, that gives us an initial understanding of the gold rush as a whole.

Our first assignment was to create a timeline that demonstrated the events that occurred, and what changed during the BC gold rushes. We created our timelines in “Canva”, an app that is really useful for graphic design. Here’s what our timeline looked like:

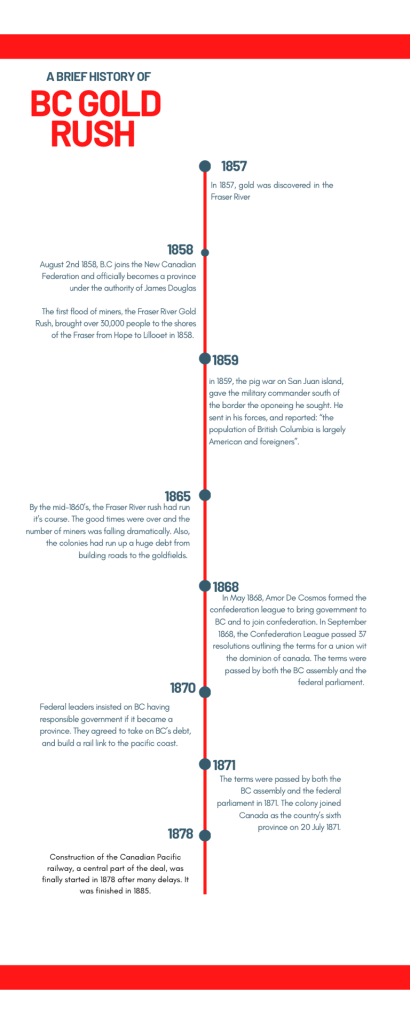
 In this timeline, we discussed the events leading up to the Fraser and Cariboo gold rushes. We also discussed confederation, and how it was affected by the gold rush.


We then learned the difference between summarizing and paraphrasing. Summarizing meaning to condense source material, still in your own words. And paraphrasing meaning putting something into your own words int he same detail as a source. We  further explored this by using “craft”, and app where you make notes instead of “taking” them.

We then began our first keystone of the project, which was a web of cause of consequences, something that we had done previously in PLP. The key question of this assignment was “How did the gold rush shape BC?” Along with filling out this sheet, we wrote a summarizing paragraph to accompany it. Here’s a photo of my completed worksheet:

The purpose of this assignment was to organize our thoughts, and understand the topic more thoroughly.

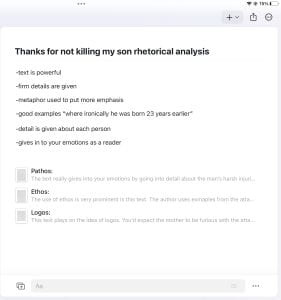
Our 2nd keystone of this project was creating our own “character cards, of the gold rush. We created them in pages, and these characters had to be fictional. To build ideas for our character, we “made” notes in craft. I was assigned “black Americans in the gold rush” as my topic. I found some good sources that explained their involvement, and I found sources that talked about significant people. 

Here’s what the app craft looks like:

After completing our notes, we had to start on our character cards. These cards had to explain the character, key details, and it had to include two “artifacts”, that described the character.

Here’s what my card looked like:

I was proud of my work, and I thought I had described the character well. This character would be important for the final product…..

Then, we began our story outline. And, surprise, the final product is a story about our assigned group of people. So my story was about black Americans in the BC gold rush. Here’s what my outline looked like:

 My story was sounding good, but I felt there was a few plot holes. I had never writen much, so all of this was new for me. 

And now for the final story. All of our note-taking and note-making had been leading up to this. To shorten it down for you guys, my story was about a man from San Francisco named Tyrese Laquavion III. He wanted to strike riches, and to make that happen he endured several expeditions, created buiseness, (with the help of others). And in the end, it all came together. 

Here’s a link to my full story:

Black Americans in the BC gold rush

As previously mentioned, I’m not much of a story teller, so this was a gruelling process for me. To get an idea of what to incorporate, I asked my sister, (who’s in PLP 12). She’s a much better author than me, so she set me on the right track. She taught me about detail, setting, and how to move from idea to idea in your writing. 

After submitting our first draft, we did some in-class peer critique. I found this to be very helpful, as everyone was insightful, and clear. I got mostly positive feedback, except for some spelling mistakes and small mistakes. So, my revision was limited as a result.

In conclusion, I enjoyed this project, as we tried out new apps, and learned about story writing. It was also cool to learn about BC history, and what happened before confederation. New concepts were explored in this project, with “note-making” as opposed to note-taking. In all, this project was great, and a good start to PLP 10.

Thanks for reading!!

First Film post

Hello readers, and welcome back to the blog. It’s been a while since I’ve posted, and a lot has happened in PLP 9. Today I’ll be talking about the project we just finished in Maker 9. This project is called “my first film”, and was all about documentaries. In the end, we created our own documentary, on a topic of interest. The driving question was: “How can I engage and entertain an audience using my video and storytelling skills?”. You can do this by using interviews, b-roll, multiple angles, and many other skills. 

To start this project off, we conducted our own interviews. We were split into groups, and we chose a topic and specific set of questions. Our topic was: “does pineapple belong on pizza?”. Over that weekend, we had to interview a family member or friend and record it. I interviewed my friend Tyler. After we each conducted an interview, we brought our clips together, and created one big video. This assignment was really helpful, cause it was our first crack at interviewing, and it tested our video making skills.

During the entirety of the project, we watched a “doc a day”. While we watched these docs, we answered questions about them. It really helped us in getting ideas for our documentaries.

Then, it was time to determine our documentary topics. We filled out this interest brief sheet, to get some ideas:

I chose to do my doc on granite falls, since I live really close to it, and it’s something I’m interested in. I focused on the falls’s history, and how its changed over the years.

Here’s a picture of granite falls:

The first step was to create our treatment and Logline. A treatment and Logline are breif descriptions that specifically explain your topic. 

Here’s what my treatment and Logline looked like:

After we completed the treatment and Logline, we created our screenplays. A screenplay breaks down each shot, and what’s in the shot. So it was an outline of what our final documentary would look like. 

Here’s what the first draft of my screenplay looked like:

My first draft was good, put it needed a few fine tunes. I needed to add more detail on how the falls are currently used, and give examples. So I got to work on my second draft:

We then created our storyboards:

In this storyboard, we started to envision our shots and what the doc would look like. We also had to include the different camera angles that we planned on using.

Now for the documentary….

We started by organizing interviews, and beginning to film our shots. It was a tough process to plan an interview, as I had to find a time that worked for me and my interviewees. But, it wasn’t that tough to organize film time, as granite falls is pretty close to my house. 

After we handed in our rough cuts, we did a peer critique activity. At that point, my doc wasn’t fully completed so most of my critique was pretty straight forward. However, I was told that I only had a middle and end, and I was missing an intro. Also, that I had to connect the topic to myself, and what the falls meant to me… 

Then I began to craft the final cut…..

I took the critique and used it to improve upon my documentary:

To summarize, I learned lots about videography and filmmaking in this project. Those skills are really important to me as a learner, since we’ll be building of these skills next year. I also really enjoyed making my documentary. It was cool to teach others about the areas around me. The toughest part in this project was the editing, it was really tough to sync everything together.

Thanks for reading!

MITOSIS VS. MEIOSIS

Hello readers, and welcome back to my blog. Today’s post is about the recent project we’ve completed in Scimatics 9. This project was called, “Meiosis models”, and was about meiosis and mitosis, and how they are similar and different. To shoo our understanding we made models, conducted experiments, and created a narrated video to show our understanding. The driving question in this project was: “How is the reproduction of cells essential to the survival of organisms?” It’s essential because if the species ceases to reproduce, the species becomes very weak and more vulnerable to extinction.

To start of this project, we created a “project start mind map”. In this map, we added our thoughts, questions, and examples.

Here’s what mine looked like:

My understanding was pretty low at the beginning, so I had a lot of questions about this topic. 

Then, to begin to build our understanding, we did a workbook. These workbooks had info about meiosis, mitosis, and how they are used everyday. This workbook helped me lots in understanding the project as a whole.

Then to test our knowledge, we did a Khan Academy quiz. It seemed that there was a lot of new content in the tests, so it took me awhile to get a good score. In the end, I got a solid 8/9.

The next step was completing our Meiosis and Mitosis models.

In this milestone, we used “tinkercad”, a design software, to create these 3D models. 

Here’s my models:

Now to go over the competencies of this project:

The competencies were: Questioning and Predicting, Planning and Conducting, and Scientific Communication.


Questioning and Predicting:

I demonstrated a sophisticated understanding of this competency. I used my class time well, finished assignments early, but most of all, created really good work. There wasn’t really a tie where I was off task, but next time when I have nothing to do, I could look forward to other assignments/projects.

Planning and Conducting:

I demonstrated an extending level in this competency. At first, I didn’t understand the experiment all that well, and I made many mistakes. But, I asked others for help and eventually understood the procedure. I didn’t get the greatest of microscope results, but we later did another experiment, and I got much better results. As my first microscope experience, I think it went well, and I learned a lot.

Scientific Communication:  

I demonstrated a solid, sophisticated understanding in this competency. My video effective showed my understanding, I used good vocabulary, and effective transitions. I also used my models to explain both Meiosis and Mitosis well. My voiceovers were concise, and were synced well. 

The final step of this project was the Final narrated video. In this video, we combined our knowledge of the processes, our models, and our experiment photos to demonstrate mitosis and meiosis. I created my video in iMovie, a software that I’m pretty familiar with. 

Here’s my final video:

I’m pretty proud of my video, even though I didn’t do some things that well. For example, my final models could’ve been more detailed, and I mispronounced some words in my voiceovers.

To summarize, I learned lots about reproduction in this project. At first, I had no idea what mitosis or meiosis were, I couldn’t even pronounce them. I learned how to use a microscope, use tinkercad, and used iMovie more in this project. The toughest part of this project had to be the Khan academy test, as it really tested my knowledge. There was alot of new content, so it took me a while to understand. My favorite part of this project was making my narrated video. I always find video making a fun thing, so I put a good amount of effort into my video. 

Thanks for reading!


Believe in Good Post

Hello readers, and welcome back to the blog. Today’s post is about the recent project we’ve finished in Maker 9. This project was called “Believe in Good”, and was centred around the book: “7 habits of highly effective teens”, by Stephen Covey. This book suggests you ways to improve your quality of life. For example, how you handle problems, organize your life, and work with others. The driving question in this project was: “How can I be my most effective self?”. You can do this by organizing your life, working in synergy with with others, and renewing yourself regularly. 

The activities that helped us to answer the driving question were the workbook and the assessment choice board activities. 

The first understanding was the “Set-up”. This section was all about getting familiar with what the habits meant, and how to apply them. The main idea for my assessment choice board activity was “what I balance in my life”.


We also created a personal mission statement. A personal mission statement demonstrates what you want to do with your life. This statement interlocks with habits 1 and 2, be proactive and begin with the end in mind. For our our personal mission statement table, we had to include at least 5 figures that have inspired us.

Here’s my table:


The next topic that we explored was the “personal bank account”. The “PBA”, is how you feel about yourself. It’s like a savings account, you can make deposits and withdrawals with the things you say and do. So you want your PBA to have a high number.  

Here’s a picture of my PBA:

The next section that we covered was the “Public Victory”. This section is about the “relationship bank account”, which is like the PBA, but it’s about how you treat others. For my assessment choice board in this section, I created a keynote slide that had examples of deposits and withdrawals in your “RBA”. 

Here’s that slide:

The next section was “Renewal”. This section is cantered around four pieces, Mental, Physical, Social, and Spiritual. Renewal is one of the most important pieces of your life, cause if you don’t stop and look around once in a while, you’ll miss it. 

Here’s my renewal assessment choice board activity:

The next section of this project was the Final Product. 

For the final product, we created 3 pieces of learning that demonstrated our learning for each habit. We had to create one visual piece, audio, and kinesthetic piece. 

For my visual pice, I choose to create a keynote slide that listed good and bad examples of habits 3, 4, and 5. 

Here’s that piece:

For my audio piece, I did a podcast about Habits 1 and 2. I talked about how I use these habits in my life.


And finally, for my kinesthetic piece, I did a video of myself and my sister canoeing, to represent habit 6, synergy.


To summarize, learning about the 7 habits taught me many things. It taught me how to express ideas and understanding through media, and how to influence positivity into my life. When we were first assigned the 7 habits reading, I didn’t have much interest in the topic. To me at the time, it was just another book that we had to read for school. I quickly discovered that these habits really related to aspects of my life. I found that these habits could really have a positive effect on myself.


Case for a Nation Post


https://www.instagram.com/p/CboK0VqJmDm/?igshid=OTE2OGRmYjI=


Hi everyone, and welcome back to my blog. 

Today’s post is about the recent project I’ve been working on, “Case for a Nation”. 

This project is all about nationalism, and the relation between events from the past, to today. 

The driving question was: “How can an understanding of nationalism of the past, help us to make sense of today?” An understanding of the past can help us to discover the reasoning behind events, who were involved, and what the effects were.

To demonstrate my learning, I’ll be highlighting the milestones/stepping stones that helped me most in answering the driving question. 

Firstly, I’ll be highlighting the Current events activity. In this activity, we had to reaserching a topic, and then relate it to nationalism. My current event choice was “the Brian Flores lawsuit”. Former NFL head coach, Brian Flores sued the NFL over racism. 

This event helped me to better understand identities and perspectives around the world. Also, to further understand the reasoning behind events. 

Here’s a picture of my current events doc:

 The keystone in this activity was “How are nationalism and identity connected?”. They’re connected because ones nationalist reveals their identity.

The second event I’d like to talk about is “the confederation simulation” activity. In this activity, each group represented a different province. My group represented Canada West. Also, in this activity, each province had to present a list of needs. We then later held the “British North America” conference. In this conference, it was revealed what each province would get/lose from the signing of this act.

This activity taught me about Canadian history, and how Canada was formed. Moreover, it taught me about about the nationalist ideas at the times. For example, the validation of power, greed, and expansion.

The keystone in this activity was “How did nationalism change BNA?”. It changed “BNA” because each province had varying terms, and needs.

The last events I’d like to mention is my “Image Curation”.

The final product in this project was an instagram post that had 3 images, and a supporting caption that explained our topic. My topic was “Lord Selkirk and the battle of seven oaks”. My partners were Theryn and Cale. 

Here’s the images that I created:

As you can see, the first image is a drawn on image, the second is a quote, and the third is an image of our choice. We first crafted our drafts, got feedback, and then applied it. The feedback that I got was to improve my quote. They said that the image in the background of my quote was too plain. I then applied this critique to my next draft, and I made it a lot better. 

This milestone was apart of the the keystone “How can I write to support an opinion?”.

You can do this by using media/tech to describe that opinion and explain them well.

Now for the Final product, the Instagram Post.

To look at my post go to the instagram account: “historicalperspectives2022”. https://www.instagram.com/historicalperspectives2022/.


In summation, I enjoyed learning about nationalism and identity. I learned that nationalism can be used positively and negatively. Also, I learned lots about my research topic, “lord Selkirk and the battle of seven oaks”. I liked how this project had writing, as well as artistic design.