The latest PLP project was all about poetry. I learned about myself, poetry, and what made the me right now. So, without further ado, here is the post.
We started this project with a cool entry event were we put together pieces of a chopped up poem and answered questions about the poem with it groups. From the very start, we knew we would be making a book of poetry, and the first assignment was to create 2 poems: a simile poem, and a metaphor poem.
The driving question for this project was “How might I construct text that shows who I am right now?” The answer to this question is almost anything! Poetry, art, writing, photography, drawing and creating all are forms of self expression that can help anyone show or learn who they are.
On the second day back, we learned about two concepts: juxtaposition, which is basically just surprising readers with two contrasting things, and comprehending poetry, in order to understand the message of the poem. Each day we got assign one or two new poems. That day, they were a found poem: creating a poem out of previously found material, and three haikus, which are poems were the lineage 5 syllables long, 7 long, then back down to 5.
On day three, not much happened we were assigned a new poem: an imagery poem. This poem is supposed to vividly describe one image.
On day 4 we were assigned a Sunday poem, a poem about the sounds of your worldview,and in class we practiced making silly sounds. (It sounds immature, I know) we were also tasked with starting to put our poems into out book.
In the last two days of this project, we were assigned three poems: an experience poem that describes an experience that shaped your worldview, a self portrait poem that describe who you are now, and a personification poem that describes what worldview is using personification. The self portrait poem can also be used to answer the driving question. And, on top of all that, we had to create and record meaning statements for all our poems and make complementary texts that go next to our poem.
After staying up very late for many days, I completed my book (which can be found below) and concluded this project. This project seemed shorter than previous ones, so this post is more snappy, but I hope you enjoyed it. Also, I feel like there was not enough time for this project, and I wish there was about 2-3 more classes in it.
Hello, and welcome to another post. Today, I am going to be talking about the latest PLP project I have done: people and the environment. The driving question for this project is: “How do people and the environment affect each other” and over the last five weeks, I have sought to answer that question. So, without further ado, here is the post.
The first thing we did was a writing activity about whether most people are protectors or destroyers of nature. For me, I almost immediately knew I thought they are destroyers. This is mine:
The end product of this project is a letter to someone important about an issue. The letter must include possible solutions to that problem, evidence of the problem, and a clear and meaningful call to action, with the intention of creating meaningful change within our province.
Throughout the project we did multiple commonlit activities to help us understand message, meaning, themes, and how to use evidence. Each commonlit consisted of a story, and then questions about the things above.
The first milestone in this project was a letter plan conference, were I pitched the idea for my letter and clarified my plan to make the product. I decided I would write to the premier of BC, Mr. John Horgan about a law that could help stop BC’s extremely large amount of forest fires. BC accounts for over three quarters of Canada’s wildfires, so I wanted to try and help. This conference went well and provided lots of much needed clarification.
The second milestone was just an accumulation of all the commonlits: hey, come on out, quiet town, the sea also rises, and Lee Sherman and the toxic bayou. And for milestone three, we were to choose one of these stories, and connect the theme of the story to the theme of our letter in a three paragraph write up. before writing, I wrote an outline for my multi paragraph writing to sort my thoughts.
And, in the 60 minutes of class time we had to write the paragraph, this is what I came up with:
If I were to do it again, I would try to connect the two themes more strongly, and try to cut down the first paragraph a ton. But, all in all, I think I did a pretty good job.
Now, just like in the last project, the milestones were kind of shuffled, so this whole time I was also writing drafts for my final letter. I wrote five drafts of my letter, which are featured below.
So, once my final letter was finished, I addressed it, put it in an envelope, and sent it off.
Thanks for reading my post! I learned a ton in this project, and will in the next one too, so stay tuned. See you in the next post, bye.
Today, I am writing a summative post about my latest, and last project of the year. This project is called Comic Cells. I learned a ton from this project, from what subsequent endocytosis is to why you shouldn’t eat rat poo. So, without further ado, here is the post.
As with all scimatics projects, we started off the project with a mind map of existing knowledge, question, sources, and anything else about the topic. Here is mine:
Project Start Mind Map
For the second milestone of the project, I created a wanted poster for a disease containing the date of discovery, how it affects cells, it’s mortality rate, and more.
Typhoid Wanted Poster
Then I started working on a storyboard to guide the making of my comic. The storyboard was a very rough guide to the comic, and some parts were not even in the final comic.
Rough Storyboard
Then I started to research a TON of facts about the virus I chose. (Hantavirus) To read more about hantavirus, veiw the sources down below. I learned a ton about cellular processes, and then started drawing pictures for my comic. I am not the best at drawing, so this was a hard task for me. However, I a very proud of the final comic, which is the namesake for this post.
And, as with all projects, there were core competencies I worked towards throughout the project. They are:
1. Questioning and predicting: Demonstrate a sustained curiosity about a scientific topic or problem of personal interest.
All class time is used for learning and creating a comic book story about cellular processes and/or diseases. I think I used almost all of my class time efficiently, but even so I still think I could’ve worked slightly faster in class and had less homework after school. But it worked out in the end, which is good.
2. Scientific communication: communicate ideas, findings, and solutions to problems using scientific language, representations, and digital technologies
Correct vocabulary and accurate diagrams are used. At least 10 interesting science vocabulary words are included in the story. I used more than ten science words in my Story, and I think my diagrams are concise and accurate at what they represent.
Evaluating: Demonstrate an understanding and appreciation of evidence
Cell/bacteria/virus characters interact in a scientific way. Symptoms and logical outcomes of the chosen disease/cellular/ body process are integrated into the story. In my story, the reaction to the virus is realistic to real-life cases, and the outcomes are on the probable side.
As you can probably tell from the title, this project was one about atoms (and molecules, Kenetic energy, etc…). We spent about three weeks learning, coding and thinking to answer the driving question for this project: how can the behaviour of matter be explained by the Kinetic Molecular theory and the Atomic theory? So, without further ado, here is the post.
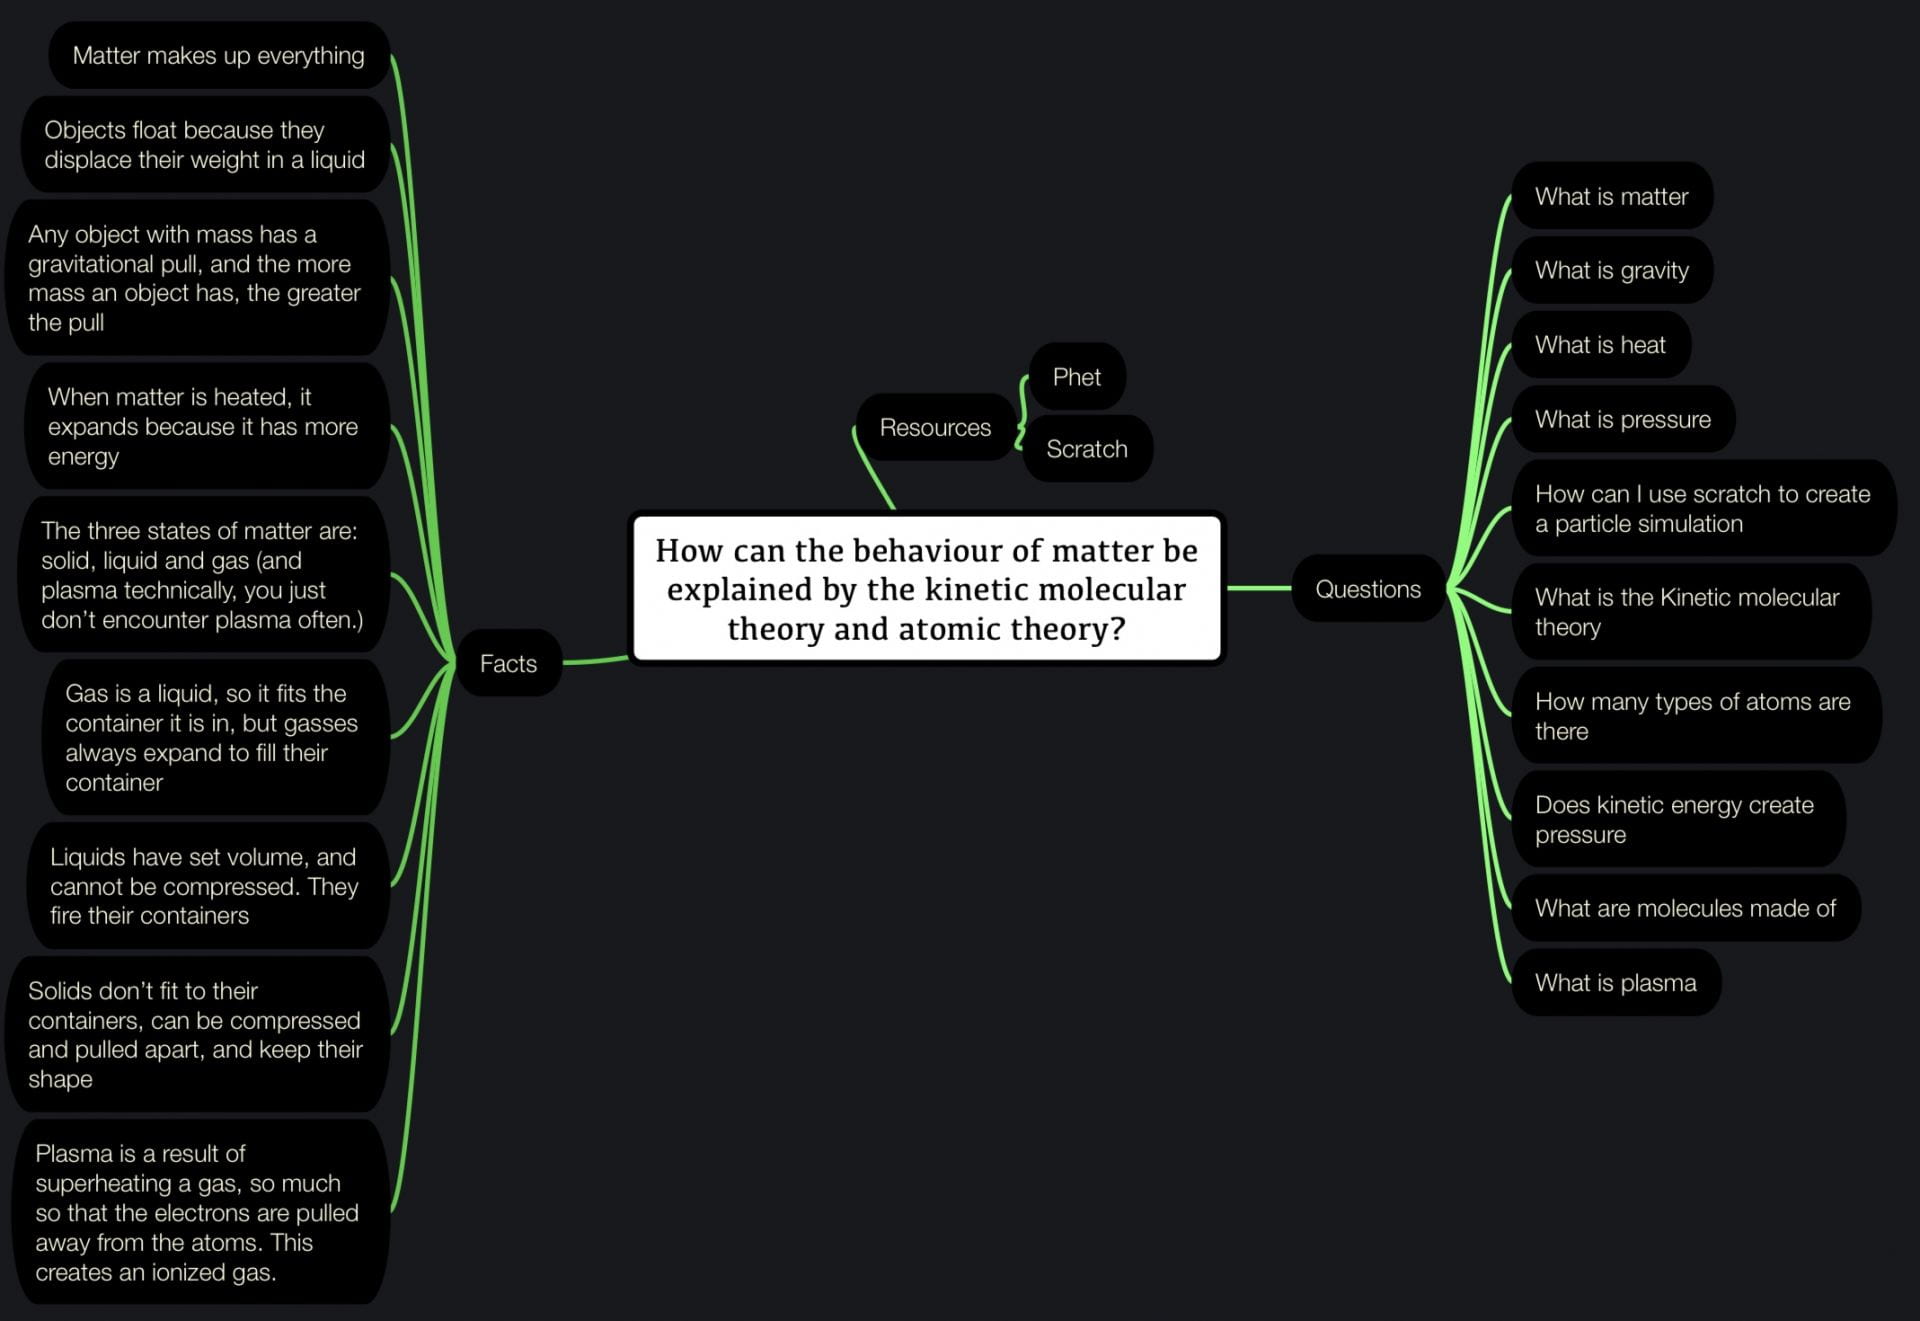
We started this project with a mind map and an experiment/magic trick. We wrote the mind map about what we already knew about matter, and then all of our questions about it.
Project start mind map
For the demonstration of atomic and molecular theory, the teacher performed a trick using a sealed bottle filled with water and an eyedropper.
The trick works by utilizing pressure. When the bottle is not squeezed, it looks like this:
Eyedropper at the top
But when the bottle is squeezed, the pressure increases, forcing the eyedropper down, and if you are subtle, it looks as if you magically made the eyedropper go down.
Squeezed bottle with the eyedropper down
One really cool activity was called the gemstone identification challenge. The whole class partnered up to measure the volume, weight, and then calculate the density of a few stones. The class average density was 3.74 grams per millemeter, and the closest density to that was that of colourless topaz, so we confirmed that the stones were colourless topaz.
Gemstone ID sheet
For milestone 2, we created accurate models for our coded project. In order to make our simulations or games follow this competency: Several different atoms/molecules, different states of matter, and particle motion are represented in the finished product. A historical model of the atom is chosen and implemented, we created some sort of model and text.
In order to create realistic and functioning models of atoms, molecules, and in my case quarks, I worked on three slides of information and graphics. It took three other versions to create to the one shown below.
The next week was mostly spent learning more about matter and coding or refining our scratch projects. Then we did milestone four, which was a coding plan for the rest of the project. This was my milestone four coding plan:
Features: Press space to show Bohr models Press M to mute music Press N to unmute music Press Q to create more clones Press 1-3 to change molecule type Gravity that can be turned on and off Click the reset button to reset the simulation Use the temperature slider to change how fast the particles move. Setting the temperature to zero will stop the particles from moving, other than gravity acting on them. You can create different states of matter by adjusting the temperature and gravity. you can adjust how much gravity there is. You can move between subatomic particle models, Bohr models, and no models by pressing space bar twice This kinetic molecular theory is included in the simulation when the particles move. They follow the Kinetic molecular theory.
After creating a plan, I continued coding my scratch project until it was completely done and polished. If you want to check out my simulator, click here. After all was said and done, I created a summative mind map of the project, which helped round of the end of the project.
As with all projects, there were curricular competencies which you can see below:
Questioning and Predicting: Demonstrate a sustained curiosity about a scientific topic or problem of personal interest.
All class time is used efficiently for learning without distractions. I used all my class time efficiently, and I am very proud of my final product.
Scientific Communication: communicate ideas, findings, and solutions to problems using scientific language, representations, and digital technologies.
Several different atoms/ molecules, different states of matter, and particle motion are represented in the finished product. A historical model of the atom is chosen and implemented. I have three different molecule designs: H2O (water), carbon dioxide (CO2), and ozone (O3). I also have three Bohr models of the elements: carbon, hydrogen, and oxygen, And finally two subatomic models of protons and neutrons.
Reasoning and Analyzing: Use logic and patterns (including coding) to solve puzzles and play games.
An interactive Scratch coded matter simulator or game is created with logical conditions and functional user controls. I created a simulator with four variables that the player/user can change, and extra aesthetic changes as well. The user can change limits all the variables, and the layout is logical and easy to use.
Thanks for reading my post! I had a great time doing this project, and i am sure to do more, so stay tuned .Even though I have featured it already, just in case, here is the link to my scratch matter simulator. Thanks to my friend Noah for all the coding help and feedback. If you want to check out his blog, click here. See you in the next post!