Destination: Imagination!

Hello everyone and welcome back to my blog! This post will be an introduction to what Destination Imagination is and everything we are doing in it this year.

first of all, what in the heck is destination imagination? Destination imagination is a yearly event that includes multiple different groups, all with different topics, where students have to create something (that something depends on the group they are in). That thing is then presented to a group of judges and the end goal is to beat the other schools.


the group I am in is called “up close”, and is based on microscopy. The something that my group had to create and present was a play acted out by us. It had to be set in a micro-world, and there had to be a mysterious object of some sort that appeared at any moment during the play. We also had a budget of 150 dollars to spend on props, costumes and other what nots.

unfortunately, I am not aloud to tell anything in this blog post about our ideas or script, due to the rule of DI that states “if an idea is shown to a different team/group, that idea is now unusable”.

The next part of DI is instant challenges. Instant challenges are challenges where you have limited time to build/create something in a certain amount of time with specific resources. I can’t find any photos of instant challenges, so see you next time!


mPOLs: the magic of learning

This post will be a summary of everything that I have learned this semester. I will be starting with the maker subject.

to start, I have to say that maker has been one of my favourite subjects this year. I had so much fun learning about photos, drawings, and becoming a PLP learner at the start of the year. I learned different techniques to use with my apple pencil when drawing, different angles in which I can take a photo to express emotion, and how to use keynote to the best of it’s ability.

You can learn about the different art pieces I created in this blog post

it showcases almost all of what I learned about art and drawings in that post, so I highly recommend looking at it. There will be a summary of what I learned in that post, but it won’t be as detailed as the other one.

The first thing that we explored was using pressure with our apple pencils. We learned how to create bubble letters and express ourselves through that. We learned about how we can use different textures and add pressure to give depth and emotion to our drawings. An example of my leaning here is my word bubble art.

In this example I showed how I can use shapes, words, and lines to express what I am thinking and how I am feeling. I used different pressure settings to colour and shade the letters.

In this project, we also learned how we could jot down our feelings through doodling and art. We learned about how different fonts can send different messages, and how to keep a story engaging while also being able to learn from it.

that was a few examples of my learning in this area, now let’s move on to the second part of this project: photos, A.K.A, Herzog. Here is the blog post for that topic.

in this area we were taught how to express emotion through angles and editing. We learned how to make an interesting and expressive photo, and how to add to it to make it more expressive.

some of the examples of my learning in Herzog are these photos that I took:

These are some angle photos I took with my partner in this project.

Next I’ll talk about scimatics. This semester in scimatics we learned all about lasers and tectonic plates. We learned about this through creative ways, like a laser display or a board game. For the math component, we focused on fractions and the Pythagorean theorem. Here are some things I created for scimatics this year.

This is a picture I took of my laser display for our laser project. Our theme was ghostbusters.

These are the game rules for my board game. The purpose of this was to learn about tectonic plates.

next I’m going to be talking about my humanities subject. Along with Maker, Humanities was probably my second favourite subject that I had this semester. We learned and built knowledge about acting, poems, and advertising. Throughout all these projects I think I learned a lot.

In our acting (Tableau) project was really fun and very interesting. This project was where I first learned about world view and how interesting it was. We read and watched The Outsiders by S.E. Hinton to try and get a grasp on the subject, and it worked. We saw through their eyes and how the characters saw stuff. When we finished reading the book and after we watched the movie, we planned out an event that was to be held at the winter exhibition. We were going to present a series of tableau’s, each one showcasing a different scene from the outsiders.

This is a panorama of us setting up our tableau

This is us presenting it.

next up, and my most favourite project thus far, has to be the poetry project. I really didn’t think writing and learning about poetry would be very fun, but I genuinely enjoyed it quite a bit. We learned about many different poetry terms, here is my list off terms:

We used all of these to help build our knowledge. At the end of the project we held a coffee house to show off our poetic skills!

the last project I will be talking about today is the first one we did in humanities the whole year: our advertising project.

this project was really fun, and now that I’ve done it I am able to recognize all the different methods of advertising when I watch YouTube or a TV show.

for this project, we were supposed to create an ad poster for a real business in the cove. Here is my individual ad poster:

This was my final draft. It was a lot more simplified than the others that I created, you can find them on this blog post.

And that’s it! A rough explanation of everything I was able to learn this year. It was very exciting and interesting and I cannot wait to see what PLP has in store for me next.

Moments Frozen In Time

This blog post is on one of my school projects, which was about taking photos in order to express creative communication. We did multiple activities to build knowledge and learn how to express emotions through moments frozen in time.

(Model is Mackenzie)

The first activity we participated in was an introduction to angles and how we can use them in a photo to give off a certain emotion or feeling. Four of the angles that we learned about (and the ones showcased above) were side view, birds eye, close up, and long shot.

In order to capture a side view angle photo, position your model so that you can see the side of their head and body (as shown above) a side view photo can symbolize many things when given the right context.

the next angle is a birds eye view angle. To capture a birds eye view photo, position your camera above your model in some way. My birds eye view photo wasn’t the best example, so here are some others

Birds eye view photos are good for making things feel smaller.

the 3rd angle I am writing about today in this post is the “close up” angle. This angle is good for getting in the moment or capturing someone’s features. To create a close up-style photo, position your model so that you are all up in their face. Then you can capture the moment.

the 4th and final angle we learned about was the long shot angle. This angle shows a subject (your model) standing well far away from the camera. To capture a long shot, position your model somewhere, take your camera and walk far away from them. They can move themselves to stand in whatever position you want them too, and when the shot looks good, create your photo.

The 2021 Winter Exhibition

At my first PLP winter exhibition, I was nervous for how it might go, but in the end I think my group did very well on our Outsiders-themed tableau. Here is my overview and explanation of what happened.

First off, what is a Tableau? A tableau is kind of like a freeze frame. To start off a Tableau, the actors will get on stage and perform a short and usually silent skit to give context for the Tableau. Professionals sometimes don’t even use a beginning skit. 

The tableau’s that the PLP team performed were based off of different scenes from a very famous book called ‘The Outsiders.’ Our Tableau’s scene was the drive in scene, the characters included were Marcia (Caden), Cherry (Frankie), Johnny (me), Pony (Ronan), Two-bit (Kadin), and Bob (Tom).

We set up our environment  using black sheets to cover up bookshelves and various props.

Here are some photos of us doing that

(Our concession stand prop being set up)


(The cineplex sign) 

(A panorama of us setting up)

Some things that could have been done better/more efficiently could have been how long our introductory skit was. It was much longer than most of the other skits that other groups did. Another thing that we can learn from and improve upon for next time was our ability to convey specific emotions. Though it was good at the beginning, I believe it drastically improved the further we got into the exhibition. One thing I wish we had done better was our set design. Though I did quite enjoy the way it turned out, I still wish we had had more fun with the set design

The Wonderful World of Carr

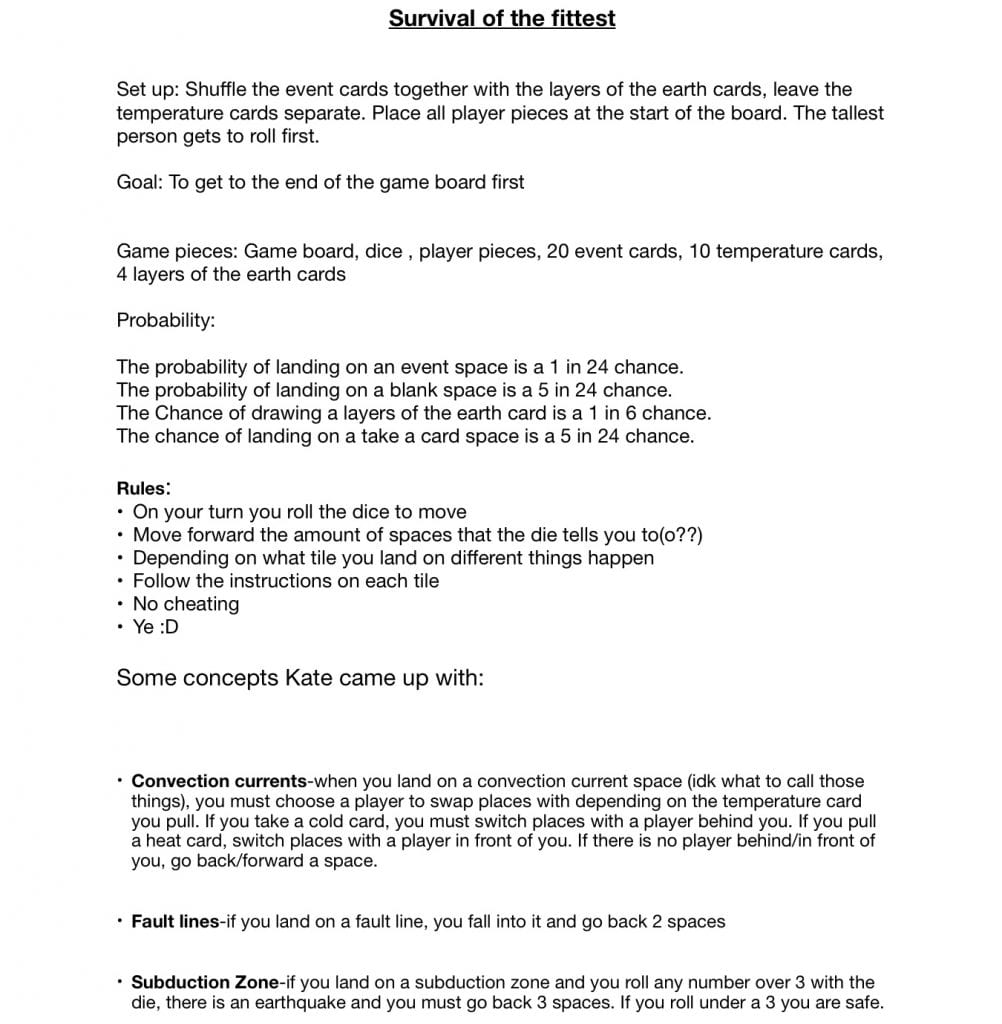
This project we are working on currently was supposed to teach us about how we can construct creative communication, hence the name, Constructing Creative Communication.

So far, I’ve been in the Carr group, in which we were supposed to become a new age Emily Carr, and put ourselves in her shoes to draw, paint and create using the power of a pencil, or more specifically, the power of an Apple Pencil. We created various different drawings, explored shading, texturing, and creating 3d shapes. We imagined our Ideas onto paper using apps and tools like our pencils and Sketches Pro. We explored using Colour, how we can make colours pop, and experience first hand a whole new world of creativity. As we dive into the wonderful world of Carr, we will reflect on shading, colouring, 3d, texture, composition, exploring our ideas, and finally we will put of our newly learned skills to the test and see how much our drawings have improved.

The first thing that we explored was using pressure with our apple pencils, we did this by increasing pressure on our iPads with the pencil, causing the size of whatever brush we were using to increase. We used this mechanic to convey emotion. Thicker lines in a certain style could seem angry, while softer looking lines couldconvey a sense of solemnity, or calmness.

Using this mechanic, we created block letters too express ourselves with. 

Our block letters were meant to show our interests, and express the things that we like, or things that are symbolic to our personalities.

My block letters here are already showing whoever is looking at them that art and creativity are some of my values. Another thing about this that is obvious is the Nonbinary flag showing on the “t”. 

Though some of these aspects about me are obvious, some are more abstract, like the squiggly lines that symbolize how I am a bit of a dense and complicated person. Or the lines going in any and every direction, which symbolize that my brain is usually either in the clouds or all overthe place.

The second idea that was investigated was doodling. We learned about how doodling is a very powerful tool that some of the smartest people on this earth use or have used, and we learned how we can use doodling in the educational way that I am talking about right now, AKA: sketch noting. In my opinion, sketch noting is very engaging and useful. It isn’t hard to do, and makes remembering things like lectures or ideas so much easier. We were told to create a sketch note on 1 of 3 topics. We could either do one on a TED talk that talked about the advantages of doodling, a day in your life, or a book summary. My doodle note was about the TED talk, and gave a brief explanation on the topic and what it was talking about.

This sketch note is lacking in organization, but it succeeds in using images, different text sizes, and unique fonts to explain the topic.

It mentions the topics used in the TED talk, and has a few quotes from it.

It explains the main idea, which is that doodling has been perceived and wrong or bad for a long time, but in reality doodling can help you retain info with ease, and gives you new inspiration and ideas.

I also created a doodle/sketch note that showcases different images and fonts that could be used in a sketch note. 

The next topic we reviewed revolved mainly around different means and methods of shading to make a drawing more realistic, and make it seem 3d. We experimented with light sources, and drawing 3d shapes. We practiced shading and using different methods, like cross hatching, hatching, smudging and cel shading to make objects seem 3d. We started by creating a value scale, which if you didn’t know, is a scale of light to dark. It helps artists with shading so that they know which shade to use for whatever part of the shape they are drawing.

(I drew this)

The next exercise we did for this activity was to “build a bot”, in which we used our newfound understanding of 3d shapes to create a robot that featured various 3d shapes, including one of the types of shading that we learned about.

I gave my robot some very bright colours, and plenty of arm joints. I like his face and head especially.:] i don’t have a name for it yet, but i assure you that i will definitely come up with one eventually. 

I have decided I will name him grass. His feet mow lawns. (I’m writing this at 11:46, my brain is beginning to derail.)

We also learned how we can use perspective to show an object in different ways, and have it represent something different from a different angle. We were told to create a practice perspective drawing, and we learned how and where to draw things into the foreground, background and middle ground. We also learned how to position things on the horizon line/vanishing point, and we learned a method for drawing tiles and not having them look funky and ruining the realistic atmosphere. The way to draw tiles would be to create lines leading up to the vanishing point (like floor boards), and then making diagonal lines to one of the sides, coming off from where the floorboards were started. After that, draw horizontal lines where the vertical and diagonal lines meet, and it should end up looking something like this.

This is the final drawing I did. It includes color in the shading and plenty of 3d objects. Here is a slideshow of my progress with it.

This is the conclusion too my blog post, mainly because it’s 12 in the morning and I should go to sleep. It’s time to put the chalk down for tonight. See you all some time in my next post, peace out ✌️😵‍💫

Scimatics Tectonic Plates

How does the movement of Earth’s tectonic plates cause observable changes and effects?

This was the driving question for our latest project, where we had to learn about tectonic plates and create a game revolving around them.

I was in a group with Mackenzie and Francis. Our board game had multiple concepts revolving around tectonic plates. Our rules here will explain all of them to you: 


From this project, I learned how to present a board game and I learned about many of the concepts surrounding the theory of plate tectonics. Before this project, I didn’t know anything about subduction or fault lines or anything in between. This project has helped to strengthen my leadership skills and improved my ability to work in a group. I learned to be able to spread out work evenly when working on a group project, and built my knowledge on plate tectonics. I had a lot of fun designing the game board and rules and also being able to play other peoples games. Out of all the games I got to play, the most entertaining one for me was the game made by [KEENAN] and [CAMERON].

Medium is The Message

*~~~*

Welcome to my blog!

In this project, we were told to research and learn all we could about advertising, and conclude by creating an advertisement of our own to present to a real business. We had an interview with the business owner we were working with, and found out what they wanted for the ad. We talked to a professional on advertising, who gave us some tips and ideas on what we could do for our advertisements to make them look professional and eye-catching. We came up with multiple drafts, and eventually created one final group ad to send off to the businesses, with the hopes of getting it put up on a bus stop sign.

We were told too make ads for local businesses in The Cove, and my business that I was assigned was Covert Cafe. In this project, I struggled with extending my effort and trying my best, some items came in incomplete, while others were not handed in at all. I learned to examine advertisements online more carefully, and recognize the advertising techniques that are used in whatever I am looking at and analyze them thoughtfully. I also learned to understand advertising and appreciate it more than I ever would have without doing this project.

I created a slideshow showing all of my drafts for the ad I created, here it is:

  • In this draft I added the covert logo for the text
  • In this draft I added an image of covert for the background
  • This is my final draft. It is much more simplified than the others

I liked my final draft because it was simplistic, but also showcased a lot about Covert in a small image. It included the Covert website at the bottom of the page, and a cinnamon bun directly at the top. It had a picture that my group members took of the inside of the cafe.

Overall, I think I reached a developing level with this project. I agree with my teachers on the fact that I was capable of reaching an accomplished learning level, but I didn’t.

Sincerely, the owner of this blog post, Kate (JASPER) :]