⚔️IT’S REVOLUTION TIME!⚔️

Hello! And welcome back to yet another blog post. But don’t worry there’s lots more to come. Now this project my class did was a very long and very time consuming one. Yes, my class did learn about the French, American, Russian revolutions and one we got to choose on our own. And I can not say this enough but this was a very long project that was kinda stressful at points. But then again what PLP project isn’t. I’m kidding (no I’m really not kidding though) this project was very  fun and I really enjoyed it. For each revolution we learned about we had to create a video. There were five different types of videos we could create. John Green, Act it out, Explain Everything and Song/Rap. So everyone was put into groups of four. My group was Malaika, Gabe, and Owen. I think my group worked pretty well together, but I do wish we could have worked better on our communication and time management. Okay so anyway, let’s jump right into the first revolution!


The French Revolution ~ The first revolution we learned about was the French. My group decided we would do the song/rap video first. The first step to making this video was of course learn about the revolution itself. The second step is planning how you are going to put all the information you just learnt into a four minute video. This was pretty difficult, but we had some great tools to help us out. There were three tools we had to complete to successfully complete the video. 

Tool #1 Screenplay. A screenplay is basically a script with much more detail about where the cast/crew will be at what par of each scene. My group took a bit of time to get a hang of this, but after we figured out how to do it and understood how important it was, we quickly got on top of it. Now for out screenplay it was part script part directions. Yes, a screenplay is VERY important when trying to create a movie or video. My group relied of the screenplay very much and it helped us out a lot. I think the screenplay is so crucial because without it you pretty much have nothing planned out and would have to just wing it. So yes even though took quite a lot of thought and time, we wouldn’t be able to create this video with out it. 

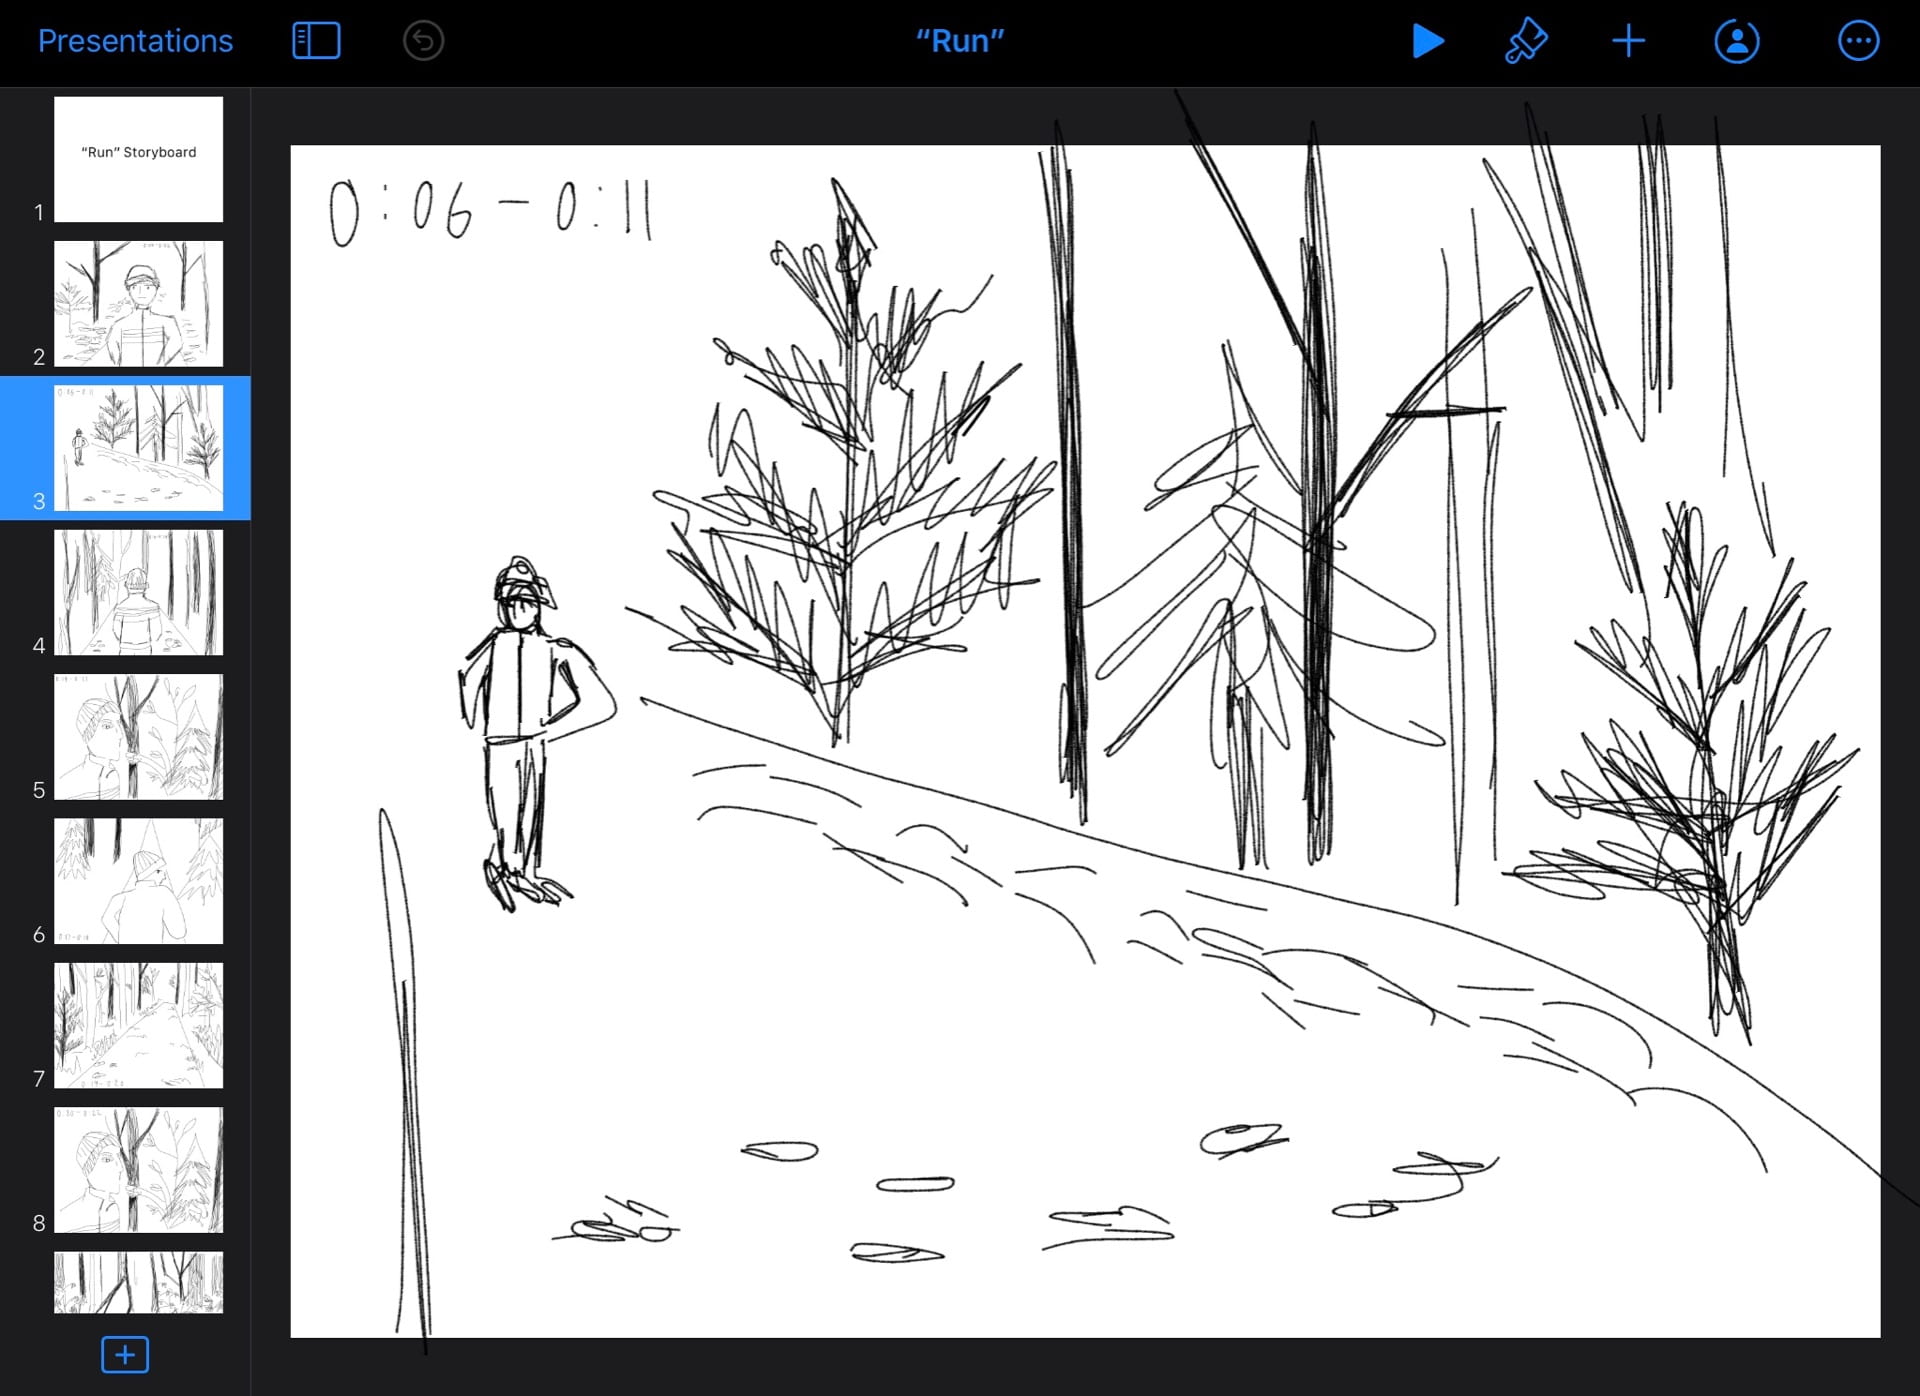
Tool #2 Storyboard. Now a storyboard is a small presentation, I guess you could say. Well for our case we created a certain amount of drawings and animated them to show how each scene of our video would go. Our storyboard was pretty helpful and did help us a bit with the idea of where we would film and how each scene would go.

Tool #3 Call-sheet. So a call-sheet is a document that has all of the crew/cast’s information. It also includes what days everyone is free to film and where each shoot will will be taken. This is definitely important to making our video because without that information we can’t film. And would get behind on everything. And just be a whole mess.

I’m conclusion I think this video was a great first try. My group did pretty well with communicating. But I do wish we were a bit better at that. And we accomplished everything that needed to be done. So yes I think my group very well on this video.


The American Revolution ~ The second revolution we learnt about was the American revolution. We decided to do the Act it out style video. This one turned out very well I think. But again I wish we were better at communication and time management.

Tool #1 Screenplay. Our screenplay for this video was a bit rusty. We were a little stressed with other work that we lost track of time and ended up having to do it last minute. Which was not helpful and made filming very difficult. We did manage to pull it all together in the end, but it took some time.

Tool #2 Storyboard. Now our storyboard on the other hand was pretty good. This definitely helped us through filming. If we to do this again (and I know we will) I would try to work on being a bit more descriptive through our drawings.

Tool # 3 Call-sheet. Yes of course the call-sheet is very important. It does help us with knowing when we are filming and knowing where.

In conclusion I think this was one of our best videos out of the four because we worked together in the tough times and ended up creating an awesome video.


The Russian Revolution ~ The third revolution we learnt about was the Russian revolution. For this revolution we chose to do the Explain Everything video type. This one was definitely the hardest because well first it’s all just animations and my group wasn’t very good at that. It was easy to do the drawing part but when it came to the actual animation part it was very difficult for us. If we were to do more videos with animations I would like to learn more about them.

Tool #1 Screenplay. You know what the screenplay is. We used this screenplay for our script and what type of drawing/animation we would create. 

Tool #2 Storyboard. For this revolution we did not do a storyboard because with the type of video we were doing it would just be the same thing but as a very rough draft. Which would be fine but since this style video was so difficult we needed as much time as we could to put towards our animations.

Tool #3 Call-sheet. Pretty self explanatory, you should know by now what it is. But we used this for our communication. We did get better at our communication which trust me is so so so important. 

In conclusion i think my group did okay with this video but it was pretty new for us even though we had worked with animations before we were very rusty and probably could have used a refresher. But anyway I think this was a good attempt at this style of video.


Our Choice Revolution ~ And for our final revolution my group decided to do the French Revolution once again because we knew the most about the French and we knew we could do better then our first because we had now done three videos and have more experience.

Tool #1 Screenplay. Now since this was our last video about revolutions we wanted to really succeed and do our best. So we took this one very seriously. We were focused and got everything done on time. So our screenplay was done very well and it helped us out so much.

Tool #2 Storyboard. Now for our storyboard we did a rough drawing of how each scene would go. This did change later on as we realized that we wanted to change how our video went. Everything did work out, even with the big change in the middle.

Tool #3 Call-sheet. This call-sheet was very important. We to have this done early because something we struggled with in the past was time management. This was been very difficult for my group and we knew it was because we did not get the first steps done in time to plan out and film our video. Now that we know we will be more prepared and stay on top of things.

In conclusion I think this was our best video, yes there were so rough spots but we figured it out and successfully accomplished this revolution project. I think me and my whole group did well with all of our videos. And we definitely learnt a whole lot about pre-production and post-production (if you don’t know what that is, I did a big explanation about that in my other blog post called i don’t like anything horror)


And finally it’s time to answer the driving question. How do ideas drive change? Well I think idea drive change because everyone is always coming up with amazing ideas. Some people take those ideas and create something out of it. Others don’t, instead they chose to keep them to their selfs. Which is okay. But for the people who decided they wanted to do something with their idea and put it to good use. That’s how ideas drive change. There are so many amazing things in our world that started from just a simple idea. But those people knew they wanted to make a change, so they took their idea and made it an reality. Without these people who are brave and know that even if their idea is a small one, it still makes a big change to your life and to other people’s life that are all around you. So don’t be afraid to share your ideas I bet it would come in handy at some point.


– Emily ✌️

😎Emojis😎

Hello peoples! Welcome back to another SBC post! This week’s challenge is EMOJIS! This was a fun challenge and it was pretty. There were a couple of things we got to choose to do so I did emoji math and emoji art.

~ Emoji Math ~

☀️ + ☀️ = 20

☀️ + 🌧 = 65

☀️ + 🌧 + 🌈 =  165

☀️ + 🌧 + 🌈 +❄️ = 1,168


~ Emoji Art ~

This is my emoji art that I created. Hope you like this very short easy blog post.


– Emily ✌️

🎵Music🎵

Hello peoples! And welcome back to my amazing blog! Sorry that was cringy, let’s try that’s again. Hey everyone! Today I’m gonna talk about music, since it is week 5 of the student blogging challenge. (okay that was better I guess) Anyway if you guys do not know what the blogging challenge is you should definitely go check out my other SBC (student blogging challenge)blog posts to learn more.


So music, music is amazing I love it so much. I have played quite a few instruments. Such as recorder, flute, guitar and ukulele. But ukulele is by far my favourite. Where do I start. I know first I’ll talk about why I started playing ukulele in the beginning. So about two years ago is really when I started. But before I did I was playing guitar, I do still play it but not as much as I used to. I knew that I wanted to play a different instrument but I wasn’t sure which one, so I continued to play guitar (which I had no problem with I just wanted to try something new). Then I heard about my friend who had just stated to play ukulele and I thought that was so cool and that I wanted to learn how to play it too. So we were looking for a ukulele for me but they were all very expensive, lucky for me we had an old one from when I was little. No it wasn’t in great shape but that wasn’t gonna stop me from learning how to play it. So we got it fixed up a bit and at first I would just look up songs that I wanted to learn on YouTube and just teach myself. But it was a little difficult so I asked my parents to put me in ukulele lessons. They did and I got to do them with my best friend who I had introduced me to the ukulele. Things were going great, I had a great teacher and I was learning a lot of different songs and chords. Now when someone says that sentence it kinda sounds like something bad is gonna happen. Nothing did it only got better. As time went on my ukulele started to break and it wasn’t really working. So I begged my parents for a new one. And I am so grateful they did.


I got my new ukulele which I love so much! After all my lessons were over I decided that I knew enough that I could continue by teaching myself. There are quite a few songs that I learnt just from watch a single video. The ones I learnt from YouTube are I’m Yours by Jason Mraz, Riptide by Vance Joy, Over the Rainbow by Israel Kamakawiwo’ole, Lava by Kuana Torres Kahele, Lost Boy by Ruth B. and Hey There Delilah. My favourite to play is definitely Hey There Delilah. I love this song so much plus it is my favourite song ever! I’m not sure what it is about it but just hearing it makes me happy and brings back great memories. So like I’ve said I love ukulele so much and I hope that I can keep with it till I’m older. I do try to play it everyday but I only end up playing three or four times a week. That’s okay but my is to play it more often so I can get better. I I hope you guys liked hearing about my journey with ukulele. And I would love to hear about any of the instruments you play or if you know the same songs as me.

– Emily ✌️

🎉Celebrations and Traditions🎉

HEY GUYS! Hellooo if you’re new here you should definitely go check out my other SBC (student blogging challenge) blog posts and learn more about it. Anyway this weeks blogging challenge we had to make a post on our celebrations and traditions we do all year, with your family, etc. So I decided to chose everyone in my family’s birthday. I decided to chose everyone in my family’s birthday because for my family it’s a big this we do. So what we will do is who’s ever’s birthday it is we will let them chose what we will have for brunch that morning and where we would go and what we would have for dinner. But I’m lucky because my whole family all lives pretty close(as in one hour away at most) but we always send as much time together as possible. Sometimes it’s annoying but sometimes it nice having them around (I’m kidding it’s always nice to have them around). Everyone’s family has very different traditions so if you have one that’s very unique and special, comment below and let me know what it is. I love hearing about you guys!


– Emily ✌️

😰I don’t like anything horror😰

Welcome back! Today I’m gong to talk about our project called RUN! Now in my class right now we are learning about video skills. So to work on this we needed to recreate a short film called RUN! This project was very fun and we learnt many things. So pretty much this video we had to recreate was a short horror movie. When I say short I mean 1 minute long. Now my group had to recreate this movie to be exactly the same. I’m not sure if we did it to match it one hundred percent but it was pretty close. If you want to watch the original video it will be right below. 

So before we started filming there was a couple things we needed to finish first. In my class we call these little projects that help us get to our goal, milestones so when I say milestone 1 it’s just one tiny project that helped us finish our video. We had 5 milestones that we needed to complete before starting our video. I think these milestones were pretty easy and did help us out a lot.


We learned that the first step in making a video was to write a screenplay. Since we weren’t actually writing a movie and just recreating an already made short film, it made it easier to get the screenplay done. The next step in making a good video or movie is to create a storyboard.

A storyboard is like a screenplay but instead of words it’s all drawings and images. This helps by showing you what exactly you need to film and where it’s needs to be done. Our screen board was animated so that we could see exactly what the character was doing and how long each scene would be.

The last step is making a call sheet. A call sheet has all the info of a crew member, actor/actress or any other extras they need.It talks all about where we are shooting each scene and on what date, as well as when and what, characters and crew are needed for that scene. The call sheet is very good for organizing a large group and making sure everyone knows what is happening. Our call sheet was mainly about when everybody was free and when and where we would actually be filming everything.

All those steps I just talked about are called the pre-production. Now let’s talk about our final video. Which is just called production. My group decided we would film on this trail that looked very similar to the original video. We did miss a couple shots that were supposed to have but now we know for next time that we should go over all our shots and look to see if we missed anything.

Overall I think my group did very well with this project. I definitely learnt a lot about pre-production and production. I really enjoyed this project, even though our video didn’t come out as well as we had hoped, I do think it was pretty good for a grade 9 class. I’ve got to say I’m happy that it wasn’t as scary as the original because I’ve got to admit I definitely jump after watching that.


-Emily ✌️

🏑Field hockey🏑

Hello and welcome back to my blog! Today I’m going to be talking about field hockey, my favourite sport! Now I have been playing field hockey for a very very long time. When I first got involved with field hockey I was only 7 years old. At first I was very bad, but I got motivated to get better. I did some extra practices to work on my skills. After about a year, I was ready to move on to a higher level. I went from U7 to U9. I was ready to show off my new skills. At that time I was 8 but everyone else was 9 and 10 which made me 100 times more nervous because they were all taller then me (everyone is) and I was very short (and I still am) plus I didn’t know anyone, which made it even worse. It was scary the first couple practices, but then a new girl joined. She was my age and we instantly became really good friends. It was great because we were at the same level. Till this day I am still friends with this girl. Her and I have been on the same team for 6 years and every year, the more people joined, the more fun we had. our team’s name was The Lightning. I loved my team so much and I wish we didn’t have to split up. This year is the first year that I am not on The Lightning; I am now on a new team called The Lions, with lot of new people that I am stilled getting to know.


There are lots of rules for you to learn, let’s start off with the basics. See the picture up there👆Right now it’s showing the back of the stick, you are NOT allowed to touch the ball with the back of the stick but you can with the flat side (which is on the other side). Now you have learned your first rule. Let’s learn some more.

You are not allowed to touch the ball with your feet. The ball can not go above your waist. You must be wearing shin guards,  a mouth guard and turf shoes. There are 10 players on the field plus the goalie. Each game has two halves and each half has 30 minutes.

A short corner is like a free hit, you get one when there is a penalty. For example: someone touches the ball with their foot within the D. The D is a half circle line around the goal, the purpose of the D is so you know where you can shoot. If you are in the D and you score a goal it counts. If you are not in the D and you score the goal will not count.

How a short corner works: there are four players in the goal with the goalie (they must be behind the line in the goal). The opposite team has 6 players standing along the D line to shoot on goal. There is one more person from the opposite team along the line of goal but at the edge of the D. They are the one that will be push-passing the ball to their team on the D. They have to bring the ball outside the D when they first receive it before they can bring it back in the D to shoot on goal.

There is something called a long corner which is when the ball goes out of bounds, you bring to the top of the D, the continue play.


There is some mandatory equipment. You need shin pads to protect your shins from feet, balls or sticks. Clothing wise you will need athletic wear for practices and a uniform for games, which includes socks that go over your shin pads, they will be given to you by your coach. You also need turf shoes. Turf shoes are like cleats but have more and smaller spikes. You will need a mouth guard because if the ball gets lifted at mouth height and you don’t have a mouth guard you might lose a tooth.  And last, but not least, you absolutely need a field hockey stick. This is a important because if you don’t have one then you can’t play. But it’s easy to pick one, the stick should be at waist height. And there you go you are ready for field hockey!

Hope you learned about field hockey. And if you have played field hockey before leave a comment and tell me about it. I would love to hear about your guys adventures though field hockey!!

And to add onto my obsession of field hockey. I have linked my blog that it completely about field hockey. So go check that our to learn some more. http://sheshootsandscores.weebly.com/

– Emily ✌️

📝Alberta Field Study Reflection📝

So this year we went on a trip to Alberta. If you have read my other blog post you would know about our big project there. But this post is mostly talking about our focus and behaviour there. Now in Alberta there were a couple of little projects we did. And throughout the trip we needed to stay focused and accomplish all our videos. And I forgot to say that all the little projects we did in Alberta were short videos. And if I’m being honest it was hard for me to stay focused while doing it. There were somethings that I could have done to help me stay on topic. So I’m going to talk about my two favourite videos which were also the more difficult ones. 

I’m going to start with talking about how I stayed on topic and focused during this trip. I’m gonna honest, it wasn’t easy to stay focused and at times I feel like I lost my focus and could have stayed on track better. But it is hard to stay focused when you’re always around your friends and on a overnight trip. So I’m just going to be talking about those two projects and how I did my best to stay focused and finished on time.


The focus for all of our videos is making and editing videos. Whether it be remaking a video or creating one of our own, we are learning about how to film, edit, and plan for making a video. The first video we made in Alberta was the a Ghost Town Video. One of our first educational stops in the trip was at the Three Lake Valley Chateau. At the Three Valley lake Chateau there is a ghost town made up of old buildings brought from old towns or build there in the Chateau. All of these buildings were made over 100 years ago and in the town it includes a barbershop, a saloon, a sheriffs office, and a hotel. This one was so much fun but because it was fun made it a bit hard to stay focused. If you would like to watch the video itself I’ll have in below. Now this one was one of my favourites because we got to go to an actual ghost town. This place we went to was really creepy it has old mannequins everywhere. And all the buildings were imported from other old rundown towns. Anyway back to the project. I do think I could have gotten things done quicker and easier if my whole group and I worked more on our time usage. Something big things that would have been helpful are making a check list of what we needed to get done and when it should be done, or we could have had a big talk as a group and talk about who’s doing what and when it needs so be finished. So that’s what I’m going to focus on for next project for sure.

https://youtu.be/Gnd-nh87yqE


Second video I’m going to talk about is the Royal Tyrell Museum. This was a dinosaur museum and what we needed to do was create a individual video that was about 1 minute long in a time length of 40 minutes. Now that sounds easy but with all the filming and editing and recording audio it’s makes it pretty hard. And since it was a big museum we used a lot of that time finding an exhibit to do our video on plus the time to get there. Now since we had no idea what sort of video we had to create until our teachers told us when we got there that didn’t give us much time to plan. And as you know planning is VERY important when creating a original video from scratch in 40 minutes. I think I did okay with my dinosaur video but I did get a little stressed at the end because I still needed to edit but I was running out of time. Next time I would definitely even out my time because I found that I was only focusing on one scene when I should have been focusing on the other more important things.


Last thing to talk about, my final Alberta video. Now this was the most important and informative one of them all. This video was about how we answered the driving question. I’m not going to go into detail with it but I will link my other blog post that explains all about it. I think I did good with managing my time well. I included everything I wanted to include and I think I did pretty good with explaining the driving question. But I would’ve liked to get more interviews. I had two in my video but I wish I had gotten more. This was one thing I would try harder at next time. One other thing would have liked to fix would be my intro. I just think I could have made it more informative. But I do believe I did good overall. I will put in my Alberta video you you guys can watch it for yourself and see if you agree with me.

https://youtu.be/2pGurWnizMs


In conclusion I think the biggest thing I will work on for next project would definitely be my use of time. This was a bit of a problem for me and I wish I took it more seriously in Alberta. I think my focus on this trip was pretty good. There were a few things I would like to get better at, but overall I managed to stay calm and remember that even though we weren’t in school, we still needed to do schoolwork. I think it was a pretty successful trip for me because I managed to finish the projects in time and in my opinion they were pretty good and definitely proud of how they turned out.

– Emily ✌️

📐Game of exponent laws📐

Hi and welcome back! Ya I know I haven’t posted in a while but it was summer! Do you expect me to do work in summer? Nope. Anyway, I’m math class we did a project about exponent laws. Now what we had to do was create a game that used exponent laws. This was not easy, it took me and my partner Rhiann many many different ideas until we found the right one. The game of exponents laws was a super interesting project. And once we had finished the last product of our game we had people come from other classes to play it. Before we started brainstorming for our final product we started with a small dice rolling game where in groups we quickly came up with simple dice games that followed one exponent law. This task was especially important because it helped us get used to writing detailed instructions which was definitely an important skill towards the end of the project.

Anyway after we made a couple of super simple dice games we moved on to thinking about how we were going to do our main game. Now for our game we used cards instead of dice. There was no limit to what you wanted to use for your game it just had to be playable. My game is a little bit confusing but once you try it yourself you will get the hang of it.


Now if you don’t understand the rules I included a couple pictures of how it will work. So try your best to get the idea of it and what helps is if you play a round to get the hang of it.


So this is what my game looks like while in play. Where the four cards laid out are, that’s where your board it. And the bottom two cards are your base and those cards are the ones you are allowed to switch out. The only time your power cards (the ones on the top row) will be switched out is when your opponent switches them out. You want to put very low numbers in your opponents powers because the lower numbers they get lower total number it will equal to.


Here’s a better idea of what the board looks like. Now that I have explained my game I’m going to tell you guys more about why did decided to make games. Now exponents are a little bit tricky but once we did some practice work we caught on pretty quickly. I personally really liked exponents because I understood them so well it made it easy and enjoyable. I hope my game helped you learn something new!

– Emily ✌️

🏔 Alberta 2019 🏔

New year, new project. You know what that means! It’s blog post time. After quite an interesting week of bus rides and interviews. I finally got my answer to the driving question. How does place impact who we are? Well to be exact the question is How does place impact wildlife? Now for you to understand why isn’t changed to wildlife we need to go a couple days before we left for our 9 day long school trip to the Rockies. About three days before we left, everyone in my class was put into people groups. Well when I say people groups, I literally mean people groups. For example there were groups like Business owners,Tourists, Albertans, Artists, First Nations, Students and Wildlife. Wildlife was my people group. Each group had the driving question changed just a bit, just to fit their people group. So basically the reason we were put into these groups was to get a deeper explanation of our modified driving question. Like I said mine was How does place impact wildlife? It did take a whole week of taking notes and interviewing workers and asking questions for me to get the answer I was looking for. We did also have to do a little bit of pre trip research. This just helped us get a better understanding of the place we were going.


Now what we actually had to do for the project was create a video answering the driving question. We went to so many places, but the two that really took my attention was the Northern Lights Wildlife Centre and Leo’s Buffalo Ranch. These two place were so amazing and interesting (Not saying the other places weren’t, they were all quite amazing) they also helped me out with my video. Like I had said before we are making a video and we had to include some interviews as well. One other thing we did during the trip was daily notes. This just helped us keep on top of our work. And every once in a while we had to answer a question about the place we went to that day.

I had two main Focusses for my video. Northern lights wildlife centre in Leo’s buffalo ranch. Both of these places give me such great information. They both gave me two different looks on the driving question. First let’s talk a little bit about the wildlife center. Bradley, The worker we interviewed plus more about the animals and how climate change is really changing their environment. This help me answer the driving question because their place is changing because of us humans. This was something I really needed to include my video the first answer the question and second to spread awareness. We are making it very difficult for animals and humans, to live in this world.

Sorry I went a little off topic, now let’s talk about Leo’s buffalo ranch. I’m gonna say this place was my favourite. Leo was such an interesting person, and he definitely showed me lots of cool things about buffalo. The reason I included this interview in my video was because whenever Leo talked about the land and the resources it sounded like he was very passionate about it. I noticed that and I felt like it was important to add.

All the places we went to definitely helped me make my way to answering the question. But now you get to be the judge on how well I did it!

https://youtu.be/2pGurWnizMs

I personally think I did quite well with answering the question. I love this trip so much. I look at Alberta way differently than I ever did before. Now I see it is such a historical an important place that I was lucky enough to go to.I hope next year we go on another trip it will be as good as this one.

– Emily ✌️


🌷Spring Expedition🌷

Hi peoples! Today I’m going talk about BLUE SKY!!! Sense it is the last blog post I’m going to write of this year you should enjoy it. First let me explain Blue Sky, Blue Sky Is one of my classes big projects that we do every year. (this is the first year we got to do it though) Essentially what it is, is a product we make to help fix a problem going on our community. The problem I was trying to fix was how parents that like jogging but sense you need to hands to pump your arms it’s kinda difficult hold to the stroller. So what I made was a free hand jogger. How it works is there is a trap that goes around your waist a spring in the middle and two poles coming out the side that have clamps so you can attach them to the stroller handle.

Making this project was really fun! My plan to create it was I would get the materials, what I needed to get was an spring, a long PVC pipe, PVC pipe connectors and a fabric strap. First I would plan out how long it would take me to build each part. Once I had that planned out I just start creating. The first thing I created was the spring (the part that would go in the middle) then I measure how long I needed to the PVC pipe, I cut it at arms length so you would have room to pump your arms but have the stroller in arms length. After a had done that i just had to test it. Testing I was a little bit difficult because i dint actually have a stroller, but I figured out a way to test it. Finally I was finished! (If you want to see the time lapse of me making it, watch the video below. 

https://youtu.be/3Tvfbcsd8PM

It felt great to actually have it done! But there was still some other thing that i needed to do. Before the expedition (that’s what we call it) we had to make a little presentation that explains all about what we had made. Somethings we had to include was our launch journal. OurLaunch journal is a little notebook that we kept to record all the steps from coming up with the idea to creating it. The day of the expedition went a lot better i thought it would be. Everyone asked a lot of questions and they all liked my product. (If you want to see my launch journal below show most of my work)

This was for sure a awesome project! And i am so excited to do it all over again next year!

K bye ✌️