Alright people. Here we go. The spring exhibition. Let’s get it done.
Last week was the last week of school and as usual, it was very hectic. An exhibition, a TPOL and a bunch of other things and by Monday I hadn’t started any of it. Needless to say, it was a grind. However, things have gone and passed and now all I need to do is complete this post reflecting on my final PLP exhibition.
I’ll be covering my idea, how I made it and also the whole experience of the night.
This was my third and final exhibition. I missed one earlier this school year because I was away. To be honest, I felt as though this one went really well for my group. We used our time to set up really well and worked really diligently throughout the day. More on that later.
So the idea for BlueSky was that we had to fix a problem for a friend. You had to try to create something that didn’t exist, but if it did you had to make your product better in some way.
Here was the problem, and also how I explained my pitch during exhibition night. My friend Manu plays a lot of golf and we often play together. However, Manu practices a lot more than I do, whereas I play more golf than he does. For this reason he finds himself alone when he’s practicing.
Sometimes, Manu likes to film his golf swing to see if anything is noticeably wrong, so that he can fix it and improve his game. But when he is by himself, there is nowhere to prop his phone up except for the ground. Filming from the ground is a terrible angle to film your swing and you really don’t get any data or information about your swing filming from the ground. However, if you film from about chest height, lots of data can be collected from the swing.
So, I tried to build a contraption that could clip onto his golf bag and be a tripod of sorts that could film him easily and from the right height.

In order to create our awesome creations, we followed the launch cycle. Everyone in my PLP class is very familiar with the launch cycle, having used it a couple of times.
If you’re not familiar, L-A-U-N-C-H is an acronym which I’ll be going over shortly.
Step 1: Look, Listen and Learn
For this stage, it was all about brainstorming. I did a few things for this stage. For one, I answered some questions. These were supposed to get me thinking about what I could possibly make.

Then, I ran a survey over my Instagram account. I did this to try and gauge the interest I would be getting. Although I kind of steered in a different direction after this stage, it was good to see the interest in golf from all my followers

Step 2: Ask tons of questions
This step was based around asking lots of question about your idea. Being sparked by curiosity and writing down tons of questions was a big part in this stage. For me, I wrote down about 4 questions. This stage was important to me because I felt like I wrote down all the questions that needed to be answered later on.

As you can see, I wrote down some “need to know” questions and where I could answer them.
Step 3: Understand the problem or process
In this step we had to understand the problem we were trying to fix. For me, I completed my “need to know” chart, sketched out a model of what I was trying to build and did some more research about my idea.
After some research, I found out that a similar type of product existed already. Although they were similar, I wanted to make mine with different materials and make it more accessible and easier to use. This is where one of the rules of BlueSky came in. Even though the product already existed, I tried to make mine better.
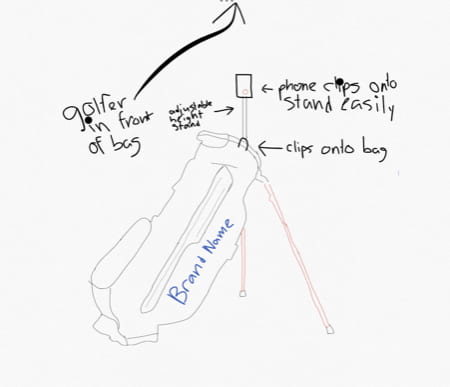
I also sketched out a vision of what my end product would look like.

Then, I finished my need to know chart by answering all my questions.

In this stage, I also verified what I thought was true. The ideal way to film your golf swing is indeed from straight behind the person swinging and anywhere from chest to shoulder height. This was good because it let me set a goal for where the camera would rest.
Step 4: Navigate ideas
In this step, I tried to piece together how my idea would work. I tried to think of materials here and be aware of what I would need to build it. This was important because it further strengthened my vision of what the project would look like.

Here’s what my ideas looked like⬆️
We moved on to what could be the most important step
Step 5: Create a prototype
In this step, it was all about prototyping. Just getting ideas down and creating them was important here. I actually failed a lot in this stage. A lot of material I tried at first were either not strong enough or didn’t have a mechanism where it could attach to a golf bag. Just when I was thinking of giving up, my dad found this carbon fibre tube of sorts lying around in our shed. This was perfect. It clipped onto the phone holder really well, and once we added some zip ties it actually held together perfectly. Then, my dad cut a hole out of the tube so it could slide onto the top of the golf bag. In the end, here’s what my first prototype looked like.

So, I used one of the phone holders you see in a car, a tube, and zip ties to create the product you see there. I was happy with the simplicity, yet effectiveness of the thing.
The last stage was about revision, and that’s what we did next.
Step 6: Highlight and fix
In this stage, I met up with my client and discussed the product. He was happy with it, but had some feedback. I had him text me the feedback.

I went to work sawing a bigger hole into the stand. However, there wasn’t much feedback other than that.
If you want to see a summary of all that, we had to create a launch journal keynote thingy documenting our process. It was for the visitors that came to our station. Here’s what mine looked like
Then, it was time to LAUNCH! The exhibition rolled around faster than we all thought. Since this was a group collaboration between the grade 8’s and us, we actually only had 1 class to work together, share ideas and think of designs. We actually worked really well together.
I was in a group with one other grade 9, Fraser and 3 grade 8’s, who were Emily, Jude and Finn.
Our theme of the group was unique sports, so we tried to make our portion of the library look as unique as possible.
Fraser and I went to work putting yellow and white paper on everything in sight. It took a really long time to do, but I have to say walking into our room it looked really cool. All the table were yellow and white and the 2 big poles were yellow all the way to the ceiling. Then, Emily brought yellow streamer which we got a ladder and hung up.

At 5:30, visitors started rolling in. I actually found it pretty fun explaining all the hard work to people that came in. I had to change my presentation for nearly every person because they had various understanding of golf and how it worked. It was cool because it definitely kept me on my toes the whole time.
I must say, 3 hours is a killer amount of time to be talking to strangers without being able to sit down, so by the end of it all my legs felt very tired and I was ready to head home.
I’m actually really excited to head to the golf course and try it out. I hope that it makes my life a bit easier filming golf swings.
I hope that you enjoyed reading about my learning process for this project. I had a lot of fun making the final project. On the night of the exhibition, I got lots of glowing reviews and the people that say “wow, what a great idea”, they really made it worth doing the whole thing.
This will be my final blog post as a PLP learner. It’s been a crazy ride the last 2 years and I get pretty emotional thinking about it. I’ll miss the awesome, stupidly fun trips where you connect with each other so much more and the unique projects where you can do anything you want. I’d like to thank all my PLP teachers from the past 2 years.
See ya, people
nik