I am proud to say I survived my second winter exhibition!
If your new to my blog, I do exhibitions twice a year for school, to present a really big project I worked on. This year, the grade 9’s got to do a massive project about revolutions… and Rube Goldberg machines! I thought this was a pretty interesting combination, but it led to a very fun project!
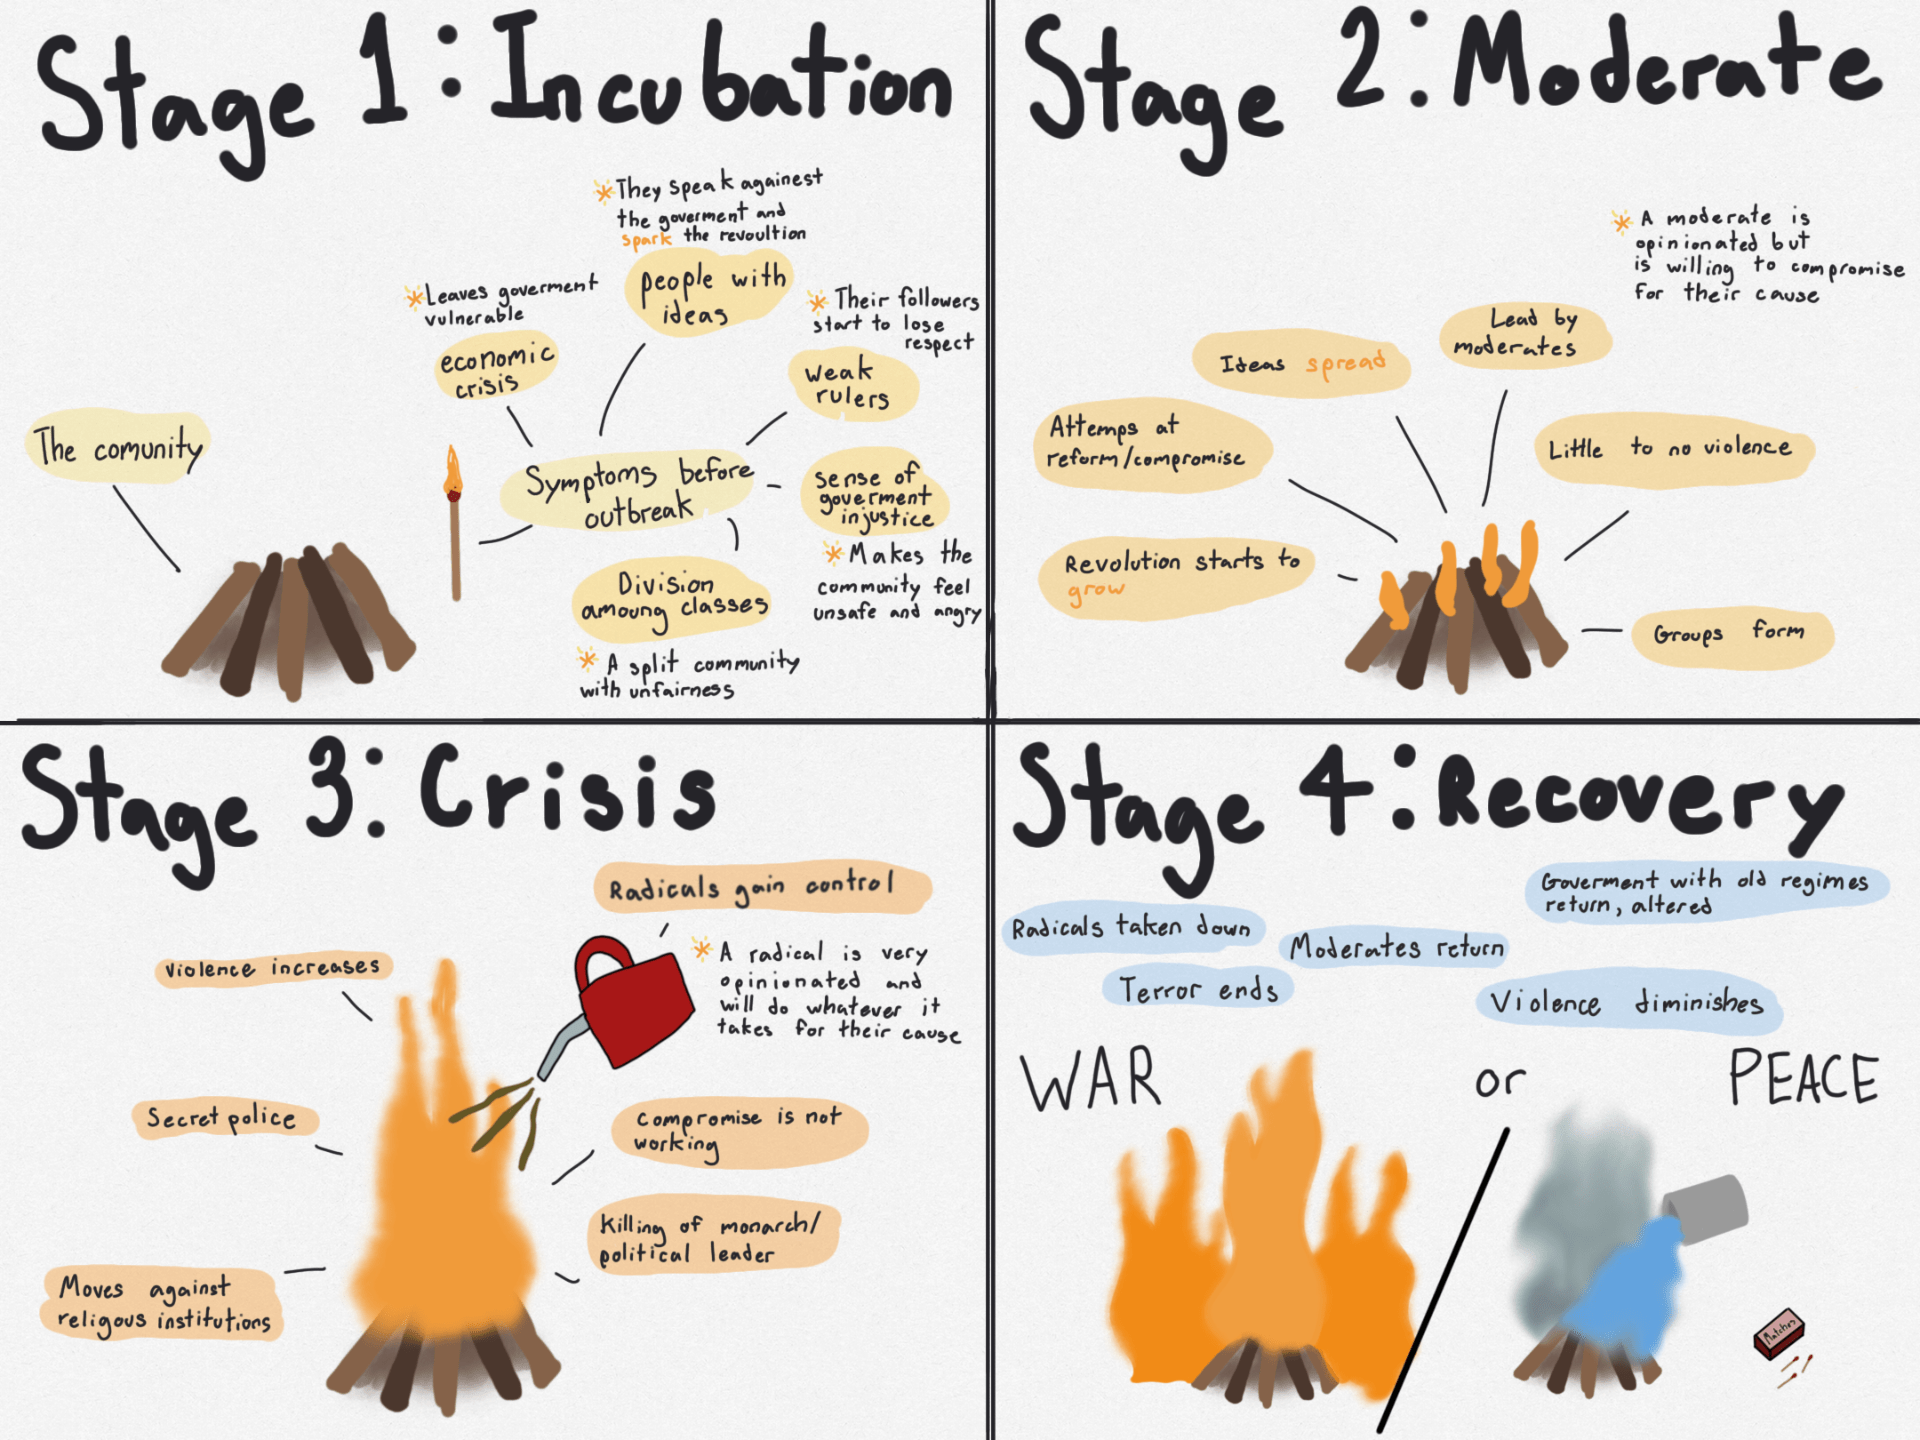
The very beginning of the project started with understanding what a revolution is, and what it consists of. I got a really good understanding of this by learning about the 4 stages; incubation, moderate, crisis, and recovery. The stages showed me how a revolution starts, builds, changes, and ends(sometimes). It took me a little but to understand, but once I did I felt very confident.
The next step I had to take in this unit was creating an infographic about the revolution I would be studying for the rest of the unit. I got… the American Revolution!
I couldn’t just make the revolution straight out of thin air, first I needed to get a really confident understanding of the event. Lots of reading, lots of videos, and a very talented history major helped me get to that confident understanding. I had a very mixed time learning about it. At the start I was very comfused and found out my note taking skills were not as good as I thought they were. I had to practice taking notes a lot until I could easily collect the important, key information I need. Once I had a basic understanding the detail came a lot easier. I’m actually happy it took me a while to figure out, because it helped me see the value of useful notes, and about more successful learning methods for me. I am so extremely proud of my infographic, and I believe I show my skills through it.
Then we got to the really fun part, put final product! Now that we understand our revolution, we got to build a Rube Goldberg machine that was a metaphor for the revolution. Each component in the machine was a metaphor for an event, time, or change. This was probably one of the most challenging projects I have done. We had 3 weeks to build a massive machine, and because we were American, of course we needed the biggest machine.
I think my group had a hard time starting the actual build. It seemed like no one was super sure of our idea, so no one really wanted to make the first move. Once we got moving, some things came easier. We all had very complex but strong ideas for the “connections” in the machine, which lead to a hard time actually building the machine. I know for me personally, it was also hard to see other groups make significantly more progress. It took us so much time to build every little part, we started running into check up dates for parts of the machine we hadn’t built yet. We hadn’t tested many of the components.
When we did, they normally didn’t work, and we had to revise. While people were working on the machine, others had to create separate parts. We needed a video that showed the process of us building, aswell as a good design for the area of presentation. Everything that we needed to do seemed like a lot, and some days we seemed to be going backwards in progress.
I can’t say when, but at one point in the chaos, I feel my group started to work much better together. We started to make connections faster, and fix the old ones. We still were running out of time, as we came to exhibition day with a still incomplete machine. We did get to finish it, but because we finished it so late we didn’t have time to perfect it.
During the actual exhibition itself, our machine worked fully about 5 times! This was such a success, because right before the exhibition started, I wasn’t sure if it would work at all. So I can say I am happy with the outcome, but the progress and build up was not successful. If I were to do this project again, I would want to have better communication and teamwork with my group. This is something that I really try to work on, because I think it has a huge effect on the project. I am sure my group could have completed our machine much sooner, and been more prepared if our communication skills improved.
Overall, I really enjoyed this project. I feel like I demonstrated a strong learner throughout the unit, but still saw my weaknesses and areas for improvement.
I became an actor, a producer, and an editor, through one project!
Me and my three friends were assigned the very fun project of making a 2 minute thriller. It wasn’t just as simple as making a quick little vidoe, we had to come up with an original idea, then make a story board, full written plot, characters, costumes, locations, etc. This might sound easy to you, but for me it was quite a challenge. My group ran into many challenges along the way, but ended with an excellent product.
To start us of, we had to actually come up with an idea. For our vision, our story was: four girls go swimming one night in the ocean. They are all by themselves, but having a good time and nothing seems to be going wrong. Then, one girl swims a bit further away from the group, looks back, and someone is missing. She starts going towards the group, but another one goes missing. Then the third girl goes missing, and the last girl is all alone. The movie ends on a cliffhanger, with the last girl floating in the water, all by herself, as two hands reach over her shoulders. I think this is a pretty bomb idea.
We discovered the first problem really quick; filming in the ocean would be so bad and cold, at night, in November. It would be impossible, and honestly pretty unsafe. We quickly fixed this problem by changing locations, instead of the ocean we would film in a pool. So with this pivot we only had to change the location, all the characters and the main idea stayed the same.
Now that we had everything, we got to filming. Problem #2 came up, when we were 4 days away from the deadline and hadn’t started yet. We also only had one night that we were all available, so we had one chance to get this right. We should have made more time to film, or changed the idea right there and then because only having one night to film is very unrealistic. But sadly, we were to confident and went to the filming site. Then comes problem #3. The pool we wanted to use is outdoor, and unheated. We were so cold that it took us almost three painful hours of going from pool to hot tub before we got all the shots. Now, because of the coldness, lots of our shots were done poorly. No one wanted to be in the water, so filming became hard, and acting became even harder. We had shots that we wanted peopel to be in the background of, but because everyone was cold, we thought it would be fine to leave out those (important) details.
This is when problem #4 came. The next day at school we started editing, and realized very fast that more then half of our shots were not good enough. And remember how I said we only hand one day to film? That meant our one chance was lost and we had 2 or 3 days left before the deadline.
Our next action would be huge, and have lots of things attached to it. We wanted to get an extension to the project, and change our idea, so we could hand in an actual video that met requirements. Our new and improved idea was still in the same realm as our first ones, but instead of being in cold water, we would film in a forest! I think this pivot was actually so successful, because it lead to a product that I am so proud of. We didn’t have to change our plot to much, because we kept the idea of people going missing, but we just had to tweak our transitions from in-water moments, to ones that would work in a forest.
We also got help from our friend Zach, who filmed many scenes for us. We also learned from the “only one day to film” incident and made sure everyone was available at least three times before our new due date. Our filming went smoothly, especially since we weren’t in freezing cold water. I feel like everyone could also “act” better, just because of the more time we gave ourselves, and the more comfortable environment.
This project was pretty rocky, we faced a lot of challenges and for a bit I thought we wouldn’t have any final project, but with problem solving, teamwork, and help from others, I am proud to hand in my video.
For one whole day, I got to follow my mom around to understand what she does for work!
She is an organizational psychologist, who does leadership development. She works with people help them become better leaders. She does this in lots of ways; through assessments, workshops, and coaching sessions.
When she does assessments for individuals, she is using tools to discover their greatest strengths and weaknesses relative to leadership skills. For workshops, she works with groups or teams, and teaches them new leadership skills. This could be about how to communicate effectively, or how to give feedback (kind of like PLP!). In her coaching sessions, she discuses what her client is struggling with by asking lots of questions, helping them understand their problem better, and helping them find a solution for that issue by themselves. This makes sure they know what their problem is, and they have a solution that works best for them.
Because I am a super cool PLP student, I got the opportunity to turn this day into a film! I had the task of creating a short video that showed what I did on take-your-kid-to-work-day, and what my mom does everyday! To create this video, I needed to have a rough idea of the shots I needed (lots of b-roll). Luckily, because my mom works from home, if I needed more videos of her office I just had to walk down stoke stairs. So the day before, I made sure I had an idea of the clips I needed, as well as my interview questions.
On the actual day, I filmed as much as I possibly could! I also took some notes on what she was talking about so I could have a really good understanding of what she does every day. She showed me her client work, and her “behind the scenes” work. That would be things like invoicing and scheduling.
Now that I had all the information I needed, the interview, and some b-roll, I started putting the clips together and creating a script. I editing my scenes lengths and removed the sound. I tried to get a variety of angles when filming, and pieced them together in ways I thought they would work well. I recorded my script and boom video was done!
This project helped me get more comfortable making short movies, enthuse on short! Normally I am not good at making short videos when I have to include narration, but I think I did much better on this video!
I had a really good time with this project, and had lots of fun learning about her work!
I don’t know if I could see myself being a leadership developer, but could you?
On my trip to Alberta I learned about the power of the moving image. The big idea for this project was questioning, specifically to the driving question “how might I use the moving image to tell a story?”. I showed this through 4 videos I made over the course of this project.
My 4 videos were different in terms of their length, angles, and the specific elements I chose to showcase. Despite these differences, what tied them all together was their ability to tell a story. Each video was unique, and even though they differed greatly in content and perspective, they all ultimately served the purpose of storytelling.
To enhance these stories, I used visual effects, sound effects, and other techniques to make the videos more appealing. The importance of the editing was shown in how it added depth, emotion, and intrigue to each video.
What Inspires Me Video
My “What Inspires Me” video was the first video I made for this project. The point of this video was to tell MY story. I talked about what interests me, what I do for fun, and what I care about most. I showed questioning in this video, because I had to question myself, and find the true answers. I also shared my ideas publicly, by posting them on YouTube. In this project I think I did a really good job of incorporating stand-up clips of me, as well as old clips of me. Next time I would want to add more effects, to really amp up the video.
Investigative Video
My Investigative video was the biggest video I made this project. The goal of it was to support my thesis by questioning. So many questions. In this video I talk about my thesis, and use interviews as well as other resources to support it. I had to question people beliefs, as well as my own. I shared my thesis and my opinions on the matter with everyone I interviewed. I did lots of my own research too, to see how Western Canada is presented online. In the end, I put everything I learned together into a video. I think I did a really good job with my video, I think it shows what I learned well, and proves my thesis really well. If I were to do this video again, I would have interviewed more people, and made sure my videos were filmed well. This could mean a better angle, or better sound quality.
Silent Video
My Silent video was a collaboration video with Neko and Syd. This video was really cool because the whole point was to tell a story, but without any words. It was silent, with the exception of some sound effects and some music. To make this video I had to brainstorm with my group, and share my ideas with them. We watched other videos as inspiration, videos from groups that had been to our filming location before. Together, we came up with a very funny plan, and executed it very well at Three Valley Gap. I think my group did a really good job with this project, but I personally think I did a great job coming up with some of the ideas for it. Next time, I would want to me more helpful for the editing portion, which I recognize Syd did a lot of.
TikTok Video
My TikTok was my shortest and probably easiest video I made throughout this project. I had lots of fun with it, and felt I had lots of freedom around it. The point of this video was to make a TikTok trend, while still telling some story of the west. Me and Lila did this by telling our story of the trip through lots of little clips of us in different locations. We share everyplace we went. Once we filmed all the clips, I put them together and added music over. The music and what me and Lila are doing in the TikTok is what makes it trendy. In this project it I think we did a good job picking a trendy video that actually has to do with travelling. If I were to do this project again, I would want to film in more locations so I could show more of the trip (tell the story a bit better).
So, what do these 4 videos all do? They help me answer the driving question! “How might I use the moving image to tell a story?”.
I can use the moving image to tell a story in lots of different ways. I have shown this through my videos, because you can see that each one tells a story, but is so different from one another. My TikTok verses my investigation video as an example: both are different lengths, angles, and have different editing. Both these videos are showing their story in a different way, because the story is not the same. Everything seems different about these two videos, except for it’s core purpose; a story. The story can be enhanced by editing, such as visual and sound effects. The story should also have a beginning, middle, and end.
All this leads me to believe I answered the driving question, but I wanna know, what do you think?